AT&SF Class 5001 Headlight
In this segment, we are moving on to the smokebox front. This tends to be very important to the “personality” of a steam engine. Many importers over the years have failed to capture the Santa Fe look accurately. The poor headlight and bracket on the USH engines really detract from the correct look. Until very recently, no importer had done a good ATSF headlight bracket until Sunset 3rd Rail followed my drawings and did a very nice one. No brass parts for it are available from PSC or otherwise. I was unable to stand the poor representations right from the get go when I got into O Scale, so I made my own master and started casting them myself. Later, I had Dennis Mashburn cast me up a lifetime supply of them. The 19 photos attached show how to use my custom casting for the headlight bracket plus a PSC 4352 ATSF headlight casting to totally fix the front end appearance of an ATSF engine, specifically these two 5001 class Texans.
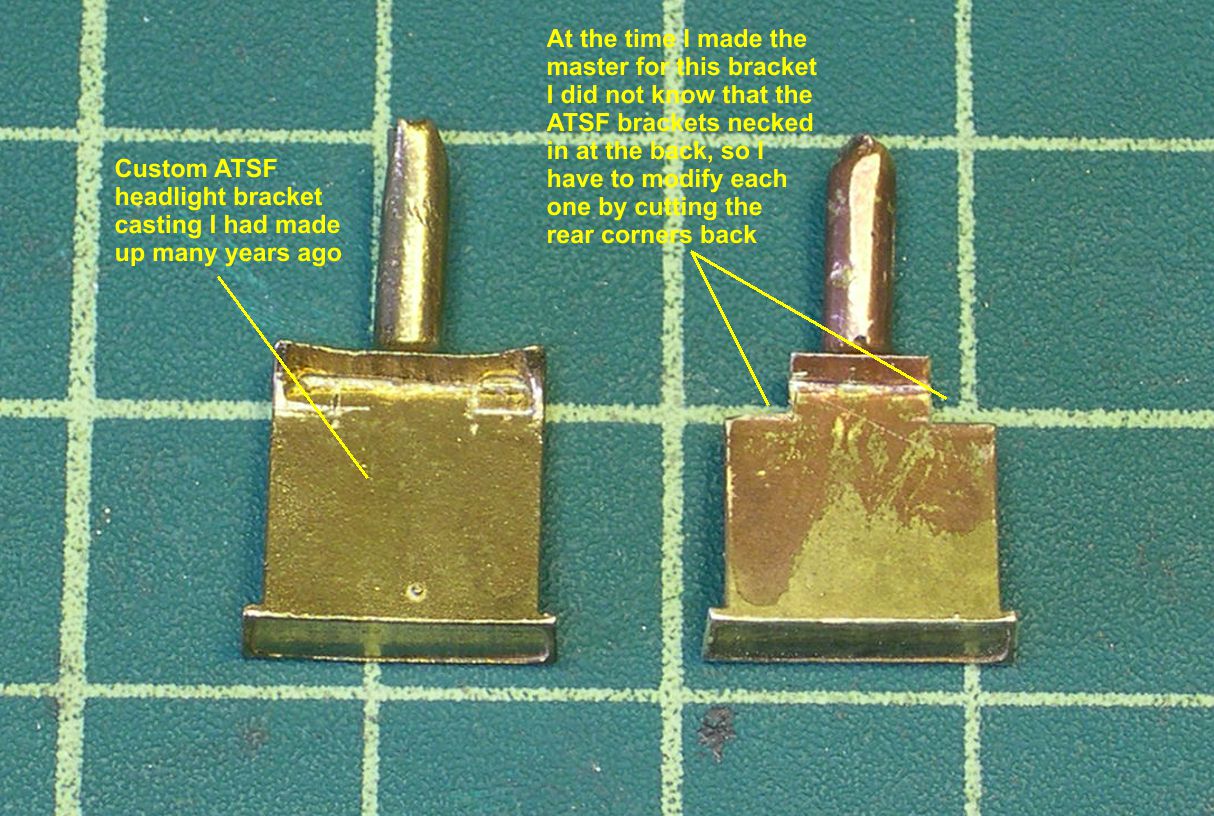
My custom bracket casting was done at a time before as much info was available as there is today, so I made a slight error in it. Fortunately, it is easily fixed. At the rear of the bracket, the prototype narrows down considerably allowing the bracket to fit more easily down at the bottom of the smokebox door. In photo 1, I show how to cut the corners at the rear of the bracket to match the prototype.
photo 1 ⤵
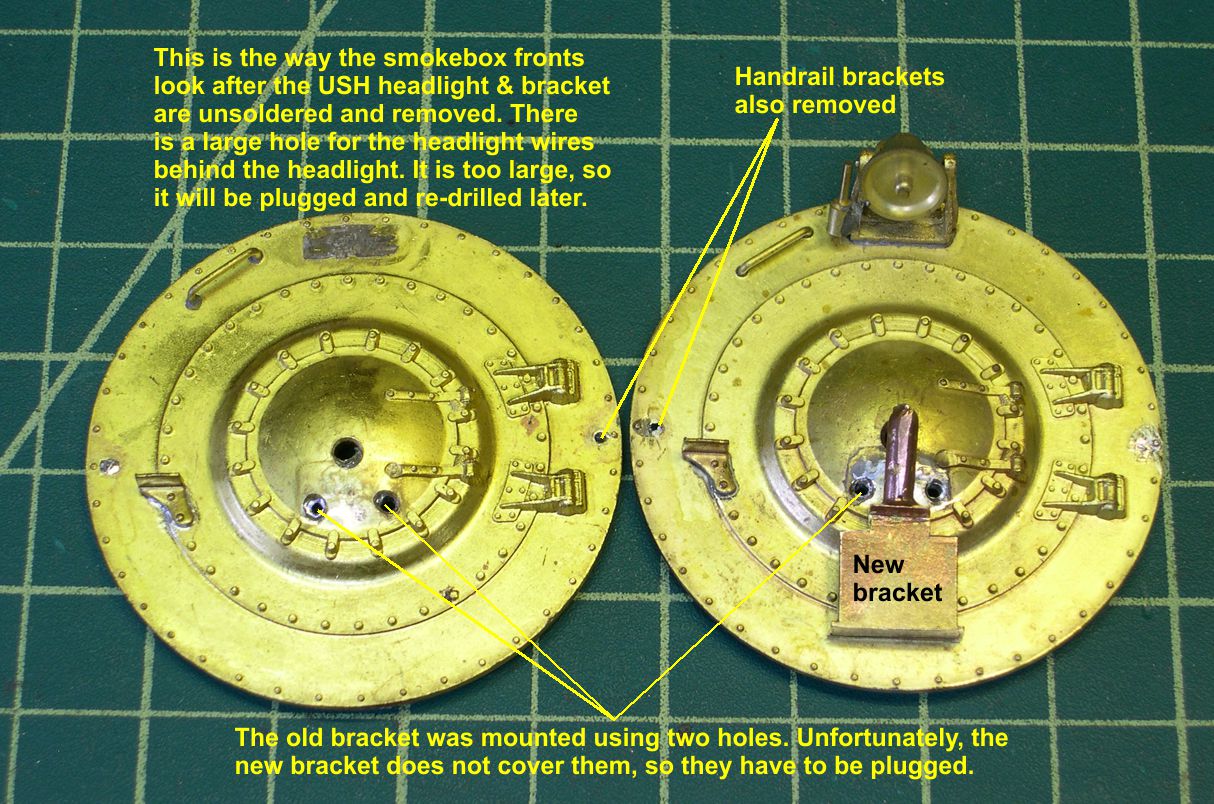
In photo 2, you can see how there are 3 holes left from removing the USH headlight and bracket.
photo 2 ⤵
The holes are crudely champfered (angled edges), so I had to drill them out larger to provide nice sharp edges at the face of the smokebox front. Otherwise, it is hard to hide the edges of the holes very well.
In order to plug the holes tightly, I turned brass rod to be just a light press fit in each hole and soldered a short piece of it in each hole. You can see how this looks in photos 3 and 4.
photo 3 ⤵
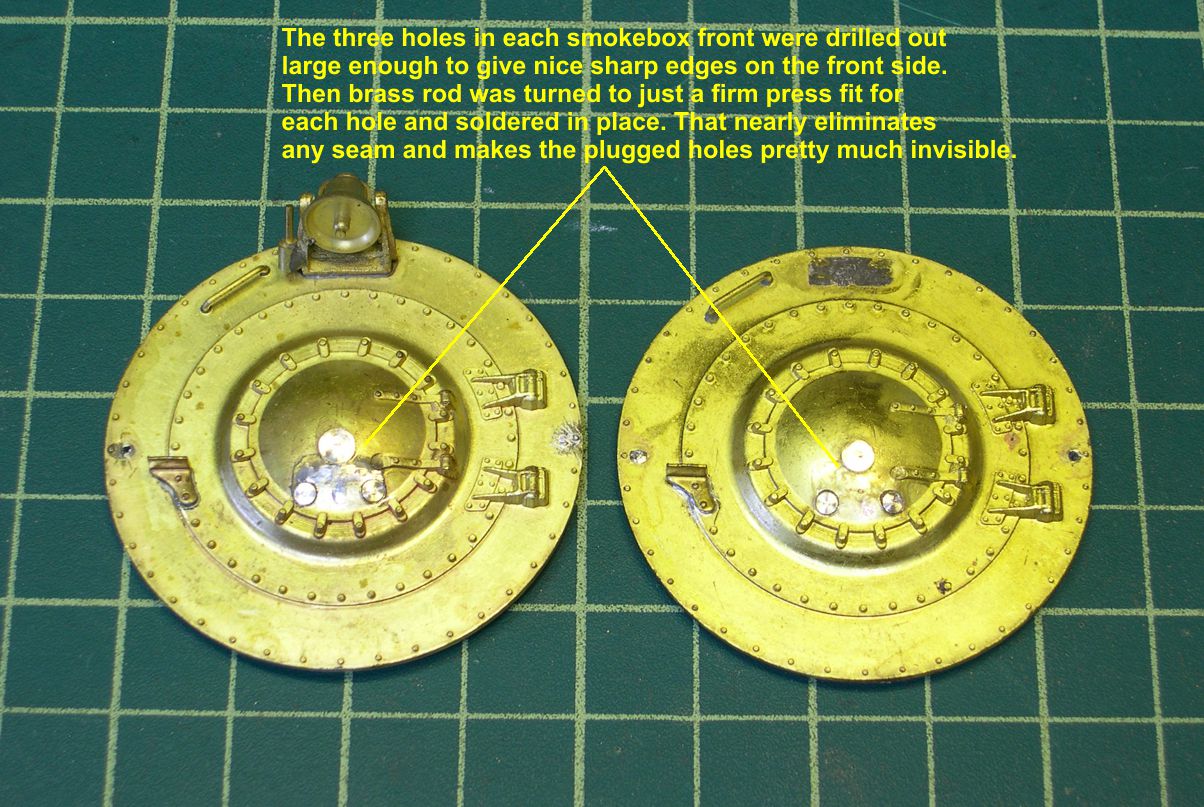
photo 4 ⤵
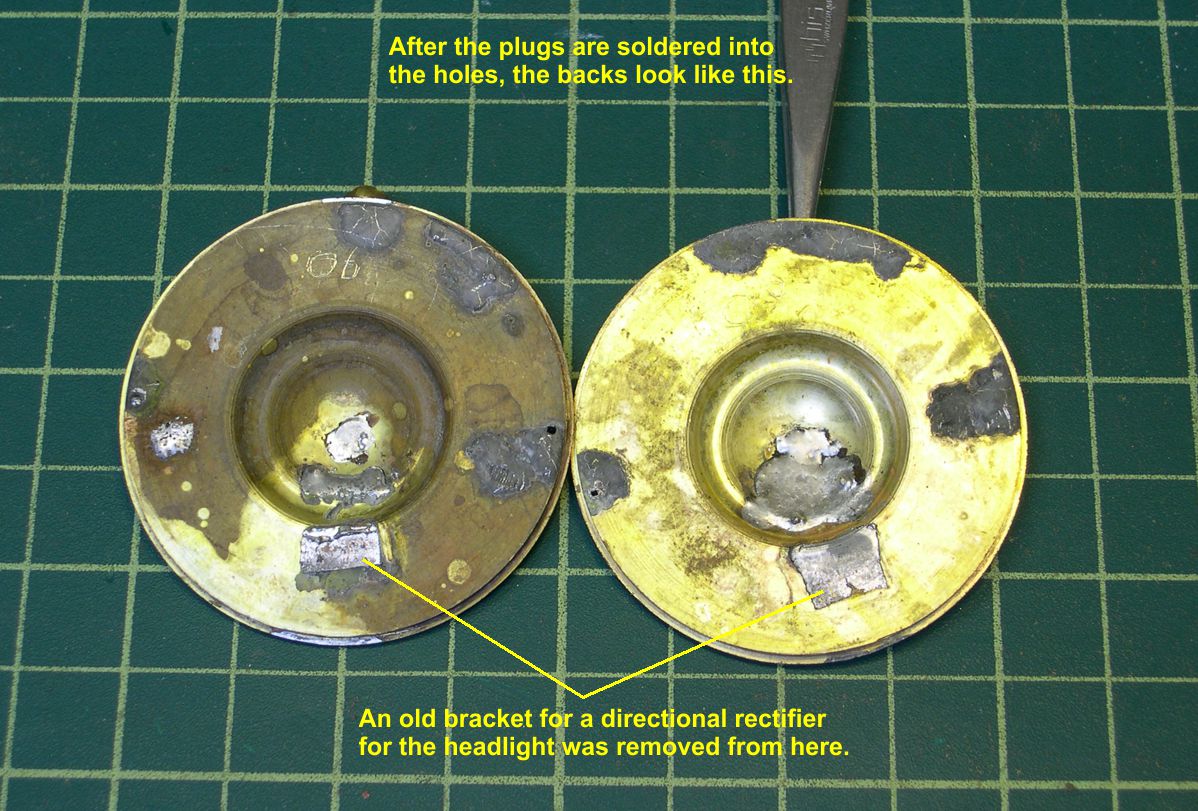
Use plenty of solder so it goes completely through the gaps to the front side. That way you can completely hide the holes after finishing. Photo 5 shows how the smokebox fronts look after finishing.
photo5 ⤵
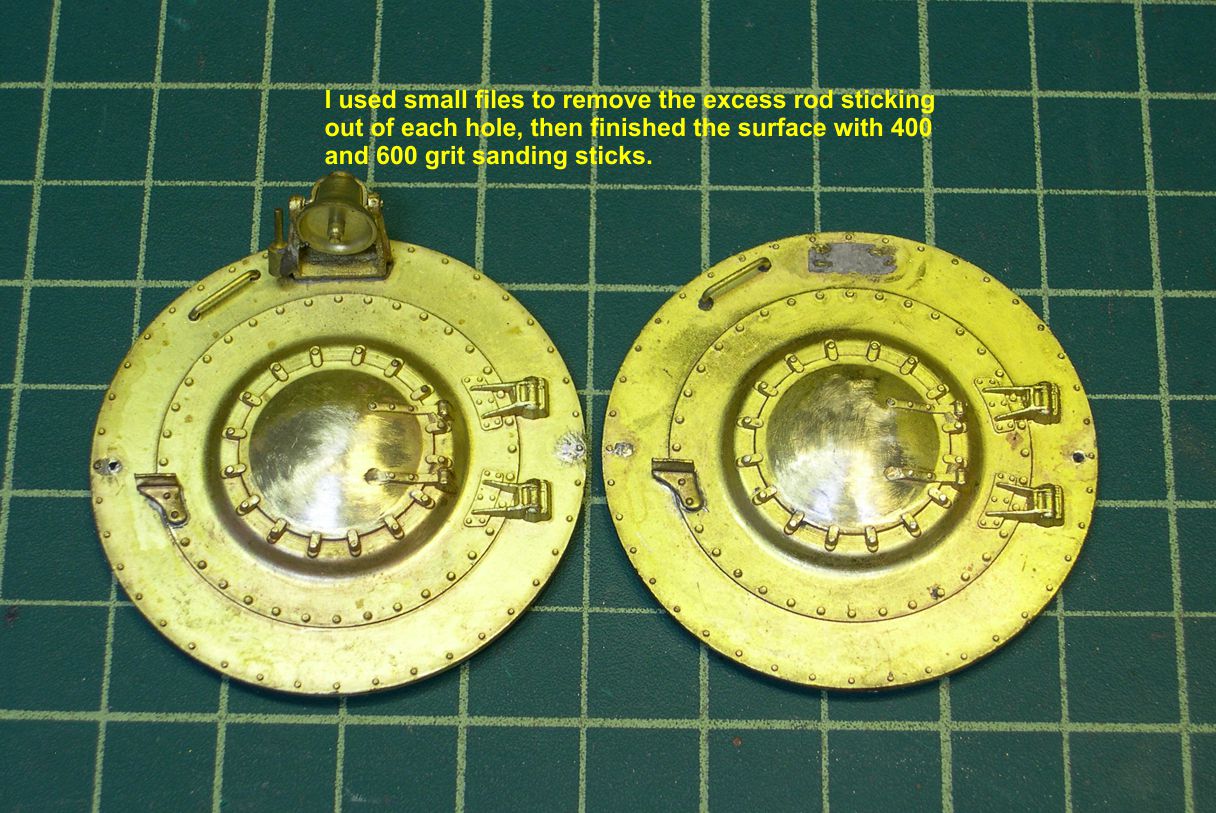
I used a selection of small files to remove the excess rod from each hole and match the plug to the surface. Then I used 400 and 600 grit NWSL sanding sticks to put a fine finish all over the surface. Now you can hardly tell there were ever holes there. You certainly will not be able to do so after painting.
To mount the headlight bracket to the smokebox front I started by locating the point for the hole for the bracket then drilling a smaller hole than needed. Then I worked my way up in drill sizes until the peg on the bracket would just barely fit in the hole. This makes positioning while soldering a lot easier. Then I heated up the smokebox front with the heat gun and soldered the bracket in place. You can see the mounted brackets in photo 6.
photo 6 ⤵
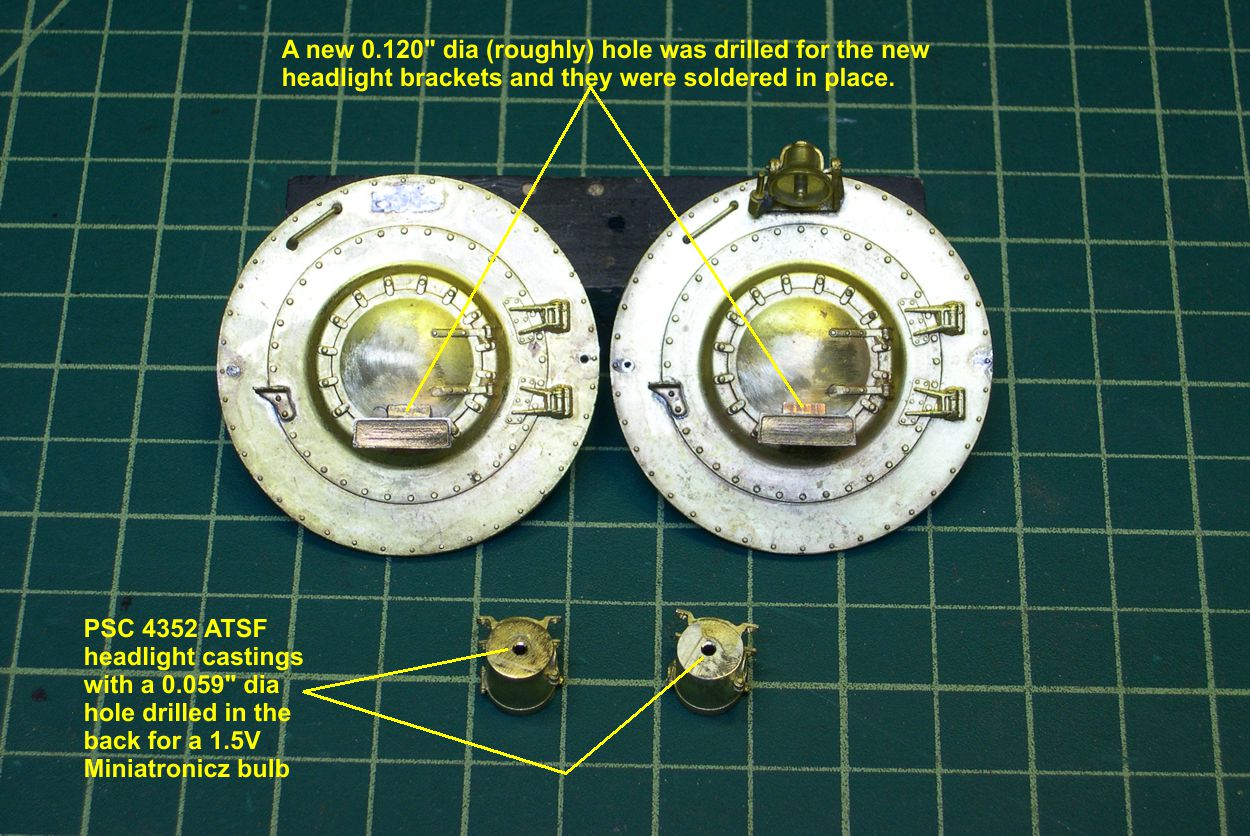
Also in that photo are the two PSC headlight castings with holes for the headlight bulb wires drilled in the center of their backs. In photo 7, the headlight castings have been soldered to the brackets.
photo 7 ⤵
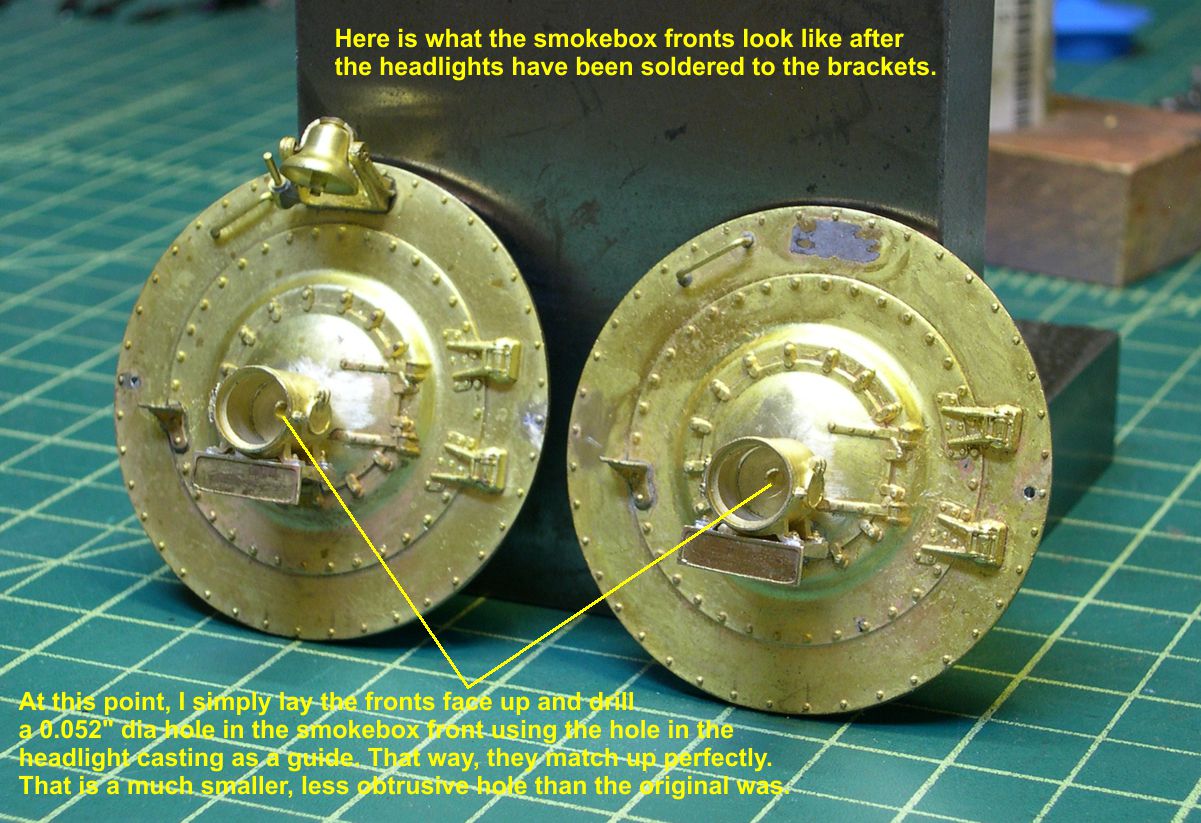
The whole smokebox front is looking much better at this point. The holes in the headlight castings are used as a guide for drilling a new, smaller hole for wires in the smokebox front itself. FYI: A miniatronics 1.5V, 30ma bulb will just slide into a 0.059″ diameter hole. That’s a good number to keep handy when lighting locos with 1.5V bulbs.
To really get a realistic looking headlight, we need a good reflector with the proper shape, so when the bulb is installed, you get a beam of light like the prototype. Another FYI: Steam locos generally did not have white aluminum coated reflectors giving a bright white light. That’s why I do not use turned aluminum reflectors. I want that very yellowish light that you can see in color photos. In fact, the ATSF headlights were “Golden Glow” headlights, and they had quite yellowish reflectors. Hence, I use turned brass rod for my reflectors. Starting in photo 8, I demonstrate exactly how I do my reflectors.
photo 8 ⤵
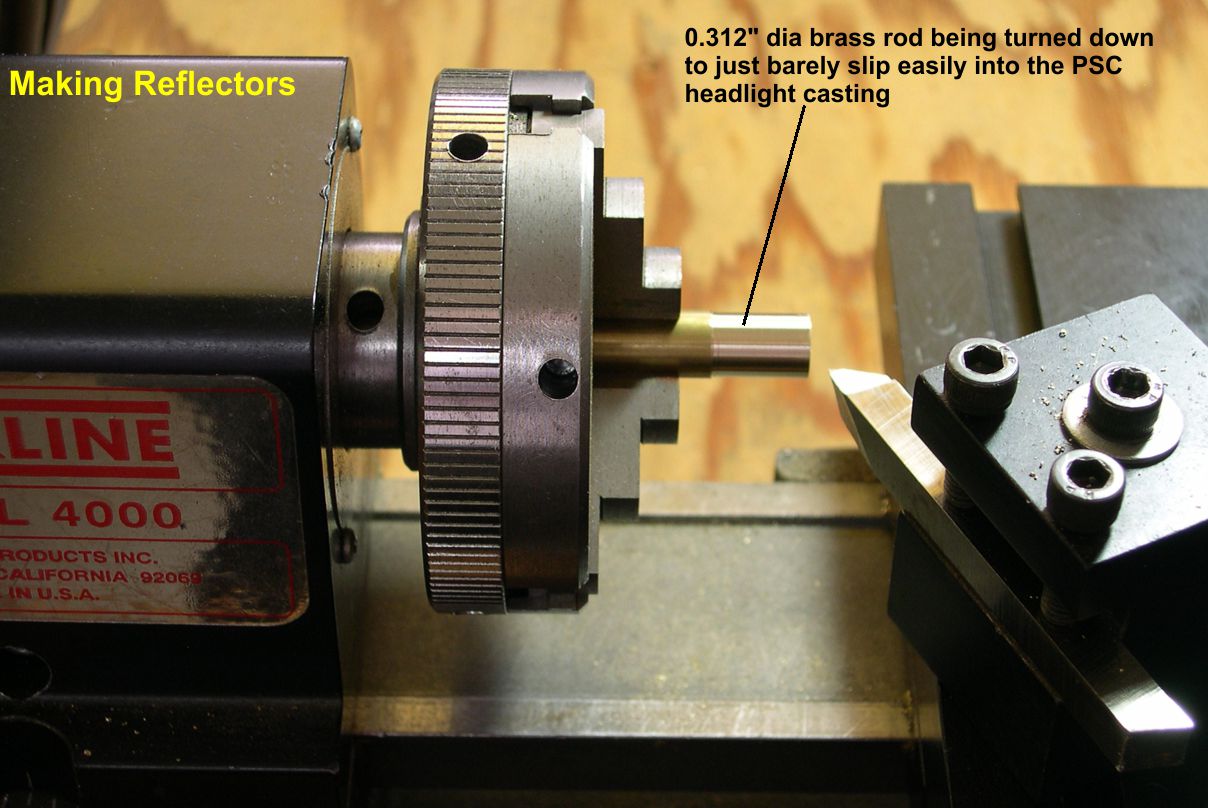
Step one is to determine the inside diameter of the headlight castings and turn down some brass rod to just over this diameter. Keep in mind that the headlight castings are CASTINGS. This means they are not terribly accurate in inside diameter or consistent from casting to casting. That means we have to carefully decrease the diameter of the brass rod until it will just barely slip easily into the casting without being a sloppy fit. It can’t be too tight or it will no longer fit at all after painting. Photo 9 shows how I slipped the casting onto the rod as a means of knowing when it was just right.
photo 9 ⤵
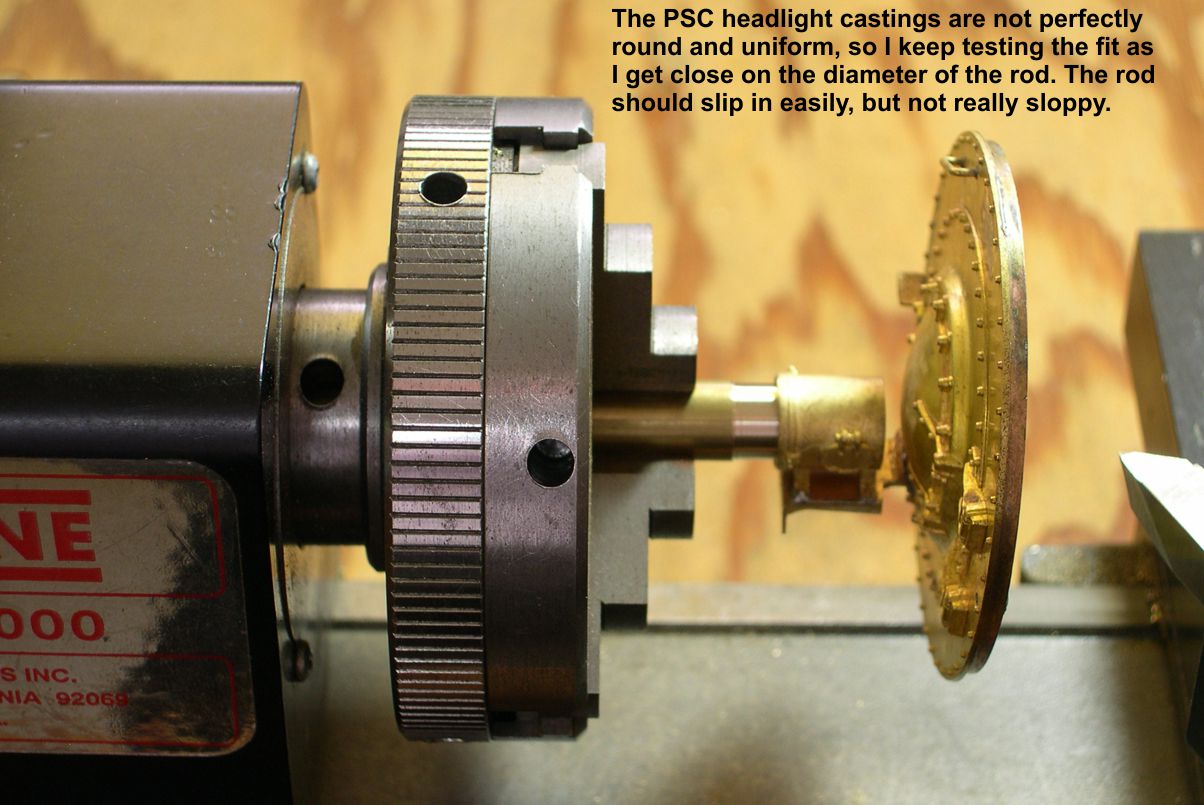
As proof of my statement about lack of consistency, one of my castings required a rod about 0.003″ less in diameter than the other did.
Step two is to drill a hole for the light bulb deep enough to go clear through the reflector when finished. The reflector will be about 0.22″ long to fit the casting, so I drilled the 0.059″ diameter hole about 0.25″ deep. You do not just chuck up a 0.059″ bit and drill the hole though. You will be very disappointed in the results if you do it that way. (Guess how I know that.) First of all, small drill bits are pretty flexible and tend to skitter over the surface before biting in someplace at random. That gives you an off center hole – very undesirable. Secondly, drilling immediately with the correct size bit generally results in an over sized hole, probably because the bit will tend to grab and bite into the walls of the hole as it progresses. The correct technique is to start with something called a “center drill”. It is specially designed to make the hole start right in the center of rotation, as it has a thick, non-flexible body with a very short bit on the end of it. You can see what it looks like in photo 10.
photo 10 ⤵
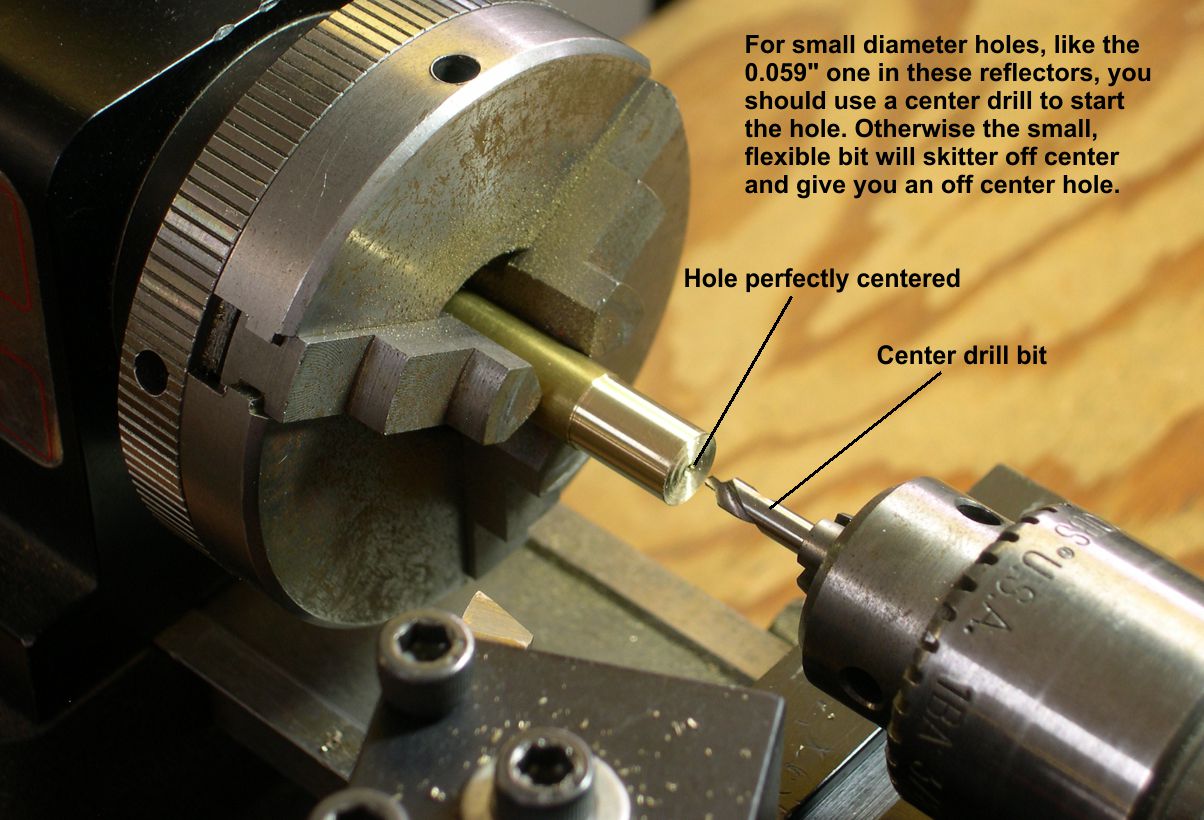
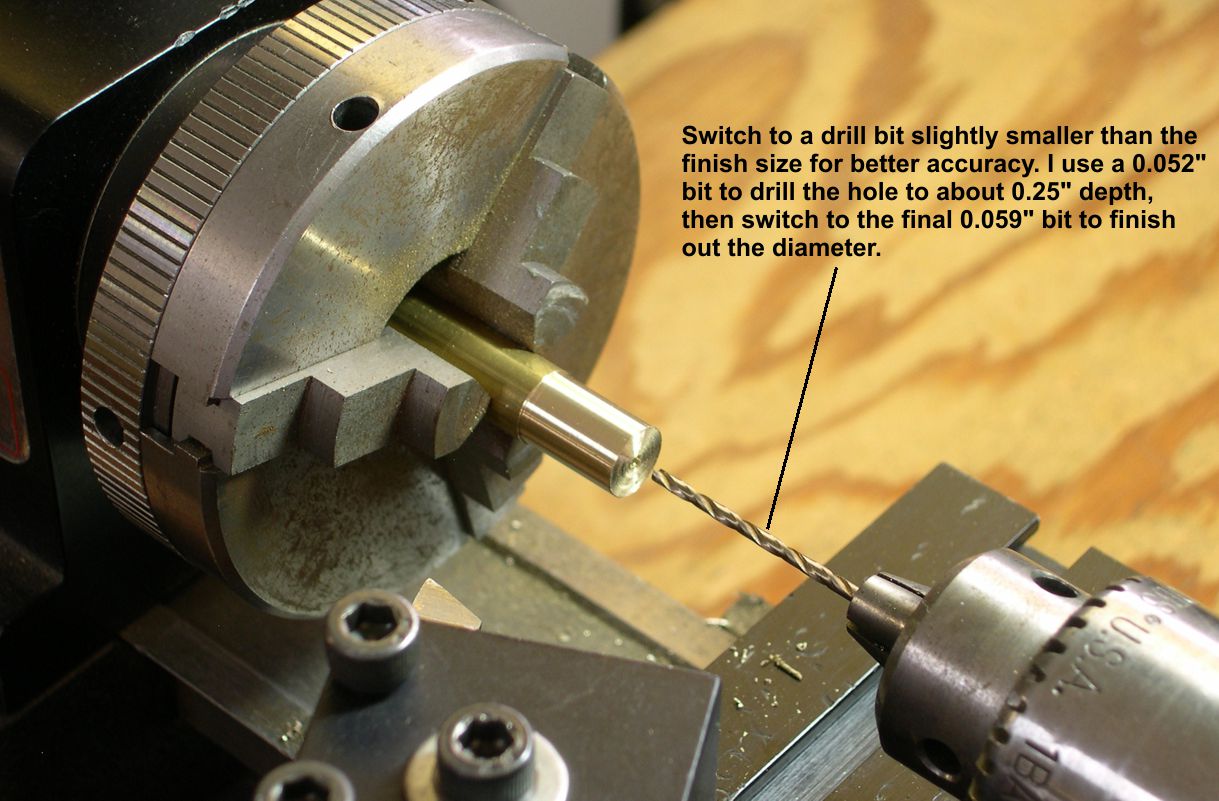
These center drills come in a variety of sizes for different size holes. Just pick one fairly close to the size hole you need – it does not have to be exact to work just fine. After center drilling, use a bit several sizes too small to drill the initial hole 0.25″ deep. Then use the correct size bit, in this case 0.059″, to finish the diameter of the hole. Now you have a well centered and accurate hole for the bulb. Photos 10 & 11 discuss this drilling procedure.
photo 11 ⤵
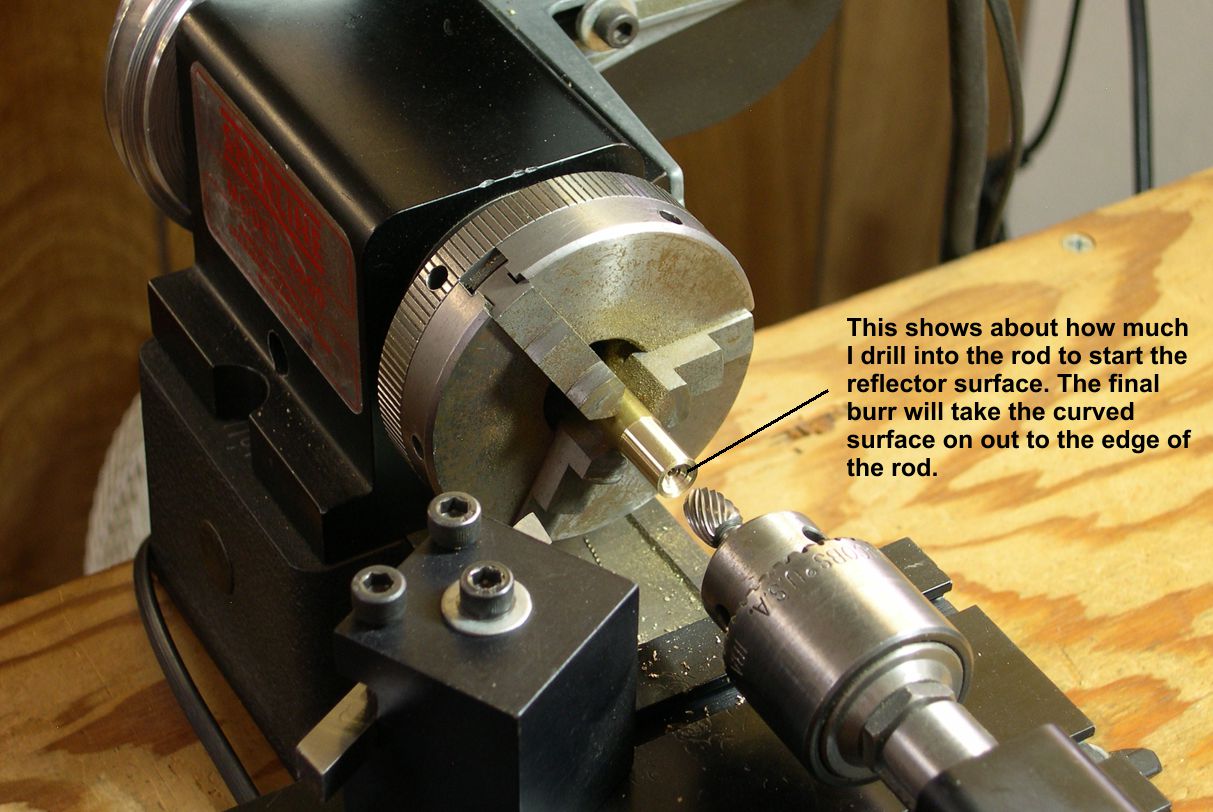
Step three is to shape the reflector surface. There may well be better ways than the method I use, and I have tried experimenting with some, but this method works very well for me, and I’m tired of trying to better it. I start with a Dremel burr of the shape shown in photo 12.
photo 12 ⤵

It cuts quickly and leaves a partially finished shape for the finish burr. Drive it in until it is close but not touching the outer diameter of the rod. See photo 13 for a good idea of how far to go.
photo 13 ⤵
Then I switch to a burr that has exactly the shape I want for the reflector. See photo 14.
photo 14 ⤵
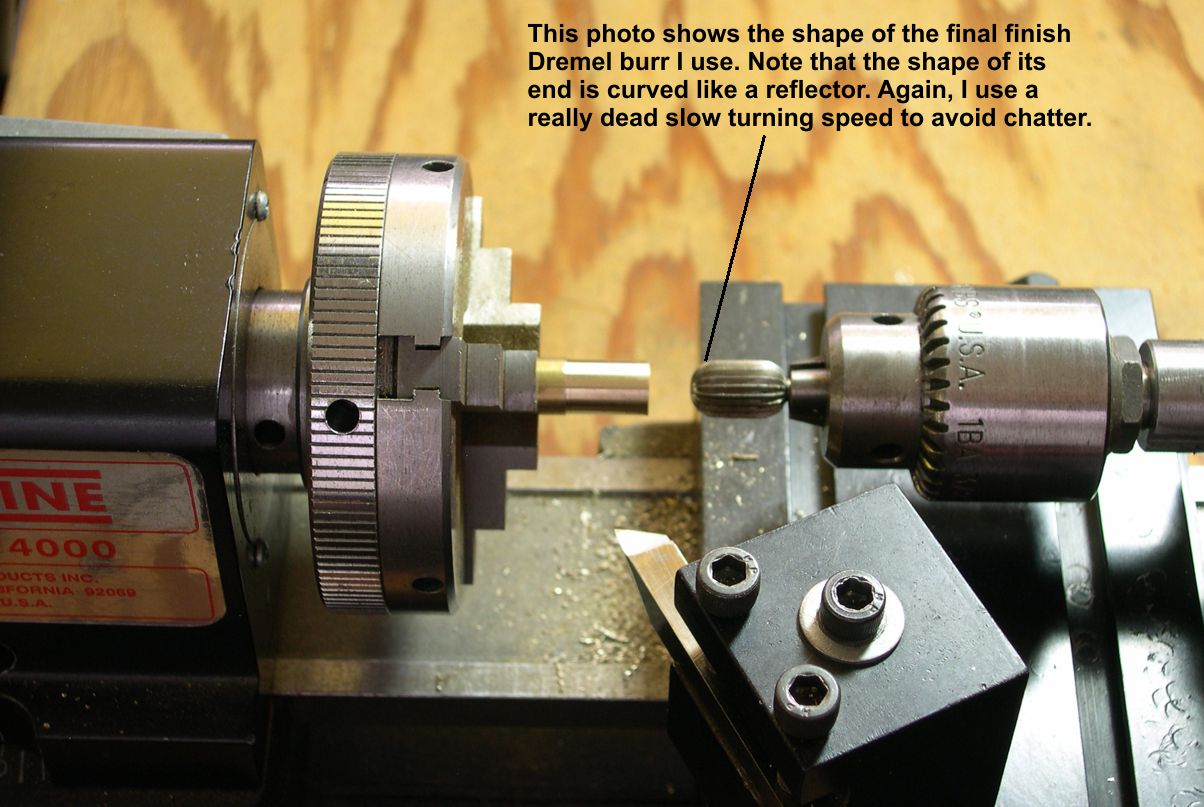
It does not cut as easily, especially as you reach the end of the hole left by the first burr. Press it in until the reflector surface touches the outer diameter of the rod as shown in photo 15.
photo 15 ⤵
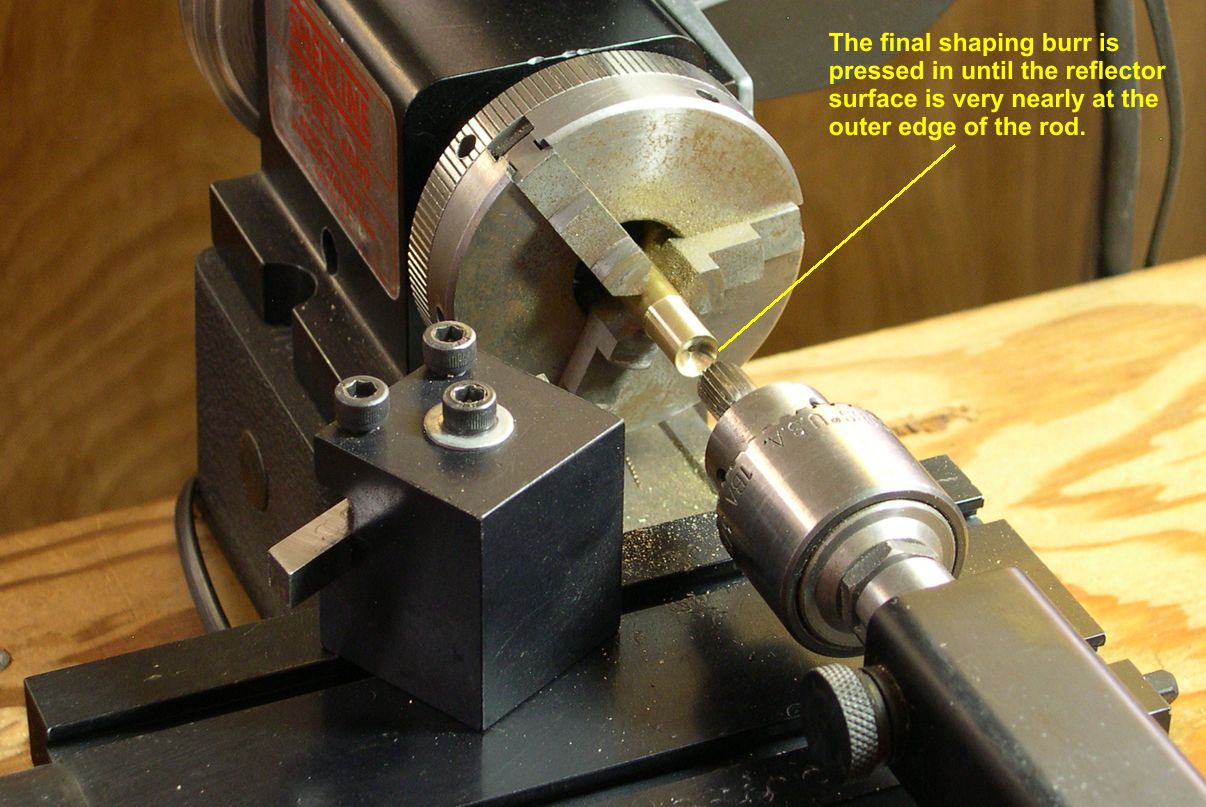
You have to use extremely slow speeds on the lathe to avoid chatter that gives you a ribbed surface instead of a nice smooth one. A little practice goes a long way on this.
Step four is to polish the reflector. Done correctly, you get a pretty smooth polished looking surface on the reflector just after the final cut. However, some time back Ray Grosser passed along a tip to me that makes it even better. Get some Flitz Polish from some place like Micro Mark. It is shown in photo 16.
photo 16 ⤵
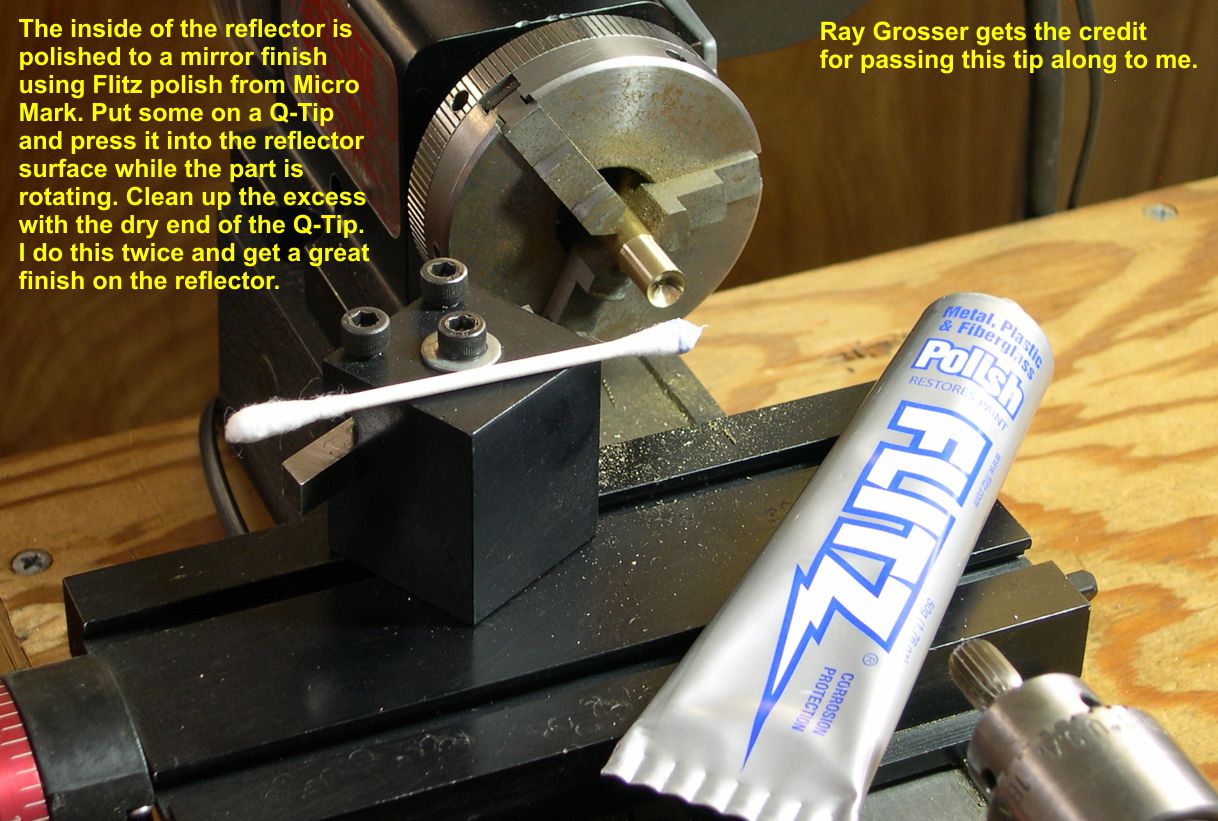
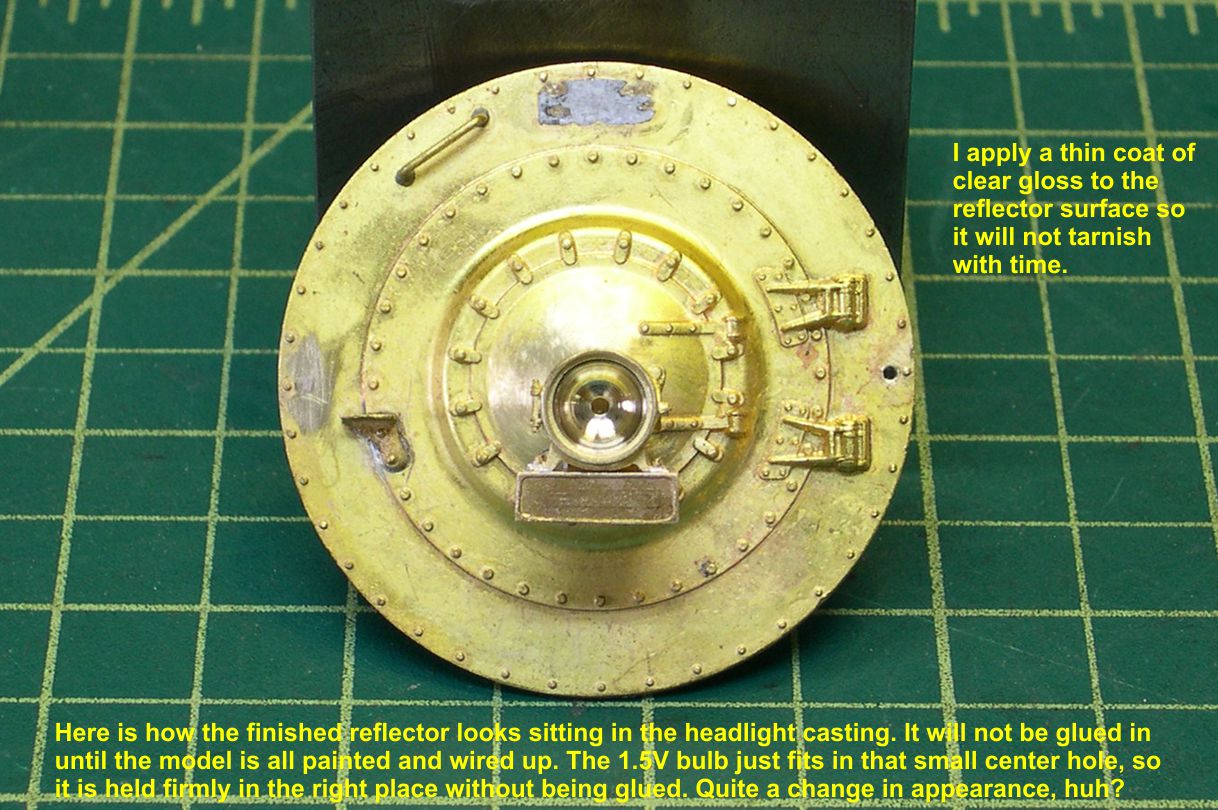
Put a little on a Q-Tip and press it into the reflector while it rotates on the lathe. Use the other end of the Q-Tip to clean off the excess. Doing this a couple of times gives a bright, mirror like finish that really looks like a real reflector. Put a thin coat of clear gloss on the reflector surface to prevent tarnish over time.
In step 5, photos 17 and 18, I show the use of a cut off tool to cut the finished reflector off at exactly 0.22″ long.
photo 17 ⤵
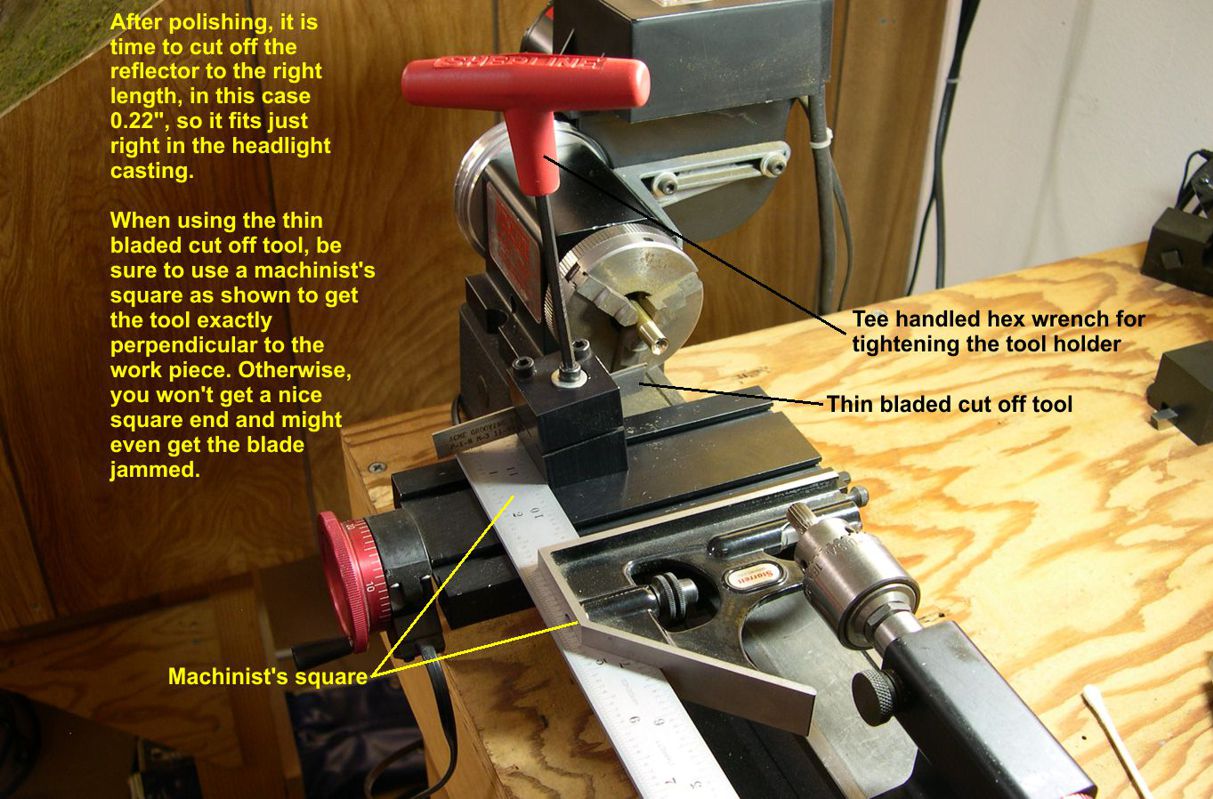
photo 18 ⤵

By rounding the rear edge on it as shown in photo 18, it will slip into the headlight casting a little easier, especially after painting of the model.
In the last photo, 19, you can see how shiny the reflector really is and how much more realistic the whole smokebox front now looks.
photo 19 ⤵
In the next installment, I will finish up the smokebox front detailing.