AT&SF Class 5001 Paint 1
In this episode, I am starting the painting of 5006. Many times people have asked me to write up how I paint with acrylics, so that is what this episode is mostly about. I will go into considerable detail on getting good results with water based acrylic paints.
Step one is always cleaning the parts to be painted, whether you are using acrylic or solvent based paint. Cleanliness is next godliness when painting. No paint is going to stick well to finger prints, grease residues, or other contaminants. No amount of etching, bead blasting, or other magic remedy is going to save you from residues. Believe it or not, good old soapy water is one of the most effective cleans you can give a model. It is the clean of choice for me due to my experience in the extremely critical field of semiconductor wafer cleaning.
Back when I first started as a Process Engineer in semiconductor wafer fabrication, we used every nasty, horrible solvent and acid you can conceive of to try to achieve the “perfect” clean on wafer surfaces. The stakes were very high, as millions of dollars rode on the cleaning efforts. We typically used trichloroethylene, very hot sulfuric acid, hot chromic acid, and other delightful chemicals for wafer cleaning. As the EPA and state agencies began tightening down on the use and disposal of such chemicals, it became increasingly hard to obtain or even afford some of our favorites. At that point, various PhDs and engineers starting experimenting scientifically on wafer surface cleaning (as opposed to the “gut feel” that had led to so many vicious chemicals being used). It turns out that essentially nothing cleans a surface as thoroughly as a non-ionic surfactant (fancy soap) in very pure water. Ultimately, most cleaning was accomplished using soap and water, frequently in an ultrasonic bath. The real secret to all this is how you rinse after cleaning. The semiconductor industry uses fast flowing de-ionized water to do the final rinse followed by high speed spin drying in dry, highly filtered nitrogen. Now that’s a bit of overkill for what we need to do of course. Submicron particles will not be a serious problem when painting a brass engine. However, as I said, cleanliness is extremely important, so we need to get a reasonable approximation of this cleaning process going.
First of all, hot soapy water in the kitchen sink is really effective at removing grease, fingerprints, and other random residues, so let’s start with that. Run the water as hot as you can stand and add several times as much Ivory Liquid to it as you would for washing dishes. I use Ivory Liquid, because it is a relatively pure surfactant (that fancy word again) without all the hand creams, etc. Therefore, it rinses off better. For our purposes, fast running DI water is gross overkill, but we can approximate it using distilled water from the grocery store. Distilled water is actually slightly more pure than de-ionized (DI) water, as it is condensed steam. Impurities don’t boil off and carry over to the distilled water. DI water actually retains some minute amounts of non-ionic contaminants, but I won’t bore you with why that is OK for semiconductors. Suffice it to say that distilled water will work for our purposes and is dirt cheap. It is used for steam irons and other things that boil water where you do not want them to gradually fill up with calcium deposits. The lack of calcium and other impurities makes distilled water an ideal final rinse for our pre-painting clean. It does not leave water spots when it dries (within reason as I’ll discuss shortly).
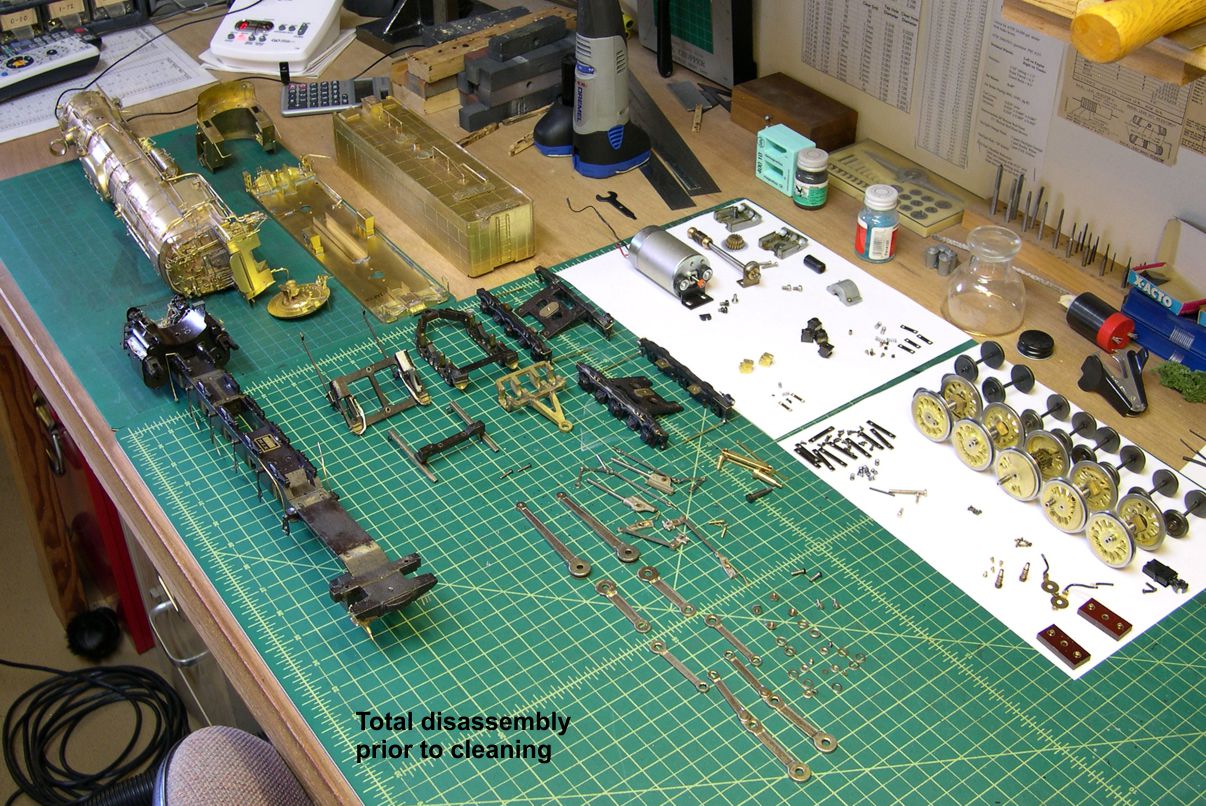
Another key to excellent cleaning is total disassembly of the model prior to cleaning. Assembled parts can trap water and contaminants between them and let them leach out later to hurt your paint job. In photos 1 and 2, I have shown how totally I disassemble an engine before cleaning it.>
paint 1 ⤵
paint 2 ⤵
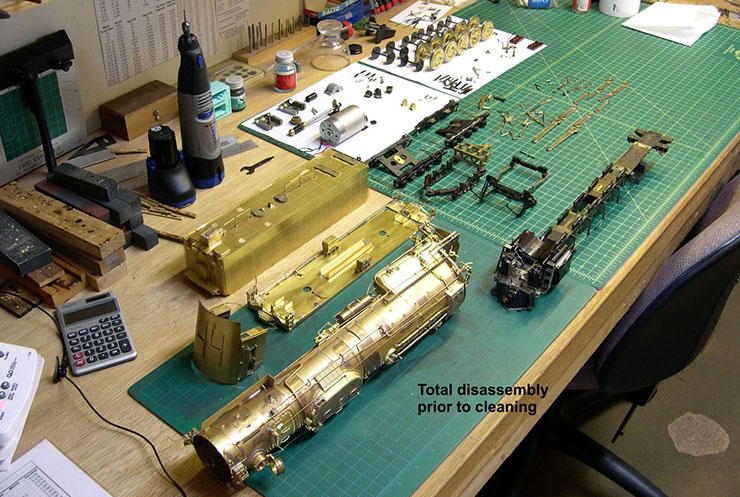
Pretty much anything that can be taken apart is taken apart and cleaned separately. I left the brake hangers in place on the loco frame, because the sander lines are all custom fit and keeping them straight would be a nightmare. Sometimes ‘ya gotta compromise a little. In the case of the brake hangers, minor contamination around where they are mounted simply won’t show anyway.
Photos 3 and 4 show the rinsing tank I use for the distilled water final rinse.
paint 3 ⤵

paint 4 ⤵

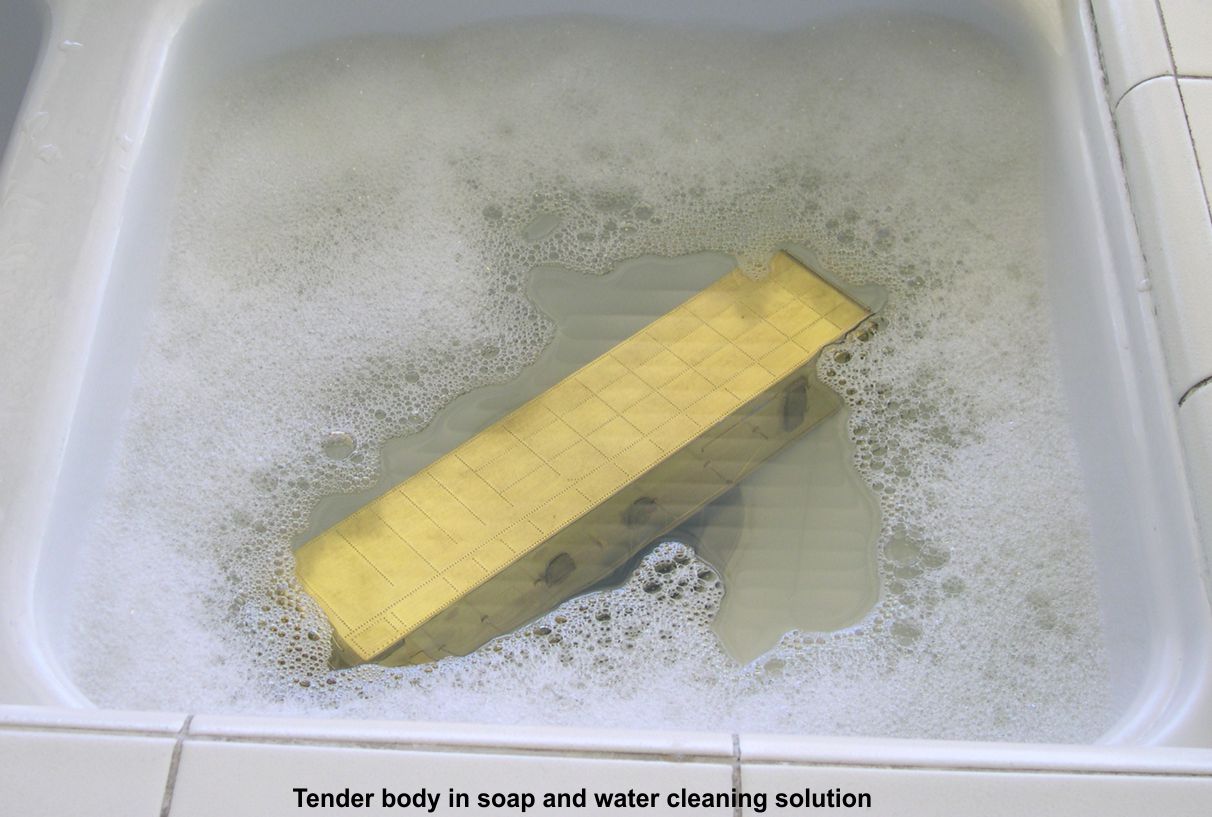
I use the same tank for stripping paint when necessary. It was designed for paint stripping, and is made of stainless steel. I forget who made it. The seller was at O Scale West one year, and I bought it then. It was a great investment. The valve you see on the end allows draining the tank in a controlled fashion, and the perforated tray allows dunking and thoroughly sloshing the parts without getting your hands in the water. Photo 5 shows the tender body immersed in hot soapy water in my high tech cleaning tank, better known as my kitchen sink.
paint 5 ⤵
I use a soft brush to scrub each part in the hot soapy water after letting it soak for a few minutes. Then I rinse the soapy water off as thoroughly as I can under the faucet. I submerge the part in the rinse tank, raising and lowering the tray a number of times to slosh the part around in the distilled water. After a few minutes, I raise the part, turn it over and repeat the rinse. After several more minutes, I remove the part from the rinse and place it on a clean towel. In photo 6, I show how I use a high quality soft paper towel to gently pat way the most obvious droplets of water.
paint 6 ⤵
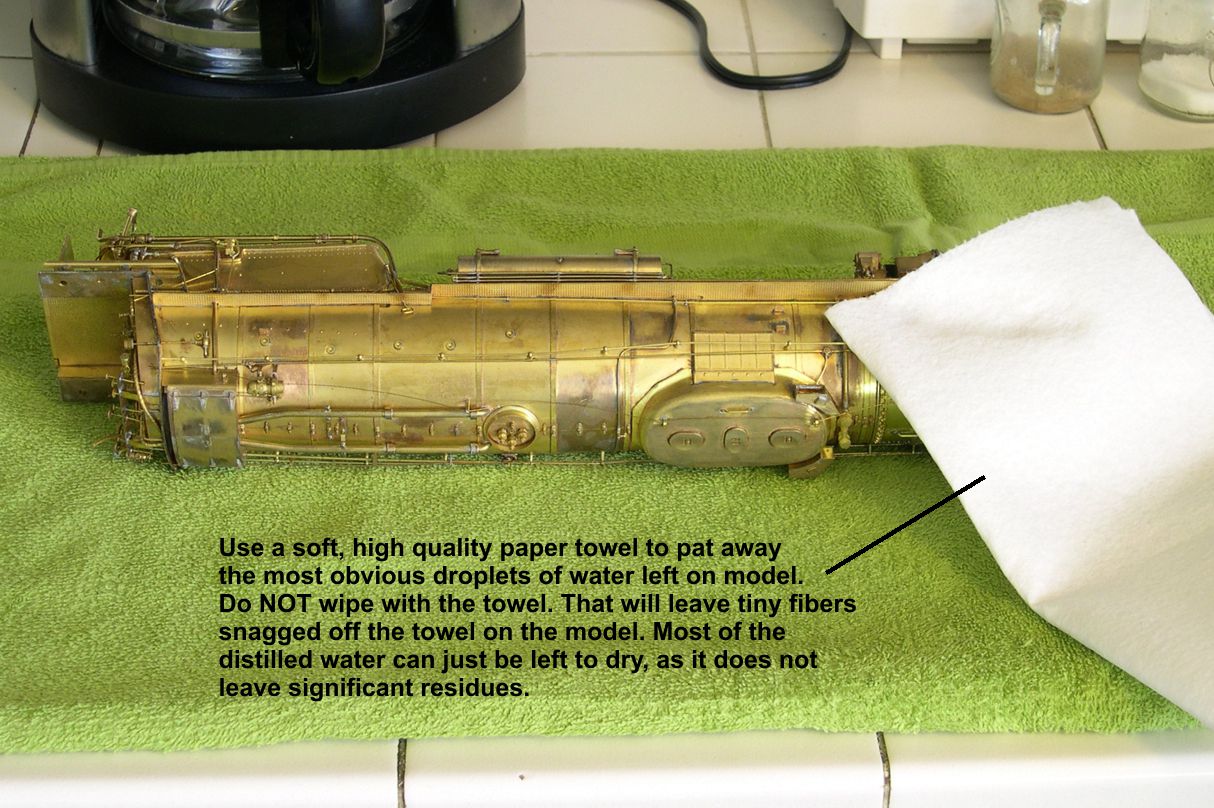
Do NOT wipe with the towel, as sharp edges and tiny details on the model will snag it and leave tiny fibers on your model to show up under the paint. The reason for removing the largest droplets instead of just letting them dry is that distilled water is so pure that it has a tendency to snag dust particles and other contaminates out of the air. A large droplet can collect enough to leave a minor surface residue behind when it dries. Mopping them up prevents this unwanted behavior.
At this point, you have “squeaky clean” parts, so be careful how you handle them. Try not to touch the surfaces that will be painted, as that will re-contaminate them. However, unlike some people, I do not bother with plastic or white cloth gloves. You can’t really trust them either, as they are not “clean room certified”. They may have contaminants that can transfer back to the model. I just wash my hands thoroughly before handling anything and then touch the soon to be painted parts as little as possible. That seems to work well for me.
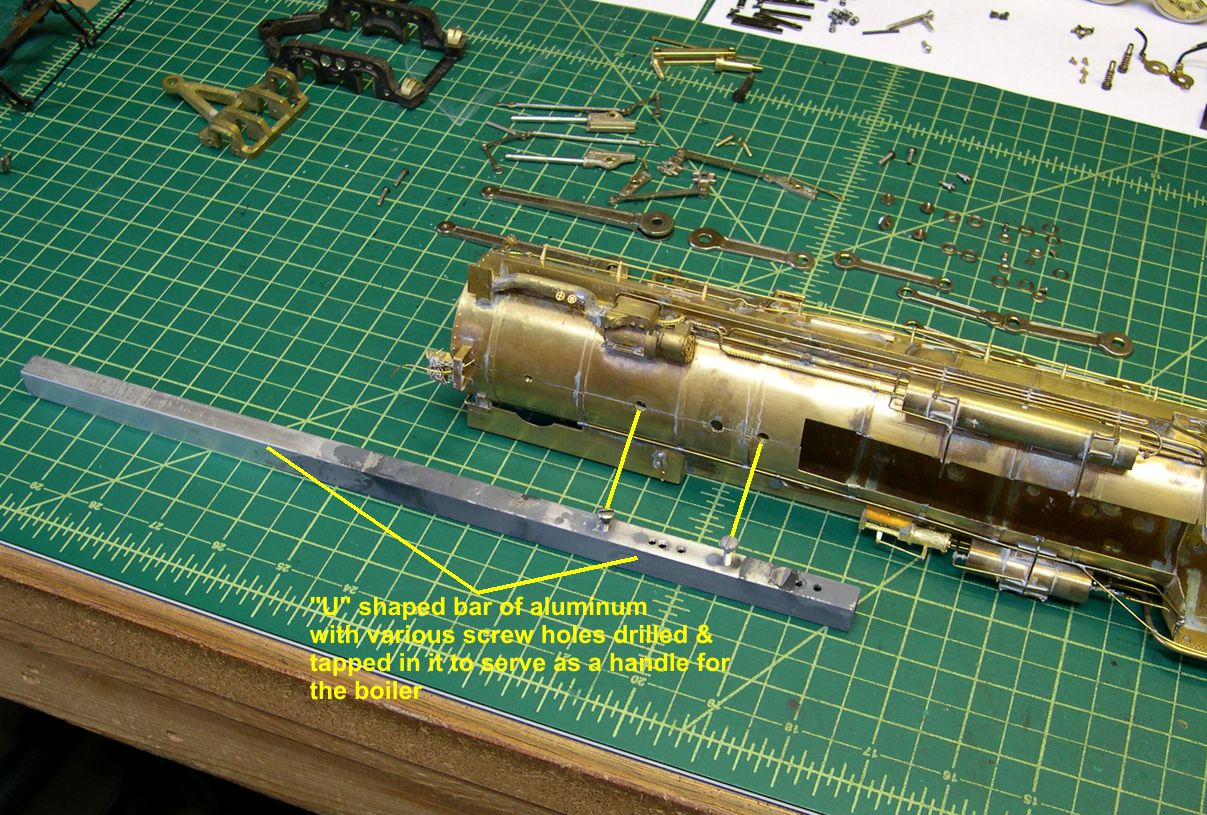
Another pre-painting thing I do on steam engines is to mount a handle on the boiler. That is the hardest part to move around without damaging it, so having a nice handle is really helpful. Photos 7 and 8 show how I use a simple piece of aluminum channel stock as a handle.
paint 7 ⤵
paint 8 ⤵
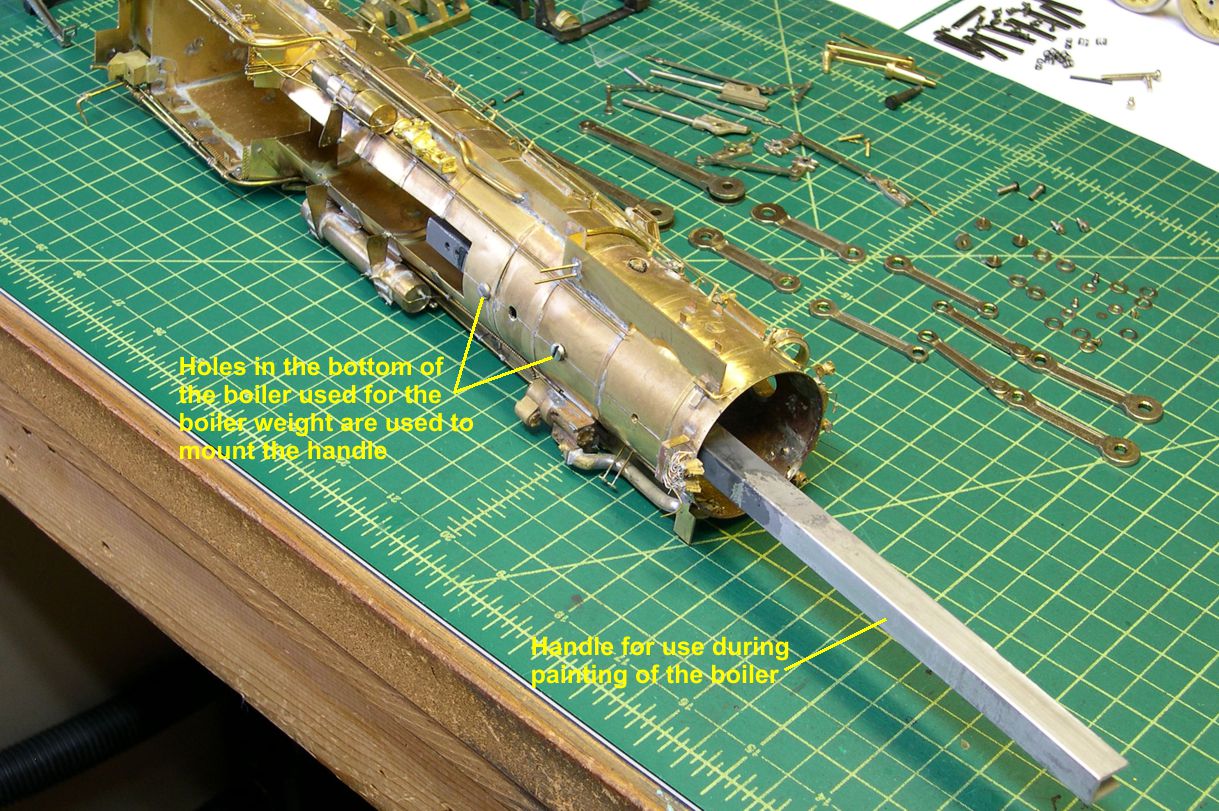
I drill and tap holes in it to match the boiler weight holes in the bottom of the boiler. After awhile, you wind up with enough holes to match almost any model without having to make any more.
Now we get to the preparation of the paint itself. Aside from the cleaning process, nothing is more important than how you prepare acrylic paints for air brushing. I have heard any number of times how hard acrylics are to use; how they clog an airbrush, how you get blobs on a model, and how critical air pressure is. All that is true if you do not prepare the paint correctly. I had all those problems initially myself. However, having spent many years solving critical production problems in semiconductor wafer fabs, I just used the same techniques I was used to using to come up with solutions. It turns out that there is a very simple solution to virtually all the issues. You have to strain the paint just before use. There is no substitute for doing so. It turns out that the pigments in acrylics are extremely finely ground. That causes them to clump together a bit more than in other paints. You cannot break up the clumps by stirring or shaking they way you can in solvent based paints. In fact, you should never shake acrylic paints to mix them up. They have considerably higher surface tensions than solvent based paints and shaking will cause air bubbles to form inside the paint. The air bubbles make the clumping problem even worse. So remember, never shake acrylic paints to mix them up.
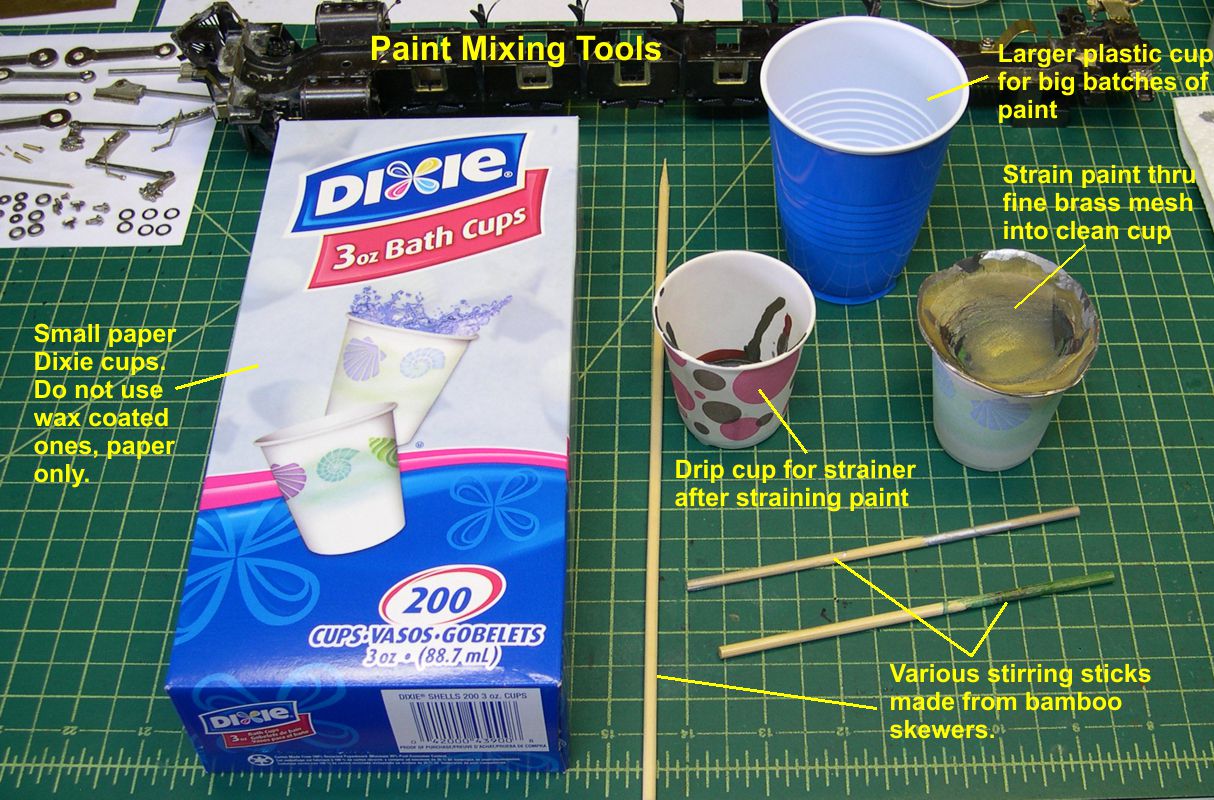
Photo 9 shows some of the things I use to prepare acrylics.
paint 9 ⤵
Here is how I prepare my paints for airbrushing:
1. Stir the paint thoroughly in its original bottle to get as much pigment evenly distributed throughout the paint as possible. I use 5-6″ stirring sticks cut from bamboo skewers. A whole package of skewers costs very little at any grocery store and is a lifetime supply of stirring sticks. There is no need to throw them away after use. Just wipe the excess paint off and save them for later use. Acrylic paints don’t re-dissolve after drying, so I just keep a selection of basic colored sticks like green, blue, white, black, etc., as seen in photo 9, and re-use them almost forever. The more dried paint that builds up on them, the less contamination is likely.
2. I use 3 oz Dixie cups, paper type only, to mix and strain the paint. For larger batches, I use plastic picnic drinking cups. Both types are shown in photo 9.
3. For air brushing, use distilled water to thin the paint to the consistency of whole milk, just slightly thicker than water. This takes anywhere from 10% to 50% distilled water depending on the bottle of paint. Some are much thicker than others.
4. Pour the thinned paint through a fine mesh strainer into a new Dixie cup. You will be surprised at all the “glop” that the strainer catches. No wonder there are problems without straining. My strainer is just a piece of fine brass mesh formed and soldered onto a ring of brass wire so it sits on top of a Dixie cup as shown in photo 9. A close up shot of the strainer is in photo 10.
paint 10 ⤵

Wash the strainer out under the tap right after straining the paint and it will last essentially forever. The one in the photos is many years old.
5. Pour the strained paint from the Dixie cup into as many clean 1/2 oz paint bottles as necessary. I usually use 1/2 oz for smaller quantities where only 1-2 of the 1/2 oz bottles are needed and 1 oz for larger jobs like painting the black on a steam engine, where I may use 6 or more 1 oz bottles on one engine. For the 1 oz bottles, you have to put a flexible rubber or plastic hose on the end of the paint pickup of the airbrush to extend it down to the bottom of the bottle.
6. Don’t worry about mixing up too much paint for the job at hand. The old wife’s tale about how you can’t re-use acrylic paints that have been thinned for airbrushing is total horse pucky. I’ve successfully re-used such paint years later. You just have to re-strain it to get rid of the blobs that form is all. Straining is only good for about 24hrs, so if you have to wait longer than that, re-strain the paint.
7. I airbrush directly from the bottles prepared above using a simple single action Paasche airbrush. I have never even tried a paint cup, as the quantities I have to use on O Scale engines is WAY too big to mess with those little things. I have also never tried a dual action airbrush, so I can’t tell you if that would be better. I get excellent results with my single action, so the KISS principle tells me to stick to that (Keep It Simple Stupid).
Once you start preparing your paint as described above, you will discover that air pressure, distance from the model while spraying, etc., become non-critical. Blobs and clogged airbrushes become a thing of the past. I do keep a mug of soapy water and Q-Tips handy so I can close the tip down, use a Q-Tip to clean it off, and take a break after an hour or so of airbrushing. If the paint flow starts to slow down noticeably, close the tip, use the soapy water on a Q-Tip to clean it, and re-open it and keep going.
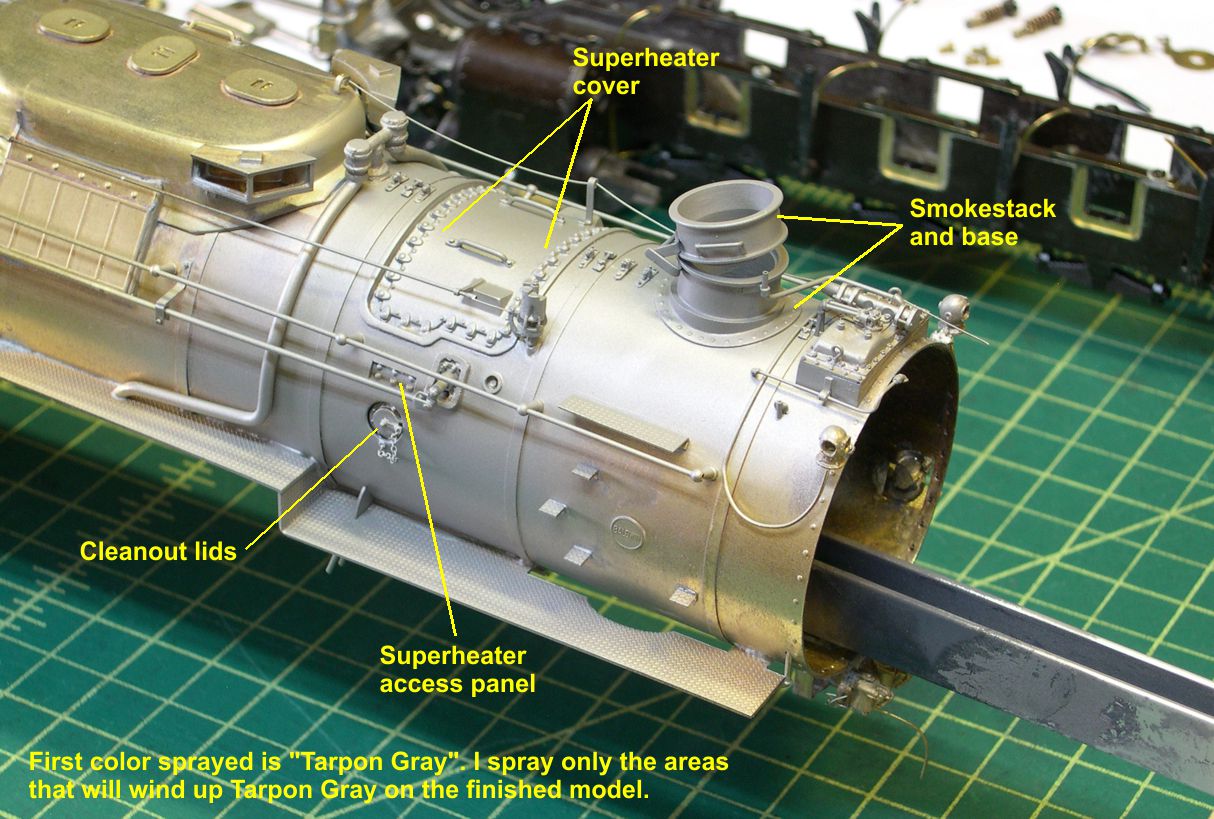
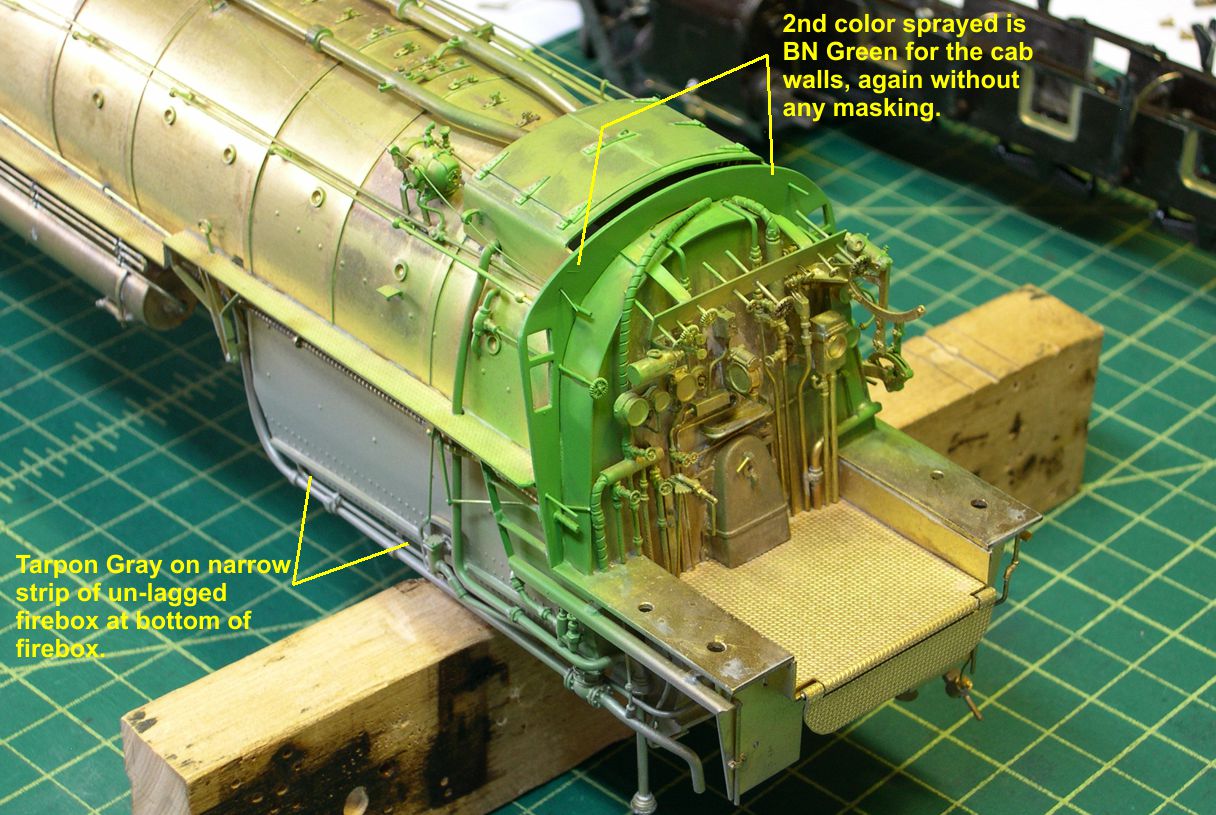
I start painting a steam engine with the colors that cover small areas. On a Santa Fe engine that means I spray the Tarpon Gray on the smokestack, superheater header, superheater access plates, cleanout lids, and bottom of the firebox where there is no lagging. I also spray the whole smokebox front Tarpon Gray. Secondly, I spray the cab walls and ceiling BN Green. These two colors require no initial masking.
For the ATSF fans out there, let’s take a short break to discuss “Tarpon Gray”. Many words have been written trying to describe the exact appearance of that color. It’s a fruitless exercise, because Tarpon Gray is a metallic color, which means it changes color pretty dramatically under different lighting conditions. Furthermore, it was not a true paint. Just like the graphite used by so many railroads on their smokeboxes and fireboxes, it was a metallic material in an oil base that was applied and allowed to dry. It was used on areas that saw a lot of heat that would incinerate a true paint in no time. Obviously, the appearance of such coatings would vary with time and the mixing and application. It appears the color was a medium gray metallic, not as metallic as aluminum or silver, but distinctly metallic. Based on what I have read of it and the color photos I have seen, I came up with my own concoction that I think looks pretty close to the color photos. I use 4 parts Santa Fe Silver, 2 parts Reefer Gray, and 1 part Grimy Black. Now this is all Polyscale, which is now defunct, but very similar colors exist in other paints, and like I said, it does not have to be perfect – there will never be a “perfect” Tarpon Gray, just close like mine.
The cab walls and ceiling on ATSF steamers was painted a medium green color very close to BN Green, so that is why I use BN Green for those surfaces. I’m sure one could nitpick that shade of green a bit but the incandescent lighting I put in the cab changes the color so much anyway, you’ll never know. Photos 11-14 show the initial application of Tarpon Gray and BN Green.
paint 11 ⤵
paint 12 ⤵
paint 13 ⤵

paint 14 ⤵

After spraying those two colors, I apply a good coat of clear Satin. I discovered over the years that metallic paints and even occasional other colors can have their surfaces changed appearance-wise by masking tape. So any time I do a metallic color that will get masked, I apply a clear coat over it. That protects it against the masking tape. As long as I’m doing the metallic, it’s easy enough to do the straight colors, too.
I will now set the boiler, cab, and smokebox front aside for a few days while I paint the frames, trucks, and other mechanism parts black. You CAN mask and paint almost immediately with acrylics, but it’s safer to give them some cure time anyway.