The O Scale Central website really belongs to all O scalers, so tell us what’s on your workbench! This page is dedicated to sharing what modelers are doing and what can be done. There are those that know how to get things done and those that need a little encouragement and or knowledge as to how to begin. Maybe this workbench series will help us help you in your modeling. Please share with us what you are doing on your workbench. Send us an Email with a few good quality pictures and description pastpresident@oscalekings.org
What’s on the workbench September 2022
I am slowly going DCC ?. Very slowly. One of the things I still love about model railroading is learning new things, but this one has been / is hard. Maybe because DCC is / can be a hobby in itself? In the 40+ years I have been in O Scale 2 Rail, I have collected a fair amount Of O Scale 2 Rail. Mostly because my Wife & I owned and operated a retail brick and mortar Model Railroading store for 20+ years and did a lot of buying / selling / trading model trains. When A O Scale 2 Rail item came in, it normally went home.
I remember when I fist learned of a system that would allow multiple Locos to run on the same track without a traditional block system. Do not remember what it was called, but do not think it was called “DCC”. I believe it was at a NMRA convention in Silver Spring, MD in the late 70’s? If he was originally touted as a system? All these years later I’m learning that the system consists of many, many, many parts! And each of these parts seems to add to the total cost. Don’t get me wrong now, I like having wireless throttles which allow me to control the speed and direction of the train, when I hit a button, the whistle or the horn or bell goes off, multiple features all sorts of different sounds all in the palm of my hand. And now technology seems to be taking another giant leap forward with Wi-Fi I am not there, yet I seem to be suffering from memory loss, in that I can remember what I learned yesterday today.
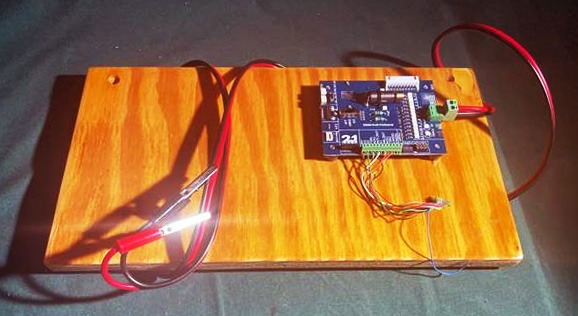
All of this brings me to the latest item on my workbench. I ran into a decoder problem in that certain functions were not working, and I could not figure out a way to know for sure if it was just me not accessing these functions correctly or if the decoder itself was bad. The online forums can be a tremendous help and can shorten the learning curve. I came across a thread about decoder testers and found another tool that I just had to have. The picture shows my recent purchase and then mounted to a spare piece of plywood. These testers are really nice because I they have a speaker and a motor built in. Almost any configuration of plugs or just wires can be attached quickly and easily. LED lights tell you if the different functions are working. You can actually run the tester as it was a locomotive and hear the sounds adjust to the speed of the locomotive. I have a handful of decoders that I have acquired over the years in collections that I’ve bought. This is a super way to find out, before I go through the process of installation if the decoder is good.
So what’s on your workbench? Please send me a page or two of text and a couple of pictures. Thanks, Bruce pastpresident@oscalekings.org
What’s on the workbench August 2022
Well, it’s the first of the month again and nobody has sent me anything so I’m going to bore you with another one of my little projects?
As some of you know, I have been working on the install of my roundhouse and turntable. This is given me an opportunity to hand lay short sections of track, mostly the leads from the turntable to the house. I suppose I could’ve cut pieces of flex track and just used my normal method of drilling a hole in the some of the plastic ties large enough to accept a very small flathead wood screw. Then countersink that hole and screw the plastic tie to my roadbed which consists of Midwest cork laid on three-quarter inch plywood. I then just paint over the screw heads with a club of paint, the cheap Walmart craft paint and the screw heads disappear! I also ballast using a dry water activated glue mix and I’m pretty happy with the results. However, it just seemed easier to me to glue some wood ties to the cork which I have already painted a flat gray.
The glue under the wood ties is allowed to dry overnight. I use a yellow carpenter’s glue and the bond is terrific. I then cut short sections of rail and spike the rail sections to the wood ties. Time for a shout out ? I bought a set of the micro mark spiking tools and of course managed to break the tip off of one of the spike pulling plier jaws. I contacted micro mark and explained that I had bought a new set of their tools and one jaw had broken. she gave me an address to return the broken pliers and within a few days I had a brand-new pair in the mail, all at no cost other than a couple bucks for first-class postage to get the pliers to micro mark. No hassle, no fuss, just fantastic customer service and standing behind their tools. I stain the ties before applying rail and solder rail joiners to the house tracks. One of the things I learned while spiking several sections of rail this way was that sometimes spikes get away like they have little feet or wings. I soon found that I had very small spikes laying here there and everywhere. Picking them up by hand or with a small pair of pliers with my arthritic hands became a real chore. I have also learned that some of these spikes are very, very sharp? Yeah don’t ask me how I know.
While shopping on Amazon, I happened to come across an Uxcell 12V 25N Electric Lifting Magnet, Electromagnet Solenoid. This device was listed at $7.99, so I had to have one. It comes with the solenoid and a couple of wires. I attached a 9 V battery and found it very clumsy and hard to use. Time to improve! I had a 5-inch piece of 1 inch plastic rod laying around as I just could not find a good place to tuck it away which translates to I didn’t want to put it someplace where I’d never find it again. I super glued the solenoid to one end of the rod stock and used electrical tape to wrap the wires to the rod along with a 9 V battery and then wired in a simple toggle switch for on/off. I could not find any of my 9 V battery holders so when the battery goes dead I’ll probably just order a battery holder, so I don’t have to cut the tape every time. Although I can’t imagine with the battery switch in the off position that it will consume much in the way of 9 V batteries. It works like a charm, flip it on and I have a couple of inches to hold, almost like a pencil, I can pick up surprisingly heavy objects but especially spikes and then I just turn the switch to the off position, and they fall into the storage cup where I want them to be.
As always, I’d love to see what you’re doing on your workbench. Send me a couple of pictures and about a page or so of text that you in a future column. Thanks, Bruce pastpresident@oscalekings.org
What’s on the workbench July 2022
It’s July 1st! 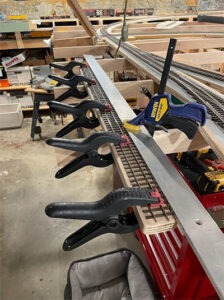 Time to review your resolutions you set back in December. Have you gotten projects finished up in your layout area? Have you learned a new skill? Well good news is you still have six months.
What’s on the workbench this month? I have acquired a Bachman On30 2 truck Shay with DCC and sound. It ran for maybe, maybe three seconds when I got it and then the gears were split but fortunately, I was able to order a new set of trucks from Bachman and have installed those. Now it’s time to tweak some CVs … I realized I did not have a test track. A scrap piece of plywood, 36 inches long became my base.
 A quick sanding and then I rigged up a little straight edge to hold the track straight under a few clamps. I just super glued the ties to the board. I followed this with a coat of stain and then drilled two holes and wired some jumpers with alligator clips to the rails. I then finished it off with a little bit of ballast. It now fits perfectly on the standard O track above my DCC/sound desk.
Happy Fourth of July!
And please, please, please send me a page or two of text and a couple of pictures of what’s on your workbench. Thanks, Bruce
What’s on the workbench June 2022
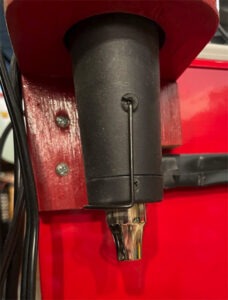
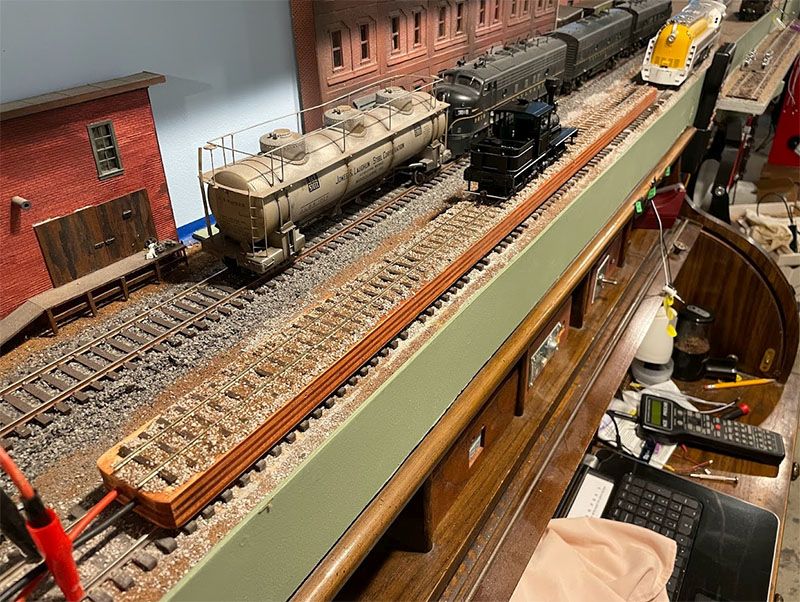
 Hard to believe it’s June 1st already! Temperatures are rising so I’m heading to the basement. Some months back I reported that an expensive but very handy tool to have on your workbench is a small heat gun for the purpose of shrinking shrink tubing. This little heat gun virtually eliminates burning the heat shrink with a flame source of heat. I really find it handy but have noticed a problem. I’m always looking for a place to set it down after use, and to make sure that the hot tip isn’t near any flammable, especially in the liquid form. It does have a nice little fold away stand to keep it off from the benchtop when cooling. But it is always in the way between uses. Found a couple of pieces of scrap plywood and built this L-shaped holder. I used a hole saw to cut a hole just smaller in diameter than the largest diameter of the tool, so it just slips in, self-centers and keeps the hot tip a couple of inches away from anything. It also keeps the cord from laying across all the projects I have on my bench. I have a dedicated toolbox that I use for my soldering station. I just used a couple of self-tapping screws after drilling the correct size hole in the side of the toolbox to mount this little device on my box after painting it red so it somewhat matches the box. I’ve had it on for a couple of days and I really like this addition to the bench.
Always hoping to hear what’s on your workbench, looking for a couple of pictures and maybe a page or 2 of text. Please send to past president at pastpresident@oscalekings.org.
Thanks again, Bruce
What’s on the workbench May 2022
 I need to start out this month by correcting an error that slipped into the online version of the Coupler, the O Scale Central’s Quartey newsletter / magazine.
Somehow, I managed to not give credit to Charlie Wary for the magnificent bridge that was featured in the last addition. I apologize I apologize I apologize. By the time that the mistake was noted the publication had been sent out. Thanks to Charlie for sending in that wonderful bridge.
I’ve been trying to get more organized in my workshop. My wife bought me a tall tool chest from Harbor freight. I love this toolbox! I’m a retired mechanic and a eternal tool junkie, so I’ve own /owned boxes from Snap on, Craftsman, Mac and more. These “General” boxes are the best for price!
I’m trying to keep all my electronics bits in this box. I happen to find a bunch of inexpensive yard sticks at Lowe’s and cut them down and hot glued them together to make dividers for all the small parts. The top of this box is supposed to be my soldering station… But you know the drill, too much stuff just ends up sitting on top of it. One of my New Year’s resolutions from 2021 was to finish some projects so I wouldn’t have 15 different things sitting on my workbench (and on my boxes).
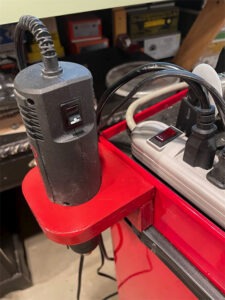
I did OK on that resolution, it was a good start, so I carried it over to this year and I am more and more determined that I need to get things finished up. In trying to finish up a project I was constantly running from one side of the basement to the other to find heat shrink. I’ve been buying it by roll as it’s so much cheaper. Problem was the rolls kept ending up in different places. I picked up a few pieces of scrap around the basement and came up with this little holder for the side of my box.
It’s a piece of scrap PVC pipe, a carriage bolt, washer and 2 nuts, and a piece of one by lumber. I sanded the edges of the wood, drilled a hole through the center for the bolt and then using a Forstner bit, countersunk about ½ depth for the PVC pipe. I also drilled a hole in the side of my box and installed the carriage bolt from the inside. You may notice my pencil mark where I wanted the center to be, the drawer slide forced an adjustment. Always a good thing to check both side before drilling a hole! The square of the bolt pushed the sheet metal out just enough to hold it in place the a washer and nut. The PVC pipe was just cut, cleaned, deburred and glued to the scrap piece of lumber. Now I have a place where my rolls of heat shrink tubing is readily available. The best part may be that I just used up some scrap that I just could not toss away.
What’s on the workbench April 2022
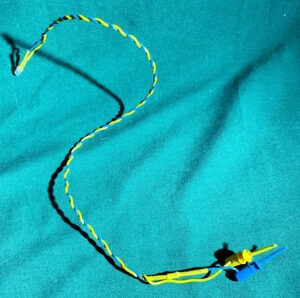 Some of you may have noticed that I’m running behind this month. Just returned home from the great Chicago show and realized I had not completed my list of tasks to do before the show, which included sending off an article for the what’s on your workbench series. I’ll start right off the top by requesting to find out what’s on your workbench? All we need is a page or two of text and a picture or two to go along with it. So for this month I picked up a little Mack rail bus at the Chicago show which reportedly had DCC and sound installed along with a decent paint job. When I got it home everything was great except the headlight was inoperative. It had one of those ultra ultra teeny LEDs for a headlight which was an amber colored device. The backup light was the same and I don’t really like it! The color is just off in my humble opinion. To start troubleshooting, I decided to see if there was power going to the LED or was the LED itself bad. I got out a known good red green 2 leg LED which if I understand correctly, will tell me current direction. I double tested it and then went to hook it up on the leads from the decoder to see if it would power up. At this point I realized that I should really make myself up a LED Test lead, so I took my 3 mm LED and wired it to some flexible wire, put in a 1K resistor in case I inadvertently hook it up to a voltage the LED would not like and two micro push hook type connectors. Took me only a few minutes and used stuff I had laying around the toolbox. I’m sure that this little device is going to save me countless of hours trying to hook up a test LED. Well, that’s it for this month. Again, I would sure like to know and see what’s on your workbench … please send me a page or two of text and a couple of pictures to: pastpresident@oscalekings.org
What’s on the workbench March 2022
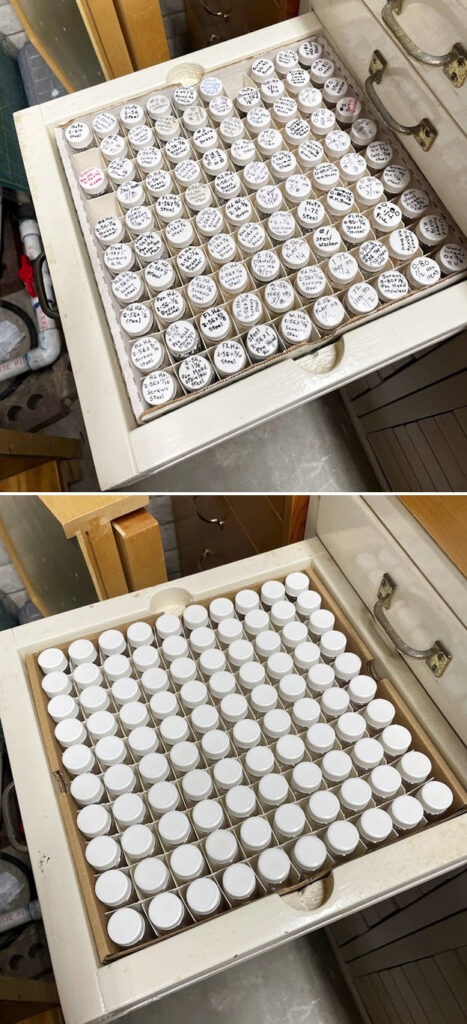 Found! When my dad passed away years ago, I inherited it his workbench. That workbench has become the primary part of my workshop. Part of that inheritance included his screw, nut and bolt collection from his many years has an HO modeler. Over The years since, I have been adding to that collection. He had acquired some glass vials with a white plastic cap. The white plastic cap is perfect for using a very fine tip permanent marker to identify the contents. As you can see the drawers were made to except a 100 pack of these vials. Between dropping and breaking and adding to the selection, I’ve run out of the glass vials. This is where the learning curve sets in. There are no markings on the plastic caps nor the glass vials as to who made them. I can tell you that there is a tremendous assortment of these vials on the Internet.
As I was searching, a posting showed a manufacturers name on the side of the cardboard box with the separators. I pulled the cardboard box out and lo and behold there was a part number and a manufacture, so I thought I was home free. I found several different companies on the Internet that listed these exact vials. Problem is, according to them, supply chain and there are none, I repeat none that I can find available. Several of these companies reported to me that they did not believe that they would have them back in stock until sometime around August or September of this year and several said that it would be 2023.
I had a scientist/model railroader friend who offered to hook me up with a few bottles just to get me through, but I had just bought a collection and there are probably 50 different types of screws that I need to add to my collection. So, I was digging around eBay for something else and happened to come across a listing for some plastic vials of the same size with white caps. A couple dollars later and an extensive shipping time from our USPS mail service has set me up with what I figure is a lifetime supply of vials. I have found this to be a very helpful way of keeping my small screws and nuts and bolts handy and easily accessible and yet, really don’t take up a whole lot of space. And the amount of time that I save not having to hunt through the basement to find a screw is priceless. The key is being disciplined to keep the vials sorted / in order. What’s on your workbench? I’m always looking for a page or so of text in a couple of pictures. Please send to pastpresident@alekings.org
What’s on the workbench February 2022
This month is more under the bench then on it, or at least trying to keep things from going under the bench. If you are like me, seems the older I get I am dropping more small parts off the bench ? maybe it’s just I am doing more at the bench?? Anyway, as you can see from the picture below, I had a 3/4 or so gap to the floor from the bench panel. You know it ? EVERY small part, screw, nut, washer would end up under the bench having rolled / slide / jumped (think springs) through that gap!
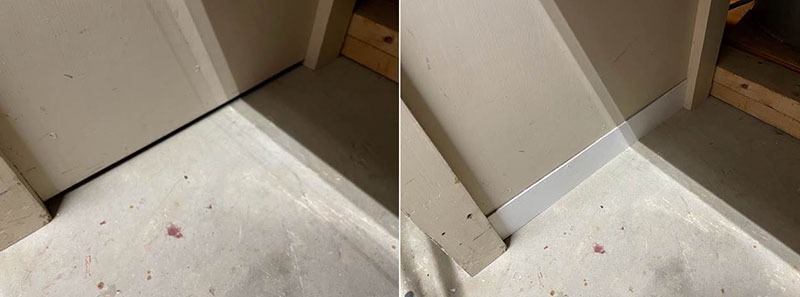
I’ve spent way too much time on my knees with a flashlight looking for things, many of which just disappeared. I still have not found a magnet tool that will pick up brass. After losing a truck spring during a conversion of some 3 rail Lionel trucks to 2 rail ( and yes, I was using the thread trick, was in the spring, but said thread must have been used 2 many times and broke as I pulled the thread out and I swear, launching the spring directly to the slot and under the bench! ) So, a tip ? thread is cheap ?? don’t try to make it last forever. It does wear with each pull and tug. Thus, a plan was prepared. I had some scrap strips of Masonite in about 2-inch width. I just cut to length and painted white to sort of match the bench. A few spots of glue and a bit of caulk to take care of any uneven spots on the floor and NO MORE parts getting under the bench! This little project has already paid big dividends.
As always, love to see what’s on your work bench. Just need a page or so of text and a couple of photos. Please send to pastpresident@oscalekings.org
BTW, hope you all have seen the new newsletter being published by the OSK’s and sent to members via email. We have and will publish this column to both the newsletter and the Website. Have received a really great report from one of are newest members? Watch for it in the next newsletter.
Thanks, Bruce
What’s on the workbench January 2022
 Welcome to 2022! Seems like it was just Y2K the other day. This should be the first what’s on your workbench in the new O Scale Central newsletter. I am also hoping that we can continue to post these monthly on the website. I hope you know that there’s a couple years’ worth of these on the website so you can go back and catch up. I hate to do it, but I’m going to start the new year by begging for submissions from the membership. What I am looking for is about a page of text and a couple of photos of what is on your workbench. Please send to: pastpresident@oscalekings.org
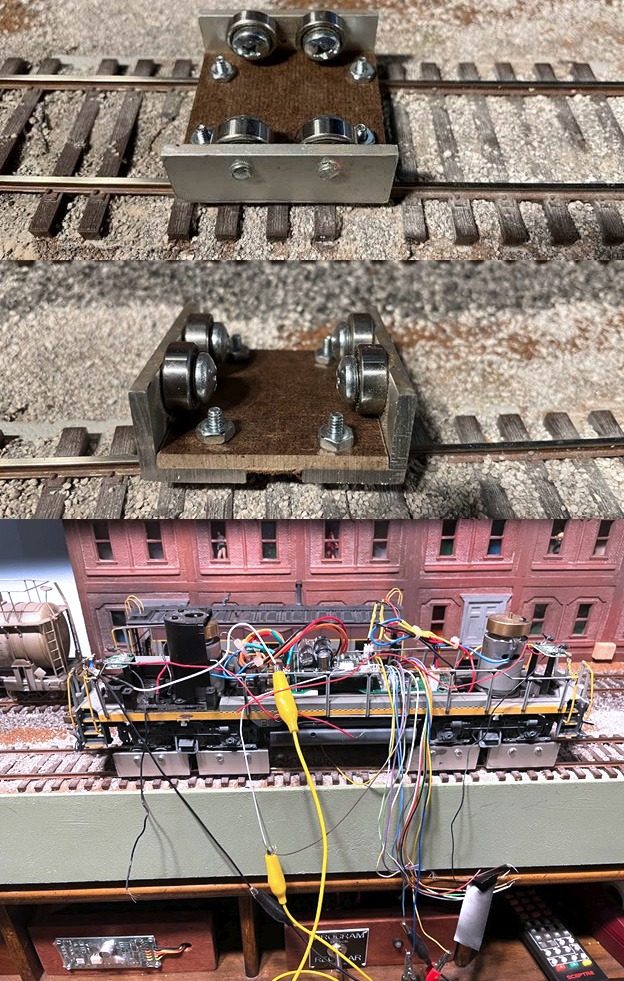
For this month I’m going to share a recently completed project. I built a set of test rollers to aid in my DCC insulation/programming. I used a piece of 1” x 1” aluminum angle, some Masonite, metric screws and nuts and lock washers and some roller bearings. I found plans on the old Internet, by searching YouTube.
The aluminum angle and the Masonite were left over from other projects. The screws, washers, nuts and the roller bearings came from Amazon. I decided to build these myself as the commercial ones available were way over my budget and besides I’m an O scale two railer. The thing I enjoyed the most about this hobby continues to be the many facets of it. Always a chance to learn something. I pretty much just followed the plans, the most difficult part was making sure I got good alignment for the mounting of the roller bearings so that the wheel sets would sit in between. I found the easiest way to do this was to use an X/Y table I picked up at a train show a few years ago.
I also discovered through the online video, that there was a tool I didn’t have! Turns out they make a combination drill and tap. I picked up a set from the local harbor freight and they were wonderful. You drill the clearance hole and then tap in one continuous motion which makes the threads perfectly aligned with the hole. As I’m sure you know, the Masonite insulates the two rails and allows power to go to the wheel-sets which allows stationary running. This is a huge help when you’re trying to do things like set up your headlights, trying different bells and whistles or horns. I have not done a re-power with these yet, but I imagine they are going to be extremely helpful making sure there are no hiccups in the drive.
Happy new year! Hope it’s filled with O scale two rail trains. Bruce
What’s on the workbench December 2021
 Here’s a tip from Brian Scace and used with permission.
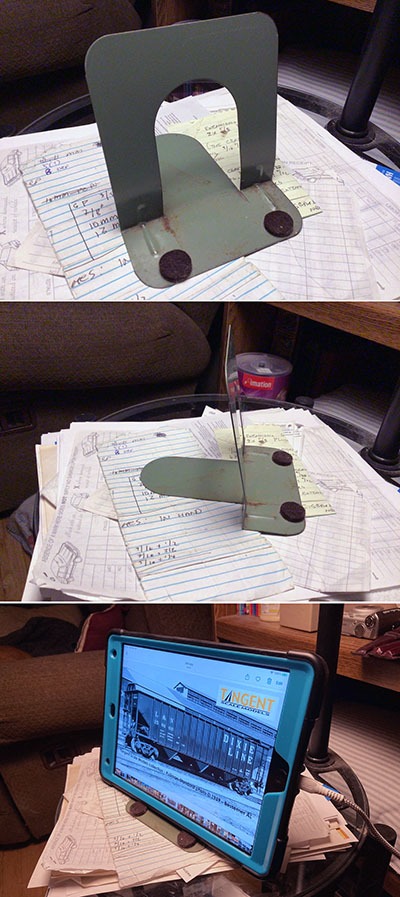
At every tag sale, church rummage, and flea market you can buy these metal bookends. If you’re in synch with me, you probable have some already. Anyway, a bit of a bend to the back and two of those stick-on felt pads you can buy at Lowes to put on your furniture to prevent scratches in the floor.
And there you have a handy stand for the workbench or shop.
Dirt cheap, robust, and works. I’ve made several because my family keeps stealing them for “civilian” use!
What’s on the workbench November 2021
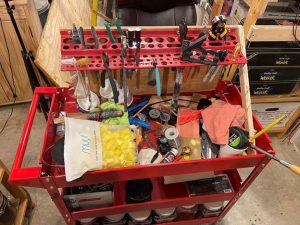
Hello loyal readers! Hope all is well. This month I want to share a quick little project which has really saved me a lot of time in the “search for it” category. A few years back, I picked up this little mobile tool cart at a Carlisle event. At some of you might know I’ve spent a lot of time in the restoration of automobiles world. Carlisle is one of the biggest automotive swap meets in the United States and happens to be located at the Carlisle Fairgrounds in Carlisle Pennsylvania, which fortunately for me, is an easy drive. Since about 1976 I have been making at least an annual trek to one of the events held in the summer months.
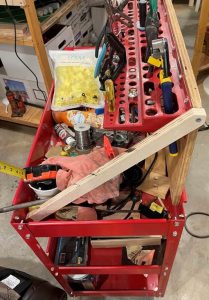
They have specialty events like all GM, all Ford, Mopar, and then the two big ones, spring and fall. Between Covid and getting older, I’ve missed the last two years or so, but it’s on my early New Year’s resolutions for 2022 list to get back. But, once again, I digress. I also have not been doing as much automotive work so this cart found a home in the basement. And I’m sure like many of you, I found that tools were just piling up in the different levels. One tool on top of another on top of another. One Saturday this past summer my wife and I were checking out yard sales and I ran across this plastic tool rack which I negotiated for a dollar! A few weeks back I decided that the perfect place for this was on this tool cart. I found a piece of plywood that was just a few inches oversize. A quick trip to the table saw solved that problem. Here’s my plug for safety: always use a guard on your table saw. I then drilled a couple of holes and put in some self tapping hex head screws to attach the plywood to the tool cart. A couple more screws put the tool rack on the top of the plywood which was cut to a height allowing the top of the tools to still fit under my bench work. As I loaded more tools into the rack, I found I needed a brace. A trip back to the scrap lumber pile and a couple more cuts provided the perfect strength to keep the plywood vertical. In just a few short weeks that I’ve been using this, I have spent a lot less time looking for that pair of pliers to firmly seat the contact in my suitcase connectors, the automated wire strippers I use so often when installing feeder drops etc. etc. etc.
I like this so much that I am on the prowl for another one when the yard sale season starts next spring. As always, I’d love to know what’s on your workbench. Just a page or so of text and a couple of photographs taken with your cell phone and sent to me at pastpresident@oscalekings.org
What’s on the workbench October 2021
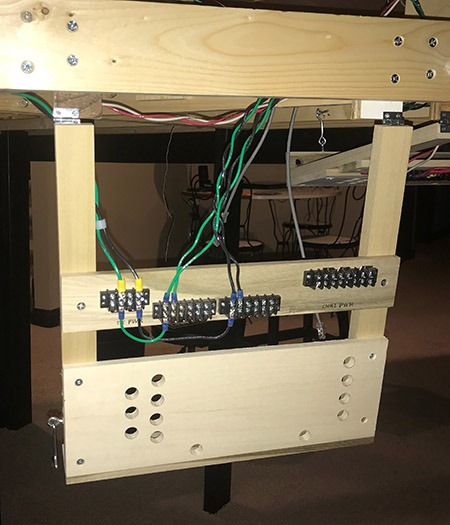
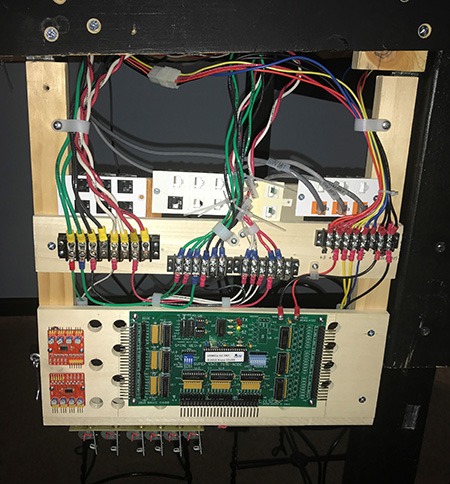
Terminal Boards for the Edge of the Layout
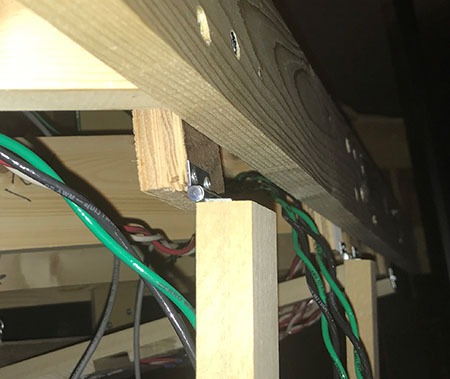
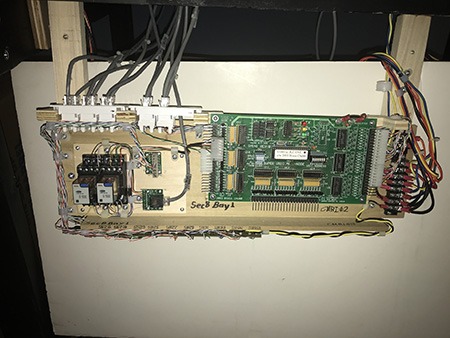
I am rewiring my layout after another move for DCC and CMRI signaling. To minimize the difficulty working under the layout I am building terminal boards and mounting them on the edge of the layout. Hinges make it possible to swing the circuit boards under the layout and hook them up under the layout. For adjustment and troubleshooting the boards can be swung down and even secured in extended position.
These pictures illustrate how the boards are used. Each board has places for electrical terminal blocks, electronic equipment, jacks for connecting layout equipment and plug connections. The plug connections are for track power, signal power, CMRI communications and lighting power. By using plug connections a lot of the terminal board wiring can be done at the workbench instead of at the layout.
After building several of these terminal boards I have a basic standard. I use basswood from the big box stores as it is relatively soft and does not splint when installing small mounting screws for mounting equipment. Here is the list of parts.
Basswood:
1” x 2” x 16” Two legs for the terminal board assembly
1/2” x 6” x 16” Terminal Board electronics and power buses. Drill 5/8” wire holes using a Forstner drill.
1/2” x 3” x 16” Terminal Board for track power and power buses.
1/2” x 3” x 16” Terminal Board at front edge for electronic equipment. Drill with 5/8” Forstner drill.
3/4” x 4” x 3-1/2” Two wood blocks for hinge attachment
Hardware
One pair 1” hinges with removable pins
One hook and eye 2-1/2”
Wood Screws #10 x 1” flat head Phillips 8 per standard terminal board
Hinge Position
Basic Terminal Board
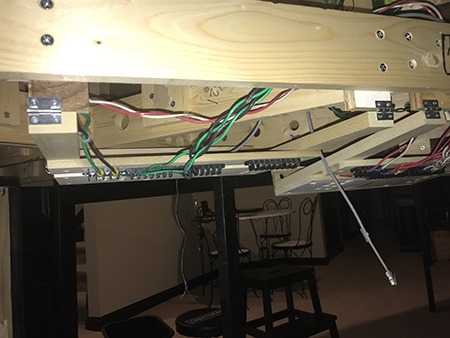
Hooked Under Layout
Hooked under layout
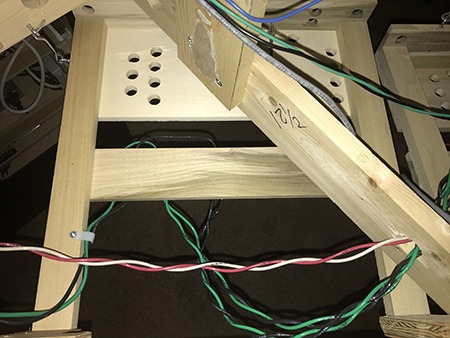
Mounted Edge Equipment
Mounted Equipment
Partially wired

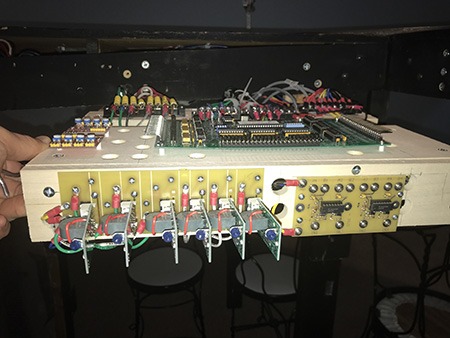
RJ SW Control and Signal Jacks
![]()
What’s on the workbench September 2021
 I don’t know about you, but I’m glad to see September show up. All the years of owning a retail hobby shop made us happy that Labor Day marked the end of the summer season, kids back in school, grass not growing as fast as it did and just generally yes, less yardwork to be done. The beginning of modeling season! So, it’s appropriate that this month is a little bit of front and work on an MTH SD70 M-2. I must admit that I started out with great plans for a steam only O scale 2 rail layout. Over time, that got adjusted to anything with side rods to allow for Denver & Rio Grande number 50. I have found that diesels are somewhat like rabbits. Allowing the first diesel on the layout opened the door to go to “transitional” era, some GP 30s, F unit’s etc. then, an AtlasO SW with sound and DCC was found at a very reasonable price. Somewhere along this path, dead rail snuck in and an SD something or rather became the perfect project. Then a SD 70 MAC cried for a battery (another swap meet find). Then Norfolk Southern did a fleet of Heritage units. And MTH provided my favorite renditions in 2 rail O scale with DCC and sound (proto-3).
Diesels now populate a considerable chunk of my motive power. After the first few days of these Heritage units running around the country, I noticed that it was a rare sighting of more than one on a train and they were mostly backed up with what I call the black horse paint scheme. I realized that I needed one of these paint schemes to help the power chores on my double stack train. Yes, nothing steam era about a double stack train. Still hoping that UP might for some reason use the big boy in some sort of test mode with double stacks behind. I can hope! Maybe not realistically, but I can hope.
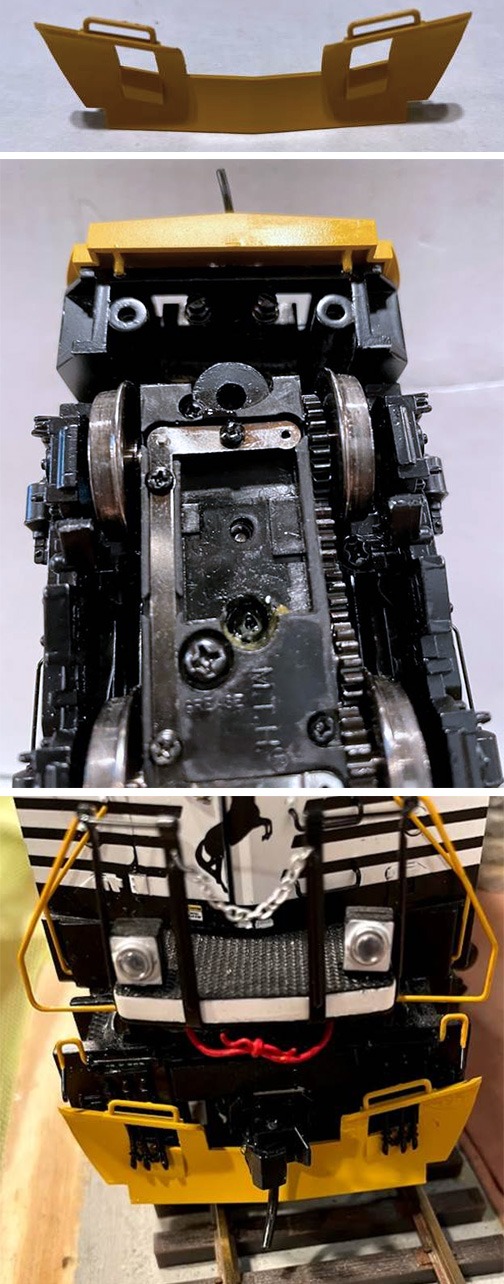
All of this leads up to my project for September’s what’s on the workbench. I have found that, what shall we call it, the generic Norfolk Southern paint scheme from MTH seems to be almost nonexistent in 2 rail O scale. So along comes a posting for an SD 70M-2 that somebody started to convert to 2 rail. I freely admit that I scooped it up as quick as I could. It was not until the unit arrived and I realized there was no snowplow. I searched my normal sources for MTH parts and could not find a factory plow.
I then put out a plea which many of you probably saw and several folks offered several different plows. I ended up sort of trading for an Atlas plow which was very close to the MTH part, at least visually to the other Heritage units I have. I’ve got to mention here that I really appreciate the help, and just the good old boy feel of O scale 2 railers. I traded for the plow a bottle of Floquil finish. Some of you might think that I really got taken with today’s Floquil prices, but I’m here to tell you not so! I am tickled to death to have this plow and the other trader I think was very happy to get a bottle of this finish. I was taught long ago that that is the very definition of a good deal, when both parties feel like they got the better.
But I regress, again, this plow required just a little enlargement of the holes for the air hoses. This was done very carefully with a very sharp X-Acto knife always pointed away from my fingers. I can happily report no blood was spilled. The trick is to go slow and careful and think about where the knife blade might go if something slips. After a couple of test fits, the plow was glued in place with some CA. I have not yet decided if I should remove the to grab irons (which none of the Norfolk Southern units have), but they look so cool! Next step is some black paint and then some weathering of the entire locomotive.
Like always, if you’re tired of seeing what I’m doing, send me what you’re doing! I just need a page or so of text and a couple of pictures. I would be glad to step aside for a month or two or three. Thanks, Bruce pastpresident@oscalekings.org
What’s on the workbench August 2021
So this month I found need for some toggle switch controls for tortoise switch machines. This is a shot of what my preferred panels for switch control look like:
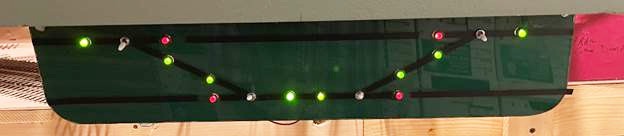
However, I have installed several new switches and have run out of my supply of clear plastic. This is “scrap” I obtain from a local sign shop. It’s about an eighth of an inch thick and clear. I paint one side of it in my railroad’s stock green which is inexpensive craft paint just brushed on what is going to be the back side of the panel. I Mark a simple track plan and drill holes for the actual toggle switches and direction indicator LEDs before painting. After painting, chart tape is used for the actual track layout on the front of the panel.
But until I can obtain more plastic, I wanted to be able to throw these tortoise machines without a 9 V battery in one hand and trying to swap wire leads with the other.
This is my solution.
I I begin by laying out cut lengths of wire, the toggle switch and some heat shrink tubing.
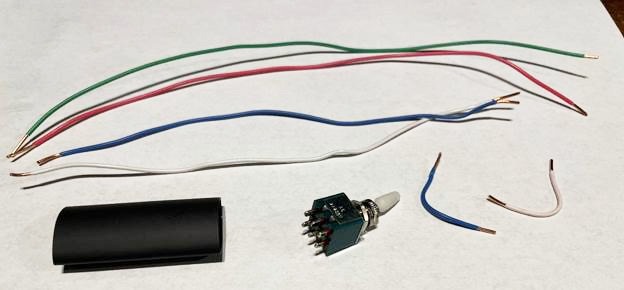
The toggles are miniature double pole double throw which I buy online in quantities of 25. This way I always have a few on hand while waiting for the next batch via slow boat from wherever. This just keeps the price per toggle down. First step is to drill the connectors out so that my wire will go through.
I’m using solid copper scrap thermostat wire from a spool that was left behind on a job site years ago when I was building glass houses for a living. This is a very small increase in the hole diameter and is easily done by hand with the pin vice. Next step is to cut wires to length and strip off the ends of the insulation. As I get older my hands don’t work as well as they used to, I find a good pair of wire strippers that can handle fine wire really helps. I’m sure there’s quite a few of you out there that still use your fingernails, but those days are gone for me, so I recommend investing in a few good tools as noted in this column. I then put the toggle in a small vice and attached the wires.
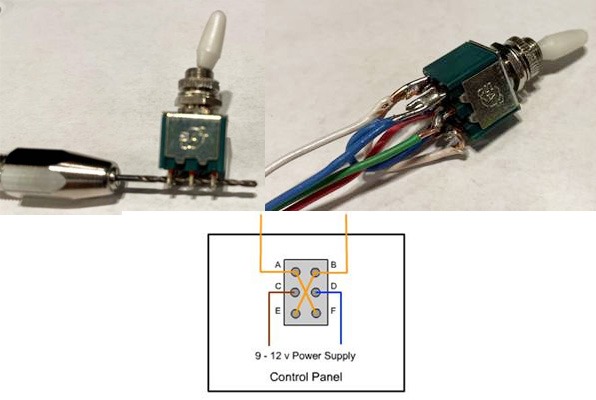
Next is a small, very small amount of liquid flux applied with a brush to the six contacts and solder all six wires in place. Here’s a diagram I found on the web for the toggle wiring.
My next step is probably overkill, but I don’t want to have to go back in and “fix” a problem, so I insert a small piece of shrink tubing between the contacts ( red piece in the picture below ) this just sits between the contacts and is not held in place.
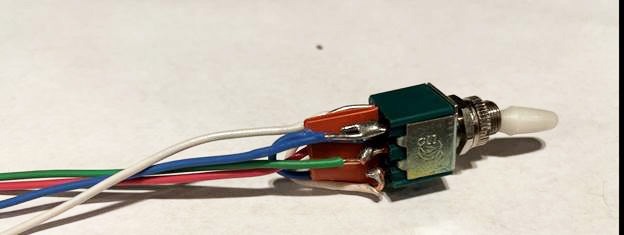
The next step is to put a piece of 5/8 inch shrink tubing over all the contacts and the square portion of the toggle, followed by shrinking with a heat gun.

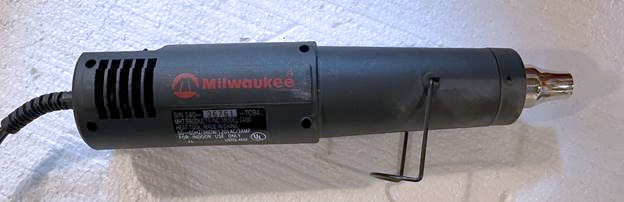
This is tool number 2 that I recommend to you. Yes, there are many sources of heat from flame that will work just fine, but again I find with this small heat gun that I never get the flame to close and ruin the shrink tubing. I bought this many years ago and it has provided great service. Amazon has similar one starting at $11, so I would tell you that this is a good investment and could be used multiple modeling applications like drying paint, glue, creating water effects and I’m sure many more.
As these are intended to be temporary controls, I now use a couple of Wago lever nuts to connect to my power supply which is a 12V bus line that runs throughout the layout room and is used for switch motors and some lighting.
A couple of standard wire nuts are used for contact for connection to the actual tortoise machine. I also use a self-tapping screw with a wire clamp to attach the toggle to the bench work.
This has allowed me to enjoy running trains without spending the time to create a finished control panel. You might notice that I have soldered the leads to the tortoise switch machine. This is based on experience of having push on connectors constantly work their way loose and fall off the tortoise.
The unused wires will be for powering the frog and LED indicators.
Would love to hear about what’s on your workbench, please send me a page or two of text with a couple of pictures to pastpresident@oscalekings.org. Thanks, Bruce
What’s on the workbench July 2021
 What’s on the workbench? Too much, way too much!
I suppose I am like many of you, I start a project and then find that I need this or that and then I kinda shove it off to the side and then forget to order this or that. This bad habit has created a terrible situation on my workbench. I have too many projects going at once. So, I’ve done two things to fix this.
Number one: I picked up a few of the needed parts at the O scale national convention in Denver a couple weeks back (is that even possible? The convention was a couple weeks ago?) And I have ordered the other items I needed. (Of course, most are unavailable or on back order or blah blah blah)
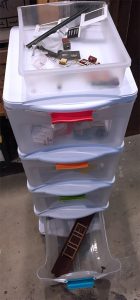
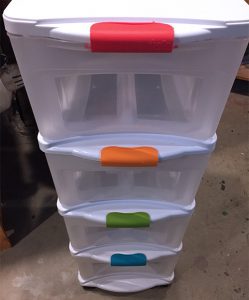
2: I picked up this plastic drawer file at a yard sale for a couple of bucks. The drawers are just large enough to fit an O scale boxcar or the like. So, as I’m waiting for detail parts for a car, I’ve taken it off the workbench and put it in the drawer. Also picked up a box of detail parts — just odds and ends at the convention and put these in a drawer for future sorting so that I can find them when I might need them. This is a good project for sitting in front of the TV. As you can see the storage box is not the sturdiest and hopefully that will keep me from making it long-term storage. This storage container has allowed me to get several things off the workbench so that I might be able to complete some things and further clean off my workbench.
As always, we would love to see what’s on your workbench! Just need a brief write up and maybe a couple of pictures. Please send to pastpresident@oscalekings.org
What’s on the workbench June 2021
I’m going to switch things up this month ?..
1st: A cry for help
Many years ago, I purchased a 36-inch two rail turntable with a multiple stall roundhouse. This became a massive undertaking. Fortunately for me, and unfortunately for the seller, we agreed delivery was included. The turntable was built into a massive probably 4’ x 4’ plywood box structure. The sellers installed 2 x 4 handles in order to get it into the back of their pickup truck and then into my garage, which were then later used to get the turntable into my basement. And then moved from one portion of the basement to another and then another. The roundhouse is about 10 stalls and came in two pieces.
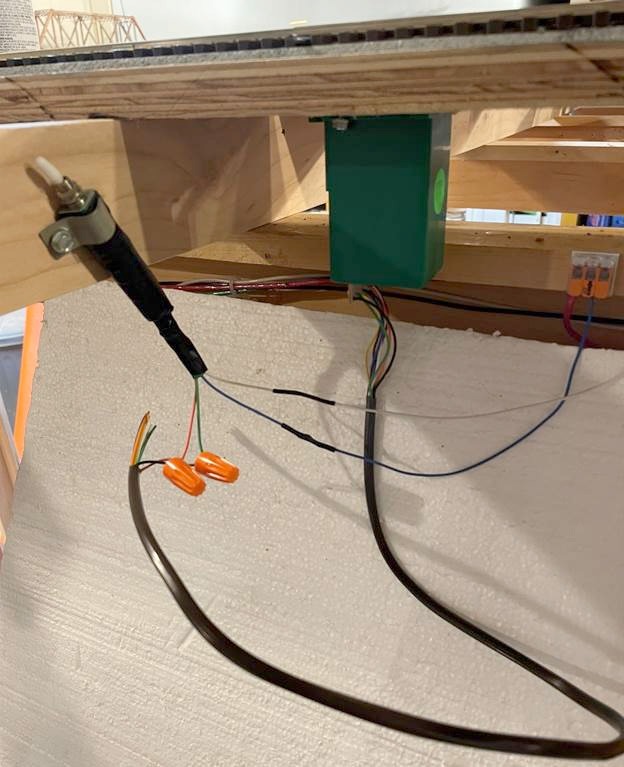
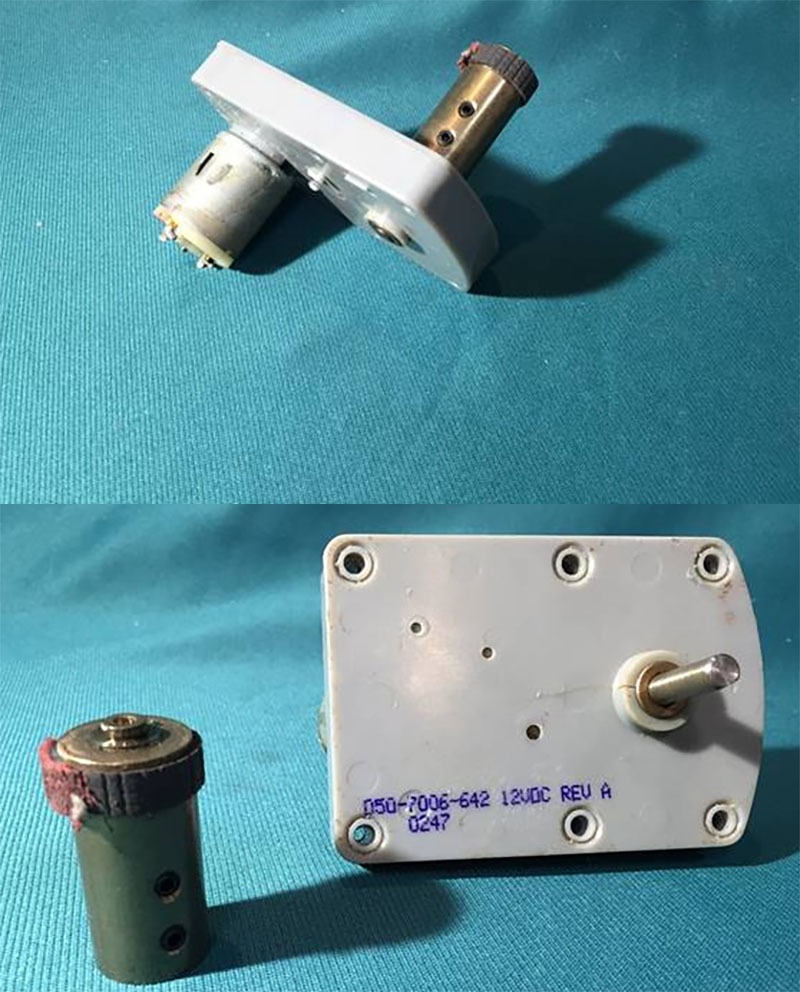 All told, I believe it was 2 pickup truck runs, and one run with a Yukon. I shamefully admit that it has probably been eight years of moving around in the basement trying to get to its final location. I can cheerfully report that the turntable is now screwed into its final location and the temporary support legs have been removed. Now, the help part of this is that I need help with is that the turntable has a gear drive with a 12 volt motor with gears that are sealed in a plastic case. The final drive has what appears to be a rubber belt attached to it which actually rubs up against the under table indexing portion of the structure. Over the years, that drive belt has decayed and now is anything but round resulting in jerky movement and sometimes misalignment of the table. I can find no markings on this gear drive other than 050, 7006, 642 and then 12 VDC REV A and finally, 0247. My Internet search skills are not the strongest, and I’ve been unable to find anything on this. This was originally a set up produced by Model Railroad Custom Bench Work. I had contact with them upon installing my turntable and they were very gracious and helpful by sending me wiring diagrams which really helped, but now I apparently have lost a good phone number and the email address I have is bouncing. If anyone has knowledge on this gear drive, please let me know. pastpresident@oscalekings.org Thanks, Bruce
2nd: an unrequested editorial
I am sitting here on May 31 Memorial Day. Thank you, thank you, thank you to all those who made the ultimate sacrifice for this country. Especially inclusive of all the Families, Moms, Dads, Brothers, Sisters, Husbands, and Wives that sent their Sons and Daughters, loved ones off to any of the many conflicts this country has been engaged in to have love ones not return. I fortunately, I guess was too young for Vietnam and too old for anything after Vietnam. Still, the sacrifice all veterans have made allow me to be able to sit here and talk about playing with trains in 2021. So thank you! Part of the gratitude that I have for all veterans is that I have the ability to attend a National O Scale 2 Rail Convention. Time is drawing very short. The convention runs June 17th 18th 19th. Yes, we are 17 days away from our National O scale 2 Rail Convention. Covid canceled us last year. Bob and his committee have been working extremely hard and have planned what looks like to be an absolute homerun of a convention. I plead with each of you to support this effort by attending. If you’re not planning on attending, and there’s any way that you can shake loose and change your plans and get to Denver, I know you will be well rewarded. As most of you, if not all, know there is a big financial risk and putting on a convention like this. Covid has really thrown a wrench into that with all the unknowns. The good news is Colorado has lifted their mask mandates and this is going to be a fantastic opportunity to get together like we used to. I know some don’t agree with me, but I feel that having a National O Scale 2 Rail Convention is essential in keeping the scale alive. I’m not preaching doom and gloom here, but the reality is a 2022 convention will be very difficult to pull off if 2021 fails because of lack of attendance. I honestly think we are in some of the best of times for O scale two rail modelers. Still, I miss seeing you 2 railers and conversing with you in some other fashion then Zoom. The crux of my editorial is simply GET TO THE CONVENTION. Here are a couple of links to get you to the information you might need:https://oscalenational.com/
https://www.youtube.com/watch?v=7WFHwyXd4ys
Thanks, Bruce
BTW, I’m still looking for articles a page or two long with just a couple of pictures of what’s on your workbench.
What’s on the workbench May 2021
Hey fellow O scale 2 railers! Well another month has snuck up on me! It’s true: time does fly when you’re having fun. And Model Railroading is FUN !!!!
This month I want to share with you a tip that was passed on to me from a fellow model railroader. I’m sure like many of you, I’ve used terminal strips over the years of the Old Screw type contacts, because, let’s face it, sometimes we just have to undo things that we have done. Using the screw type terminal strips enabled removal for change, troubleshooting, and corrections. But I always honestly felt that it was troublesome and labor-intensive. I have been introduced to these Wago lever type connectors. These things are cool! Not really expensive, and available in multiple formats. They allow for different wire sizes to be connected together.
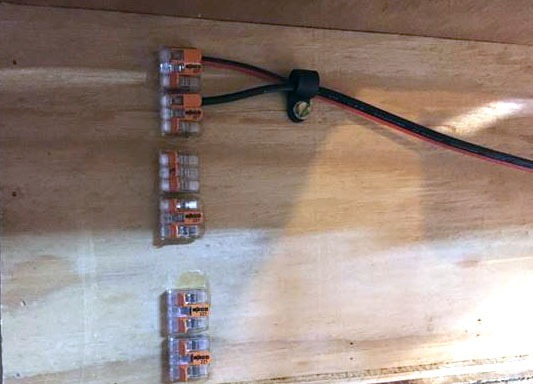
Connectors under Turn Table
I have tried these in a couple of different applications and do not think I will go back to any other type of connector. The best part of these to me, is the ability to lift the lever and remove a wire, and then make a change, do troubleshooting, reinsert the wire and lock it back in place with the lever. No tools needed. Below is a shot of a terminal strip I made under my turntable with several of these connectors and some five-minute epoxy. I thought about just using a piece of double-sided tape but unfortunately my supply drawer was empty. Also below is a shot of one of the boxes I bought off of Amazon when I had a prime membership. I have found prime memberships to be very dangerous to this model railroader and so have let mine lapse, but that’s a story for another day.
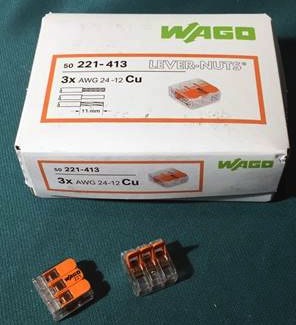
A box of three position connectors
Another thing I like about these, most common screw type terminal strips are straight across connections, but I always seem to need 2, 3, 4 junctions. Which always meant finding the jumper terminals or making some with a piece of copper wire. These are available in that format.
I recommend you pick up a box and see if they will ease your wiring as they have done mine.
I would like to challenge all of you to set a goal to send me something on your workbench for the month of June. I am sure I am not the only guy out there doing anything on his model railroad amongst the membership of the O scale Central / O scale two railers.
All we need is a page or so of text and a picture or 2. I used my cell phone to take these pictures, so they do not have to be professional grade. If nobody sends me anything for next month, you’ll get another dose of what’s going on the Maryland & Black Diamond railroad.
Thanks, Bruce
pastpresident@oscalekings.org
What’s on the workbench April 2021
It is April Fools’ Day! I am not sure if the joke is on me or on you, but nobody has submitted anything for this column, so you are stuck with me again. This feature is not supposed to be a monthly report on what Bruce B. Blackwood is doing. It is not intended to be a professional author grade article, nor professional grade photos. Just a page or two of text and one or two snapshots. These pictures can even be taken with your cell phone. Heck, if you are like me, your cell phone probably has more resolution than your old digital camera. I believe that when we share projects we are working on, there may be enough of a spark to get someone working on their own project. It may also be the someone can glean just a tidbit of knowledge from your project to overcome a challenge on their project. Please review what you have been working on/what’s on your workbench and send me a short writeup to pastpresident@Oscalekings.org.
One of the things that I miss most during this pandemic is visiting other’s layouts, and not just O scale two rail, although they take priority. I generally have three takeaways from these visits.
Number one: What perfection! How do I get there on my layout?
Number two: Things I really liked. How do I incorporate that on my layout?
Number three: Things I really did not like. How do I avoid that on my layout? Now this is not meant as a negative, but I do try to be honest enough with myself to admit that there are some things I do not want to spend time effort and money to model. In fact, one of things I like most about model railroading is the many different facets of the hobby and that there is always something of value to learn. I believe all knowledge learned in model railroading can help you in life. Quick little story — shortened for this article. For many years, my wife and I owned a model train hobby shop, and naturally with my mechanical background, offered repairs. I cannot tell you how many Lionel diesel horns I have repaired over the years. For many reasons, which the largest was cost of health insurance for two adults that just seemed to get older every year and with four kids, we decided to close the shop and find full-time employment for me. I applied to the DC Metro system as an electrician on the rail cars. As part of a hands-on test, a few components were supplied. Using these components, the applicants were to breadboard up a buzzer. Well, the buzzer was an old Lionel like Horn! It was like somebody had an old F unit they had taken apart. I put that circuit together so fast and had the horn blowing that I almost did not trust myself to have completed this correctly.
Back in January, I set some goals for myself including finishing some projects on my workbench. Having completed several of those projects, I found myself worked into a corner so to speak, and that required revisiting a bigger project of layout expansion. Thus, my workbench has been pretty much untouched during the month of March. But during the month of March, I did build and install a test/programming/dedicated track. I still think I am very much a beginner in JMRI/decoder Pro, but feel that I have learned that QSI decoders found in many of my Atlas and Sunset engines do not play well with Decoder Pro. Honestly, because of the amount of time, effort, and expense I have put into my programming desk with a dedicated laptop and programming track, I am somewhat fearful of adding a QSI programming device. The answer seemed to me to be a separate programming/test track for these QSI decoders.
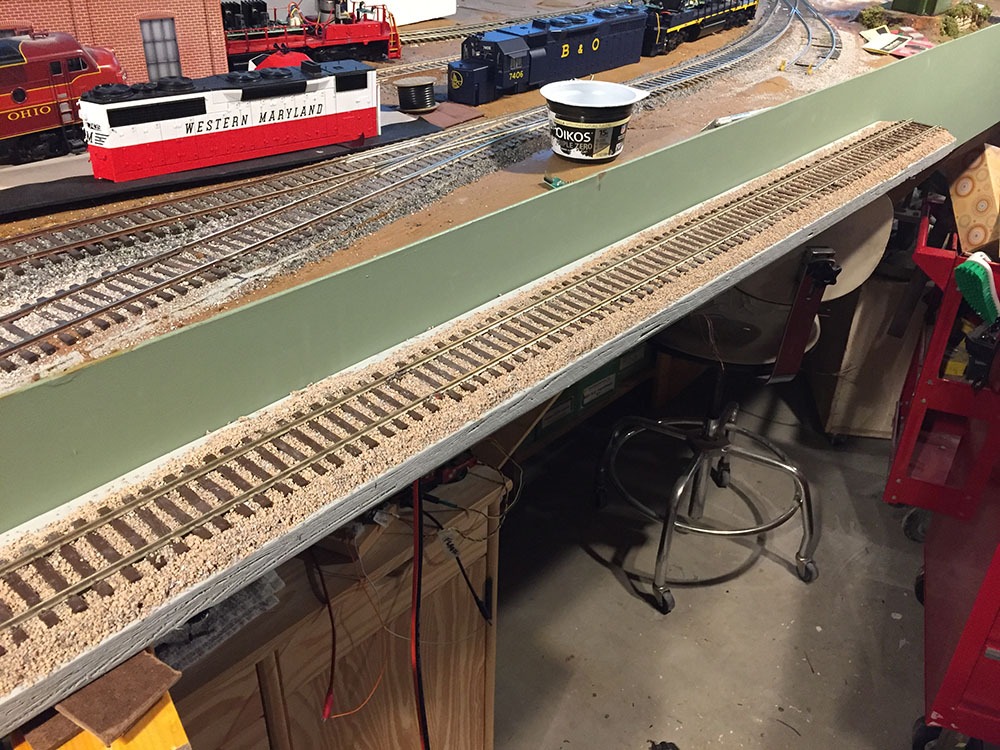
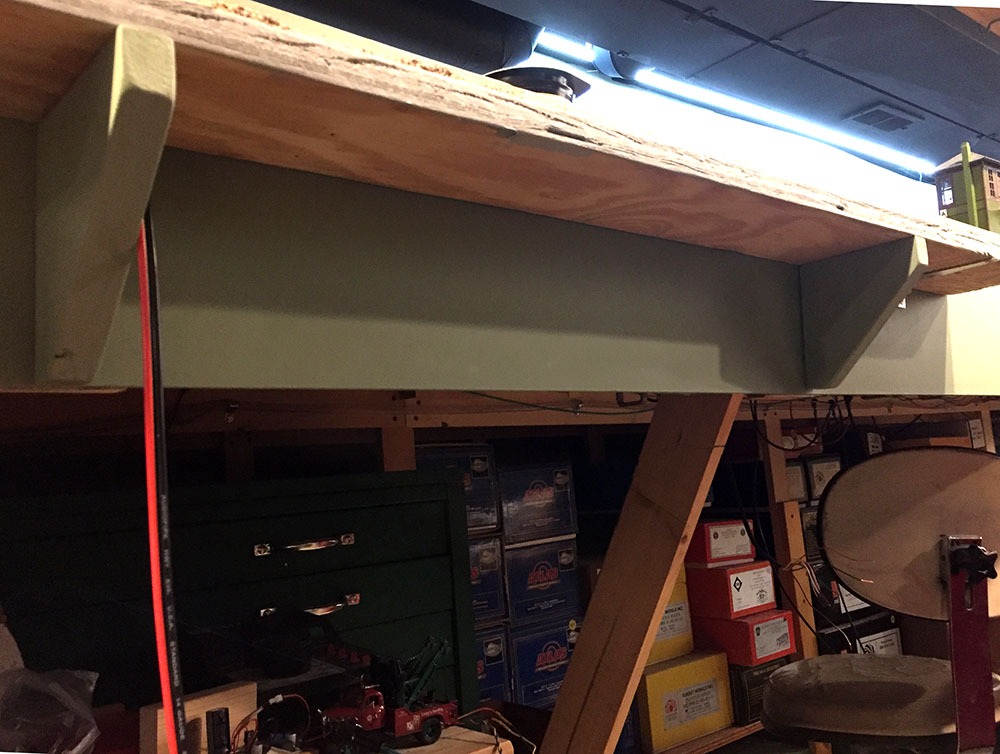
The project involved cutting a piece of plywood, installing two hinges, and mounting this to my railroad’s fascia. I also built two supports using dowels to align everything when the track was in the upright position. Since this is on my railroad’s fascia, I determined that I needed to ballast the track. After soldering a pair of feeder wires to the rail, some of my “siding mix” ballast was glued in place. Some of you of all ready see a problem with this I have not installed any type of device that will stop the Locomotive from running off the ends of this track. This could lead to a major disaster! Not only can operator error lead to a locomotive hitting the floor, but often you will get locomotive creep when programming as a form of acknowledgment that the CV was changed. You say that could never happen. I beg to differ. On my permanent programming track, I learned from experience that locomotives will creep and followed the advice from those wiser than I and cut a dead section between programming track and layout track. I look forward to wiring up this section with the QSI programmer and learning how to tweak the decoders in a few more my locomotives. Thanks, Bruce.
What’s on the workbench March 2021
I’m back!!! I’m just going to start out by begging for submissions for this column. I know I’m not the only person that has something on an OS2R (O Scale 2 Rail) workbench amongst our membership. This is not intended to be my column. It is also not intended to be a high-quality / super professional layout. We need about a page of text along with a picture or two. Articles that would be especially helpful are those with some sort of tip to show and pass along. Please send your submissions to me at pastpresident@oscalekings.org. I’m going to show and tell about a cost saving and fun to learn electronic project. If you’re into DCC, you understand the need for a keep alive to deal with dirty track and momentary loss of power. I am just really in the throes of installing motor control decoders and sound decoders in my locomotives. First couple of my installs were without a keep alive and thus problems presented themselves, especially in the hard to reach and clean track areas. I bought a couple of keep a lives and was adding the cost to my installs when I came across a YouTube video on how to build your own keep a lives.
( https://www.youtube.com/watch?v=bhK4HuJb6Ws )

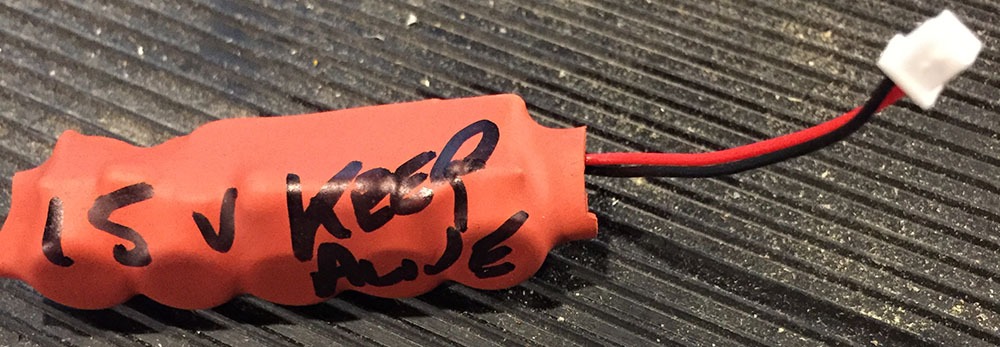 Following the instructions given in a well done video, I ordered up some parts and started building my own. You need a few tools and some real basic soldering skills, then you can save yourself enough money that it’s worthwhile. I also learned a few things along the way. Again, please send me your write ups of what’s on your on your workbench. Thanks, Bruce
What’s on the workbench February 2021
Hey gang, just like that another month has slipped by us. I hope you all are well. I try to take the 1st of February to review some of the New Year’s resolutions/goals I set a month ago. I hope you do the same, especially with the goals you set toward your model railroad; whether that be a layout, adding something new to your collection ( the hunt is on! ) and probably most importantly, learning a new skill set or improving upon one that you may have been struggling with. One of the things I was working on during January proved that to absolutely be the case for me. I’ve been working on adding sound and DCC to a few of my locomotives / finishing some of these projects that have been on the back burner for quite some time. Last couple of weeks has been filled with chasing gremlins! I guess it’s model railroader’s law as I had a couple of friends/customers stop by. Now don’t get your tracks in a knot, we practiced social distancing as much as possible and always wore masks, and none of us had felt sick or thought we had been exposed to Covid. This was about a week ago, and nobody is reporting ill effects. Anyway, I had run a train around the layout making five loops the night before without a problem, and of course, as soon as I got the train moving that morning, a car that has never derailed, derailed in spot that I do not have issues with derailments. As I was trying to complete a power on board conversion this month past, I ran into a partially broken wire at a connector that was intermittently making contact. Yes, it was the electrician’s worse problem, an intermittent one. After I found that and fixed it, a section of my layout went dead for no apparent reason, fortunately, I “think” I have some troubleshooting skills and it didn’t take terribly long to find that a quick disconnect had disconnected when I had pushed a box back on the shelf. That wire will be to the attached to the bottom of the bench work so it’s not just hanging. Once I got things to a normal state, the learning began. But that’s best left for another day’s discussion.
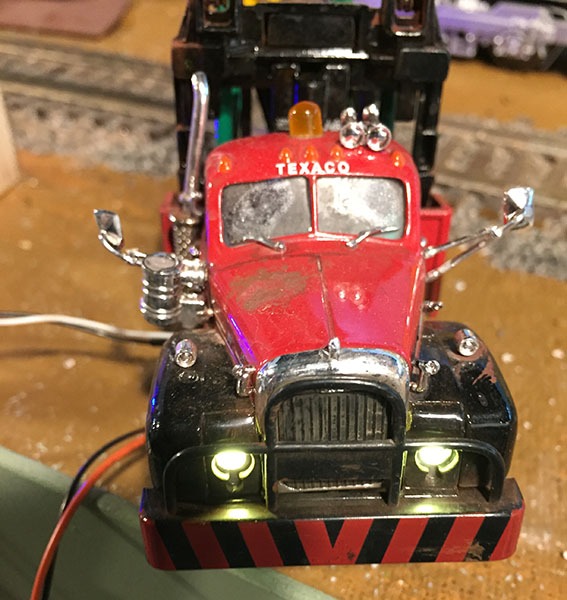
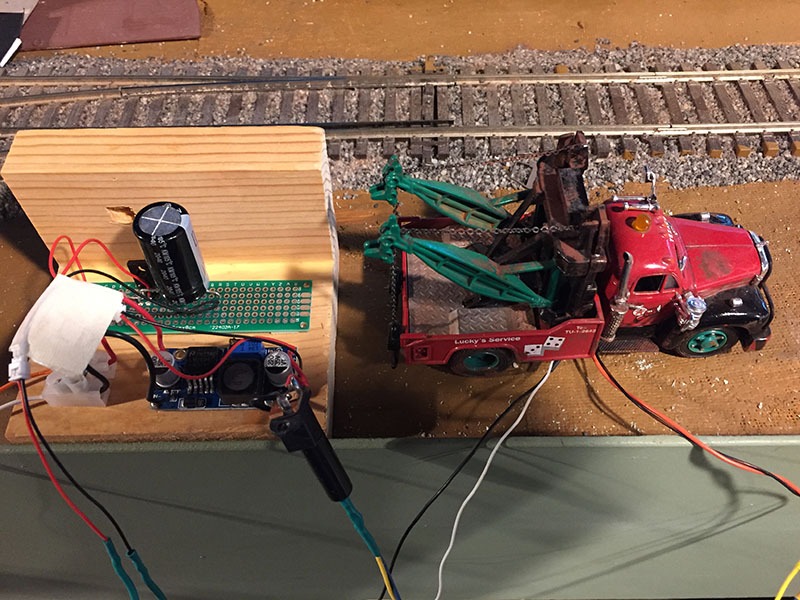
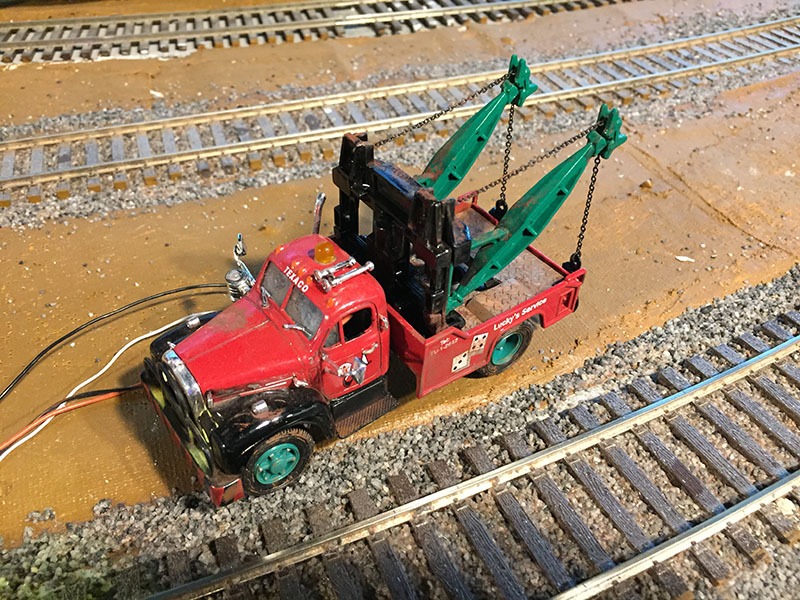
For this month’s “What’s on Your Workbench”, I want to share with you a little side project I did to take a break from chasing some of the frustrating gremlins. I found a Corgi 1:50 a scale recovery Wrecker and decided that it was just crying for some additional work. So, I set about disassembling it by removing a few screws and then drilled out the headlights and installed a pair of LEDs. I think it was about this point, as I was starting to weather the interior, that I fell into the rabbit hole. The model came with a plastic casting of a beacon. It was nice, but I felt it needed more. So out it came, and a flashing orange LED was ordered. I will best describe this as being nowhere near a flashing orange LED. So back to Amazon they went. A better 3 mm amber color LED was ordered. A search on the old Internet and a simple circuit to create a flashing LED was found.
Once this was built, the model was weathered and reassembled with mini plugs so that I can drill a hole in the layout when I find that perfect spot and plug it into the flasher circuit and its little power supply circuit that will run off of my accessory lighting bus. This was a rather quick/easy project, but one that was a nice break from other things. I hope you’ll share what’s on your workbench for next month and beyond. We are looking for about a page of text and maybe a couple of photos. Please send them to me at pastpresident@oscalekings.org Thanks, Bruce
What’s on the workbench February 2021
Our new president, David Vaughn, has asked me to continue soliciting/writing the what’s on your workbench column. The since it’s 3rd of January and I have no one else in line, you’ll have to suffer through another one of mine.
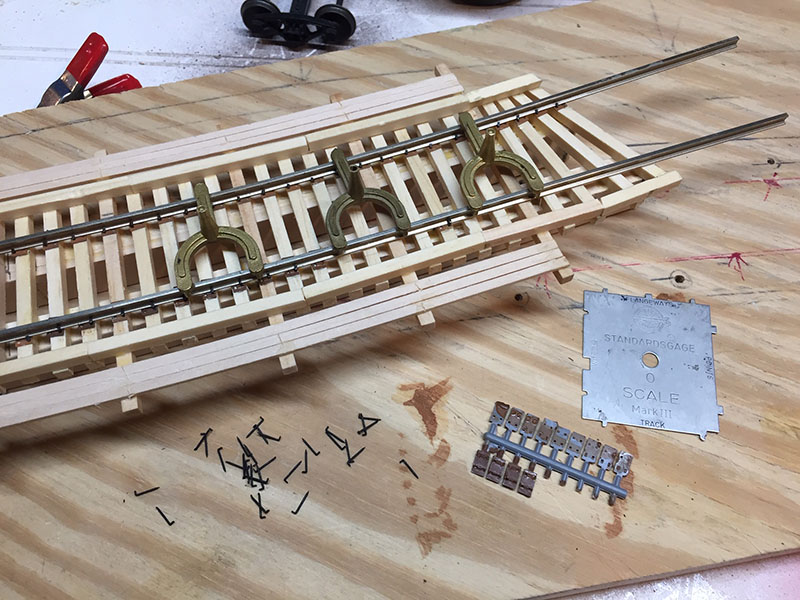
So, a few months back I challenged you to set some goals and lead out with four of my own. One of those goals was to finish a bridge for my Highline. Well I failed. Now I could give you a bunch of excuses about parts not arriving thanks to the USPS mail slow down, (Just for grins, a pair of headlight castings left Gettysburg PA on December 10 headed to Mount Airy Maryland which is probably 35-40 miles away, the headlight castings arrived January 3, 2021. Seems that for the $3.80 postage charge from the USPS entitled my headlight castings for a trip to North Carolina via Baltimore. Now Baltimore is only about 25 miles from my house. The return leg from North Carolina went through Hyattsville Maryland which again is 30-35 miles away but south of me instead of North. My headlight castings apparently spent a week and a half sitting in Hyattsville. ) or that kids came home for Christmas break and family always trumps model railroading, or that a procrastinator like me met new shopping challenges with Corvid. But those are all just that, excuses. Like most of my model railroading projects, building this bridge caught me quite a few lessons. I’m sure some of you of have experienced the difficulty of getting a small piece of metal to go through a carpenter’s glue joint. I have a new respect for those of you who choose to hand lay al of your track. When I was looking at putting in several hundred tie plates and two spikes per plate, the task seemed overwhelming.
One of the great things about model railroading (especially OS2R) is that many of you are willing to share your knowledge freely, and one of the Gettysburg 5 helped me with spike selection and then it just became monotonous and not frustrating. I was bending to 3 out of 4 spikes due to using the long wrong length. I’m happy to report that all the tie plates are in and spiked so I can move on to the next phase of this project, but I digress, what this month’s column is really about is making a temporary workbench. My workshop bench is buried in projects. And honestly in the interest of time, I just was not willing to spend the hours it would take to clean it off and put everything away on these other projects that I was waiting for parts to arrive …
But there I go digressing again, so as I was without a workbench that would handle the length of this bridge, I noticed I had a piece of plywood sitting on a pair sawhorses that was basically a temporary place to pile other projects. I convinced myself to take the time to put those projects away and proceeded work on my bridge. I soon found that to see the small spikes I needed a floodlight, so I set up a tripod with an LED lamp so it would not get to warm. This was great but I was constantly leaning over the bridge to get to the other side of the rail and couldn’t see anything. Well it just happened that someplace (may have been Wally world) had a sale on 4 foot LED lamp assemblies instead of the 4 foot fluorescent tubes.
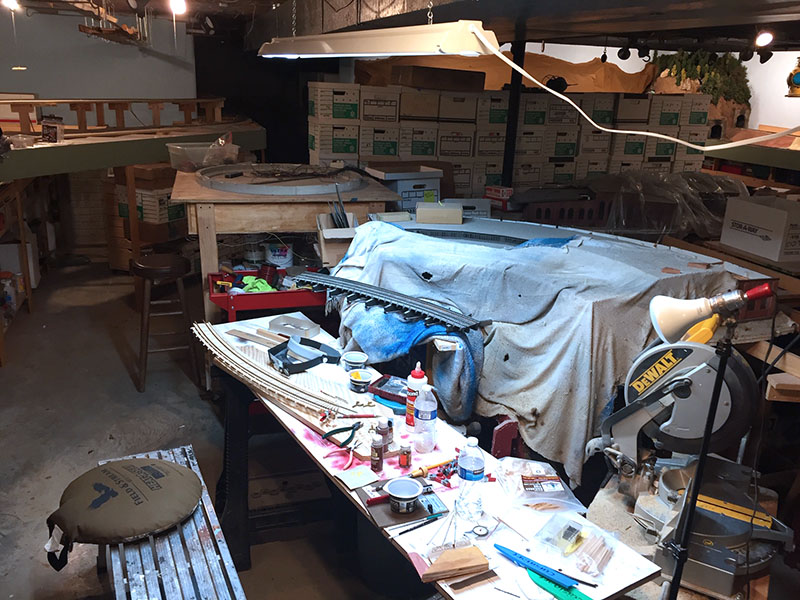
These fixtures came wired with a plug ready to go, so I installed the included eye hooks and hung it over top of my temporary workbench with the supplied chain. It is amazing how much light a couple strips of LEDs can put out. This really helped me finish spiking the rail to the ties. I like it so much that I’m not sure this is going to be a real temporary fixture in the basement. I believe I paid 10 bucks these LED light fixtures. May I suggest that you might think about obtaining one for a temporary workbench of your own.
So, I am again looking for folks who would like to share with us what is on your workbench. Doesn’t need to be long and elaborate, maybe a page or two and a couple of quick photos. Would love to hear from you. Send to pastpresident@OscaleCentral.org
Thanks, Bruce
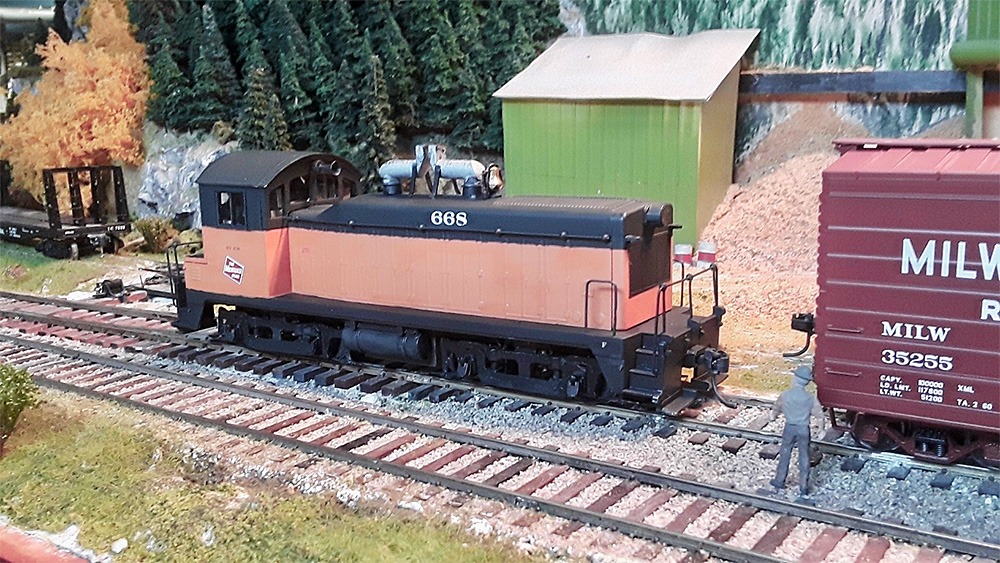
Milwaukee NW2 Project Finished
By Rich Randall
I painted it and installed a Tsunami 2 sound decoder, speaker, TCS KA-2 keep-alive, partial cab interior, glazing, spark arrestors, and crew. It still needs weathering. Happily, it runs very well. (See a few projects below is for the beginning of this project)
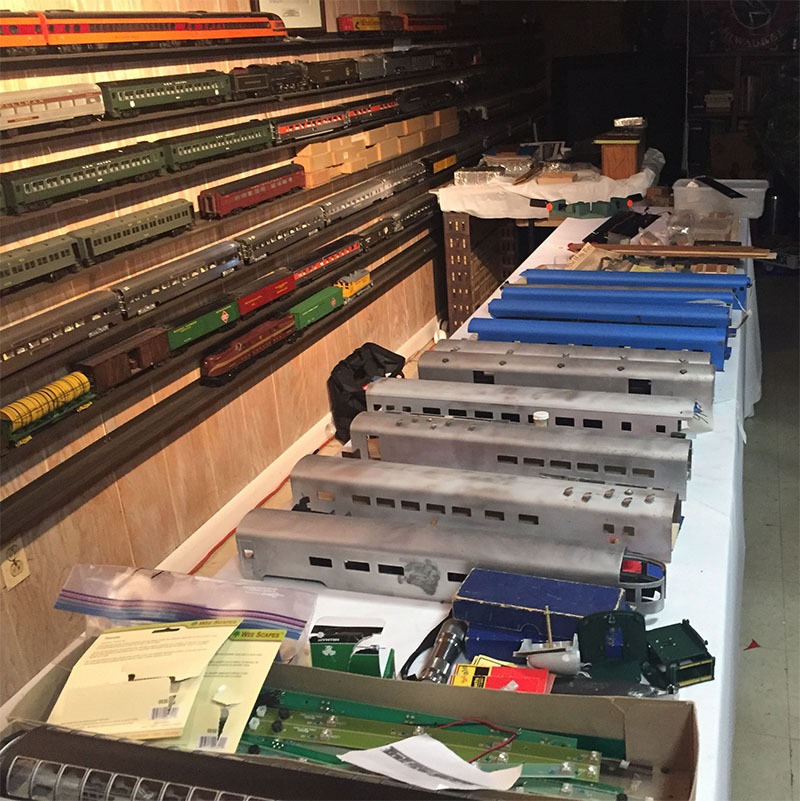
The American Orient Express
Bob Lavezzi
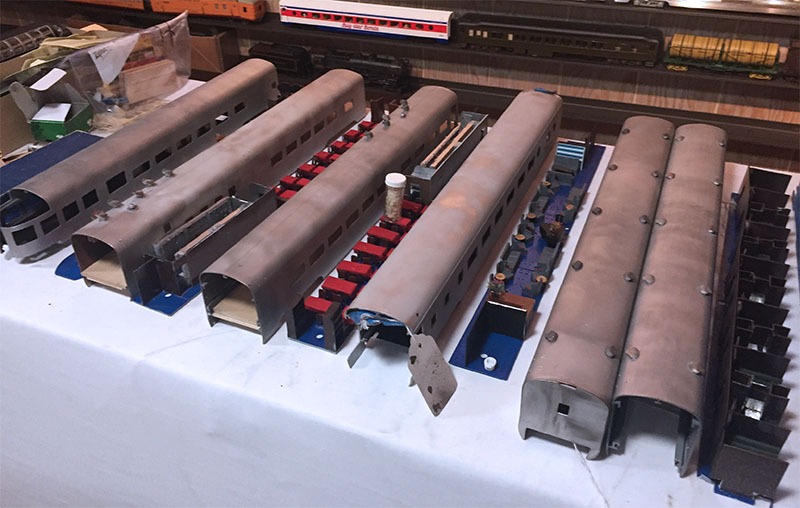
A long-term project for me, with my wife Karen’s encouragement, is an 18 car train, the American Orient Express, on which we took 5 trips throughout the US and Canada. I started accumulating cars from some rejects from K-Line, but the majority of my cars are Boxcar Ken passenger cars in which the windows were not cut out. The correct window configurations were put on these cars by OK Streamline.
I wanted to do these cars right, which meant full interiors in the observation car, the club car – with its grand piano, & the 2 dining cars, which were placed back-to back on the consist, where my wife enjoyed the opulence of the past (which got her on these trips) – being served 5-star gourmet meals and wines with white glove service.
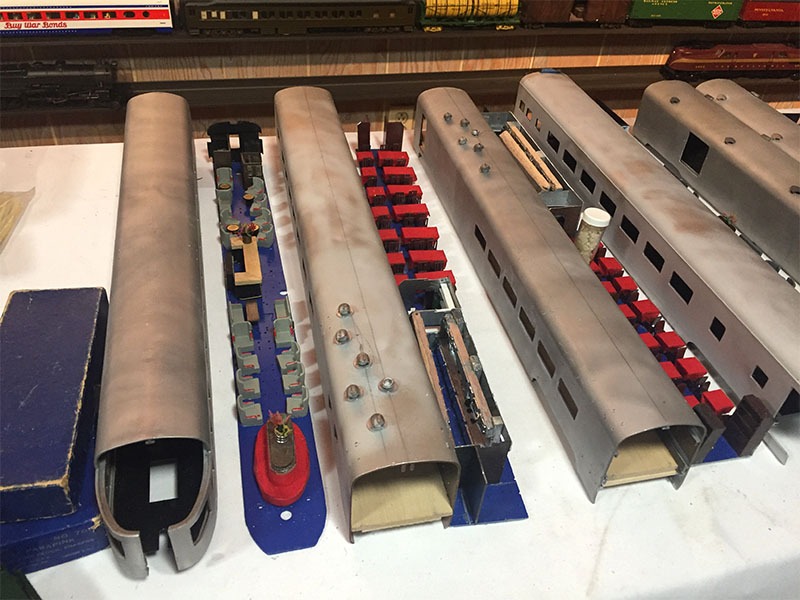
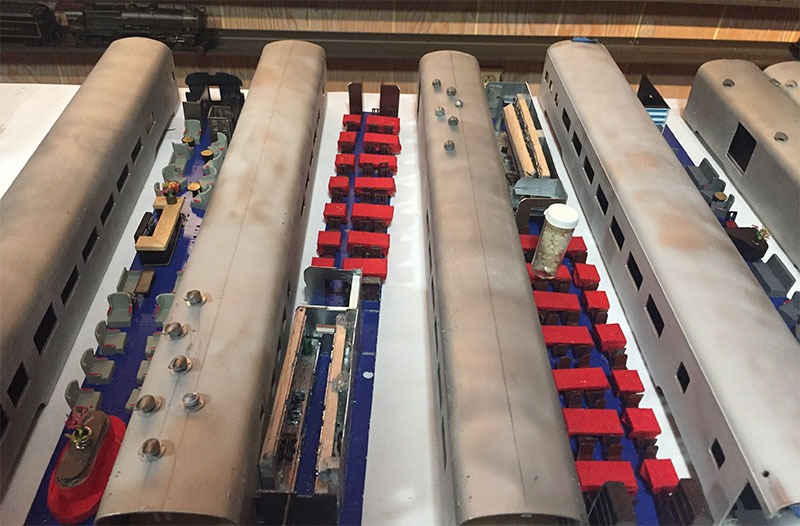
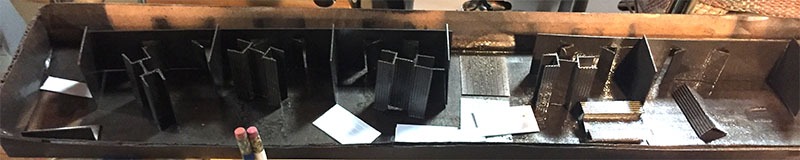
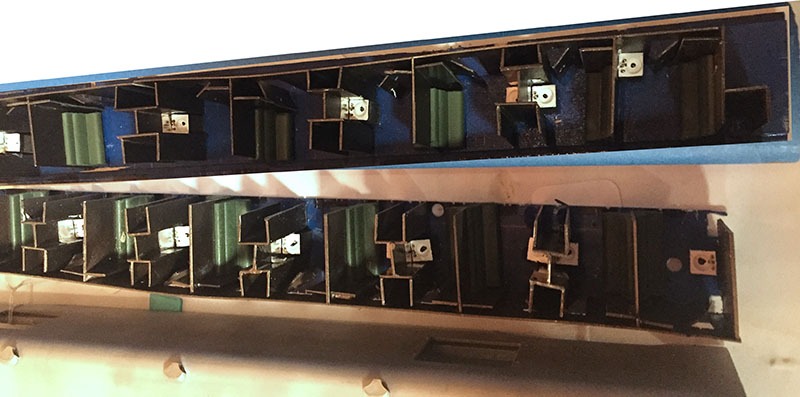
Next came the sleeping cars. This was a challenge… trying to recall all the different configurations of these cars from Presidential Suites to regular Pullman compartments. I am still working on these interiors. At most times, there were 158 passengers sleeping on this train, plus the crew, with a porter for each individual sleeping car, who brought us whatever we needed to start the day, and kept us supplied throughout, with whatever we needed.
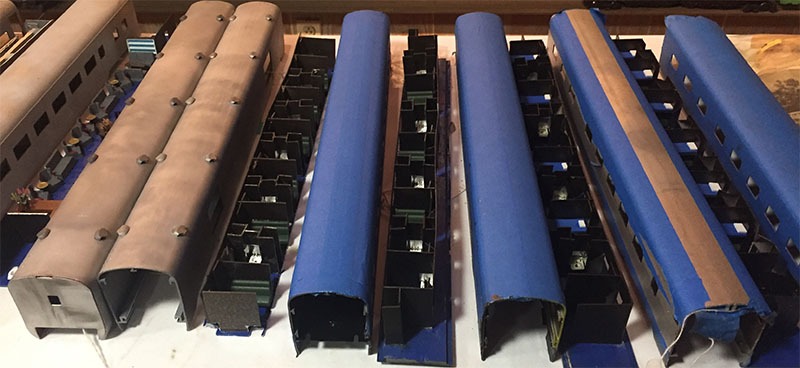
My next project will be the Superdome, where Karen & I spent many romantic nights watching the stars go by throughout the US and Canada. Then will come the crew cars, and of course, the baggage cars.
Pulling this consist will be 2 Genesis locomotives. More to come…
GEARS
John Wubbel
Back in the day, that is before the Internet, it may have been challenging to quickly find information on a topic. Case in point, I wanted to learn about gears, how they work, how to calculate the engineering aspects around speed, rpm, torque etc. It just so happens on my work bench I was playing around with a gear box design that probably came from the model race car guys to adapt it for powering a locomotive.

So wouldn’t you know it, I found the files to 3D Print the basic parts. In fact, I thought I could improvement upon it. The lure to this design was to provision the motor higher up I the engine body while the drive shaft could align and power the trucks out both ends of the box.
With lightening speed I jumped across the Internet to https://sciencing.com/how-7602582-calculate-rack-pinion.html to read about gears, reduction ratio calculations and counting teeth. The size of the gear box was just about perfect for O Scale. To improve the gear box, I wanted to use a Pittman motor and perhaps use ball bearing on pinion and main shaft. For now as proof of concept, I settled for cutting some brass tubing and printed the pillow blocks to get to a run time test faster.
The parts in the photos below illustrate the CAD model above.
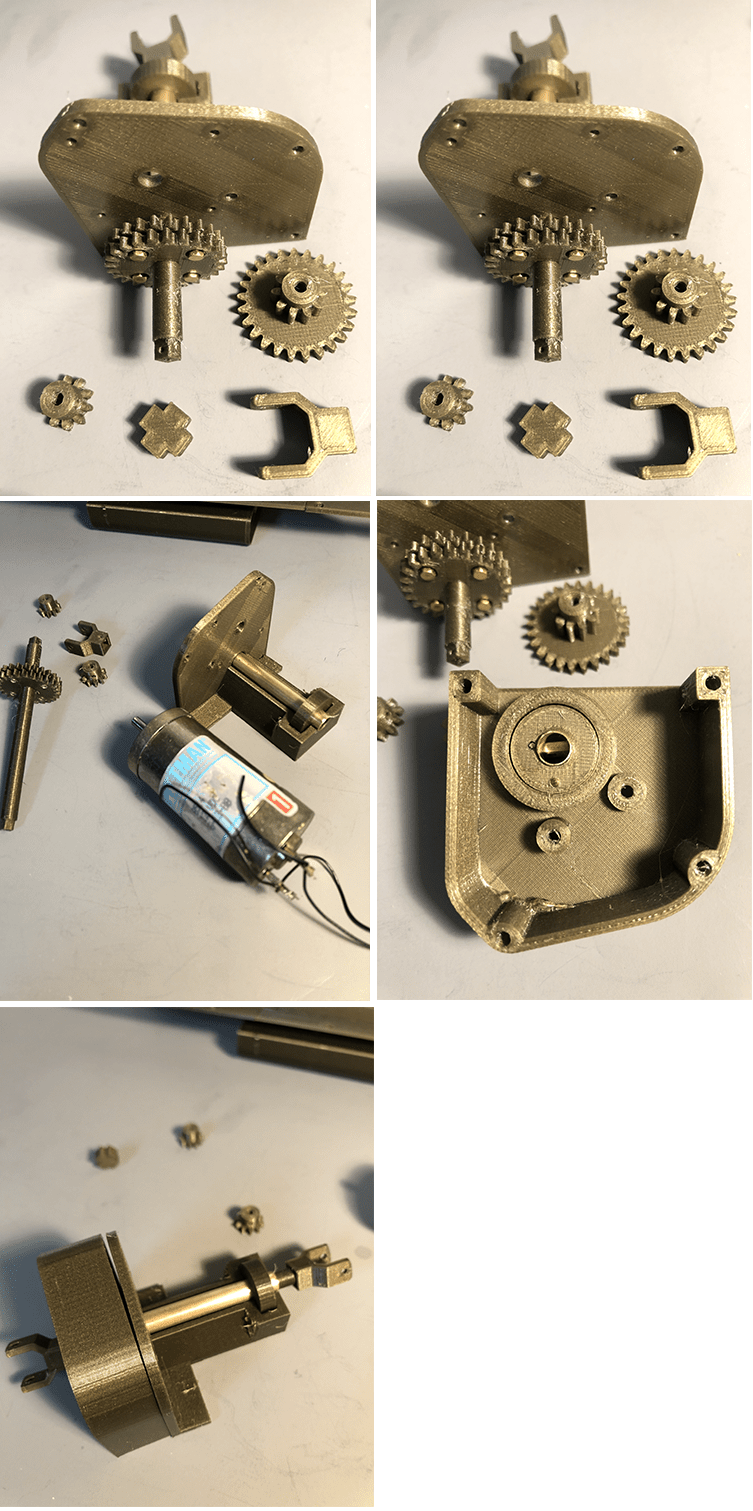
If installed on a race car the rpm would be very high given the type motor used. For a switch engine application I would want the gear ratio to be able to drive the engine at slow speeds. Additional work needs to be done and bench or stress test this before using it in a locomotive. Files for the gear box are located at: https://www.thingiverse.com/thing:2301751
And that is what is on my work bench today.
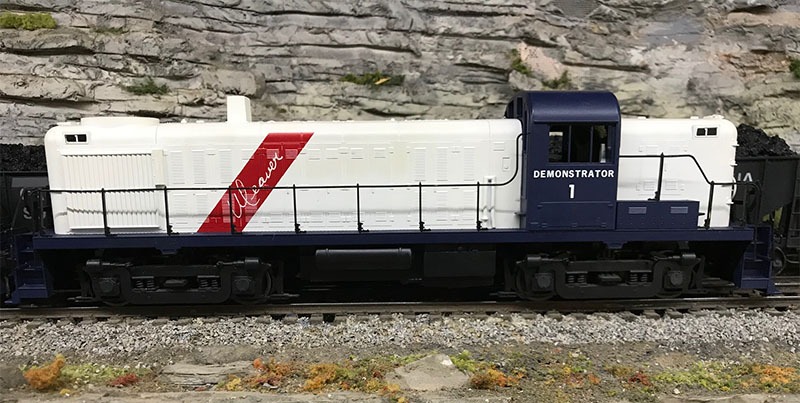
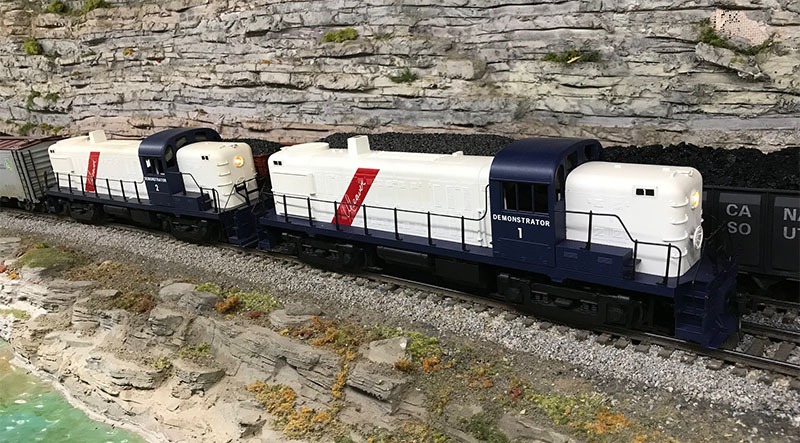
WEAVER RS-3 DEMONSTRATORS
David Vaughn
What is on my workbench now is a look backward and a look forward: I have two Weaver RS-3 “Demonstrators.” When Weaver launched its RS-3 model, the Company used its very accomplished screen painters to prepare two in demonstrator paint and numbered them 1 and 2. The practice mimicked prototype manufacturers publicizing new models by sending them on barn-storming tours. I don’t know if Weaver actually sent the demonstrators around to clubs or conventions, but it did use the units in advertising.
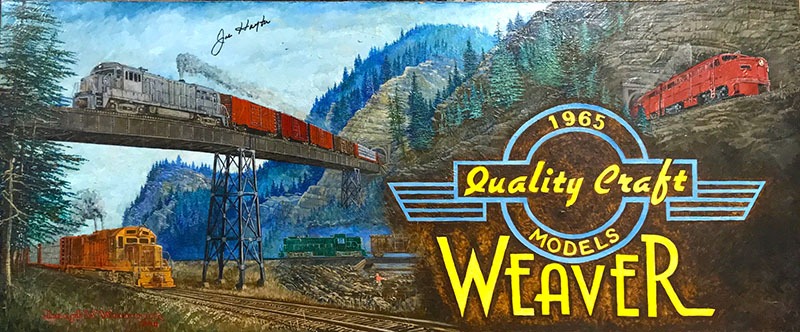 I don’t know how many RS-3s Weaver sold over the years, but it has to have been a large number. After Weaver closed its doors in 2017, Bob Lavezzi and I purchased a lot of the pieces and parts, including the spare parts for brass locomotives. Among the other pieces I picked up was one of the two RS-3 Demonstrators, which was on display in Weaver owner Joe Hayter’s office. I picked up several other pieces of Weaver memorabilia, including the original painting pictured in one of the photographs. It was also used by Weaver in advertising.
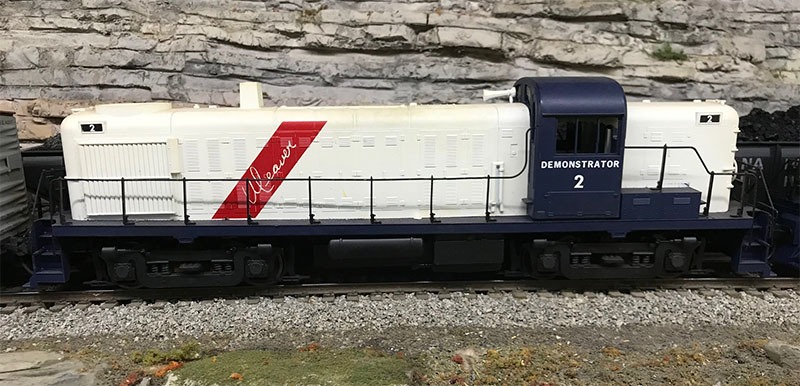
I knew there had been two RS-3s painted as demonstrators, and I wondered what had happened to the second one. Weaver did not have it. Forward to March Meet 2020. Dave Dillingham (I think), the fellow sitting at Table A-2, next to me, had a Weaver Demonstrator sitting on his table: the missing Number 2. It was covered with dust. I asked him where he got it and he said he had purchased it years before but could not recall from where. He did not think it was anything special. I bought it ($100?), brought it back home, cleaned it up and coupled it to Number 1. The team was back together.
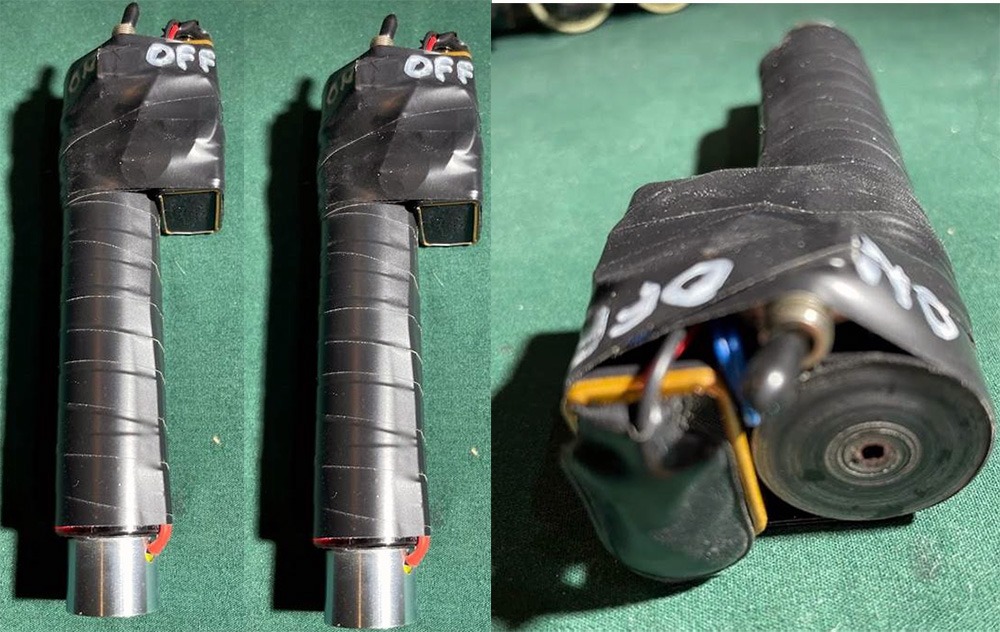
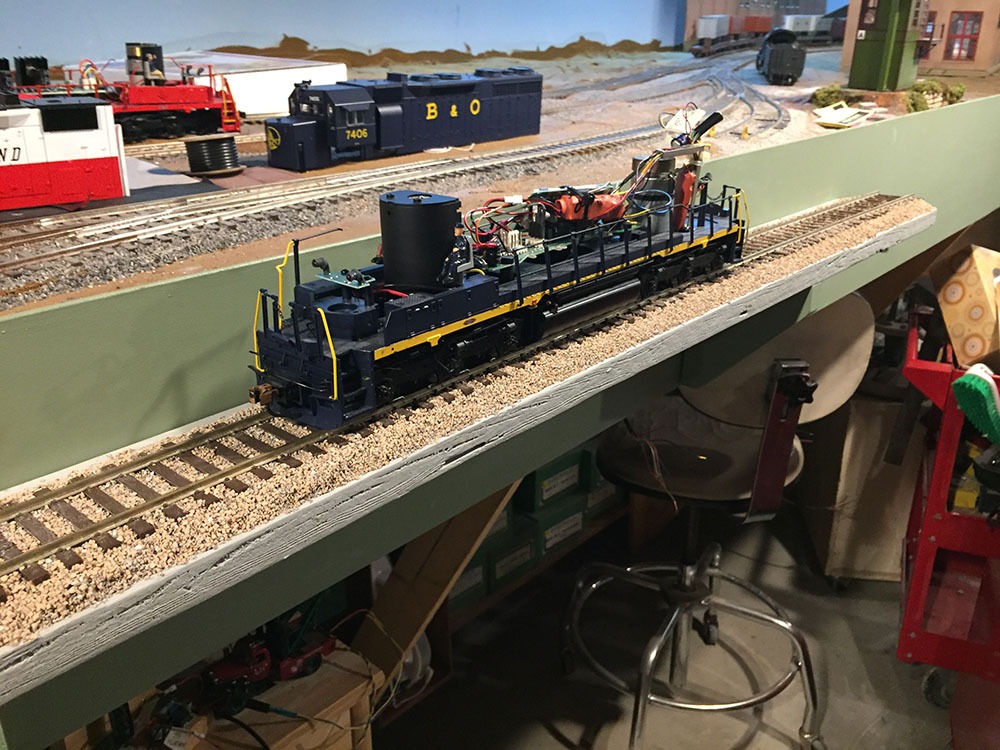
 I hope to use the Weaver RS-3 demonstrators to take around to different clubs and private layouts, in commemoration of Weaver. But how to configure the units when some layouts are DC, some DCC and somc DSC or other non-standard control systems? Answer: dead rail. Place a battery in the units or a trailing car, install a radio receiver and control the units with a radio throttle. To be sure, this is not my first brush with dead rail: in advance of the 2004 DC area Scale O National Convention, and fearing that my DCC-equipped layout would shut down from some electronic glitch with a layout-full of visitors, I had solicited help from Pat Mitchell and wired a NKP berkshire (779, a USH model) with both DCC and dead rail receivers (with batteries in the tender) and an A/B switch to toggle to either mode. I never had to use the berk battery mode – thank goodness – and remain a dead rail newby.
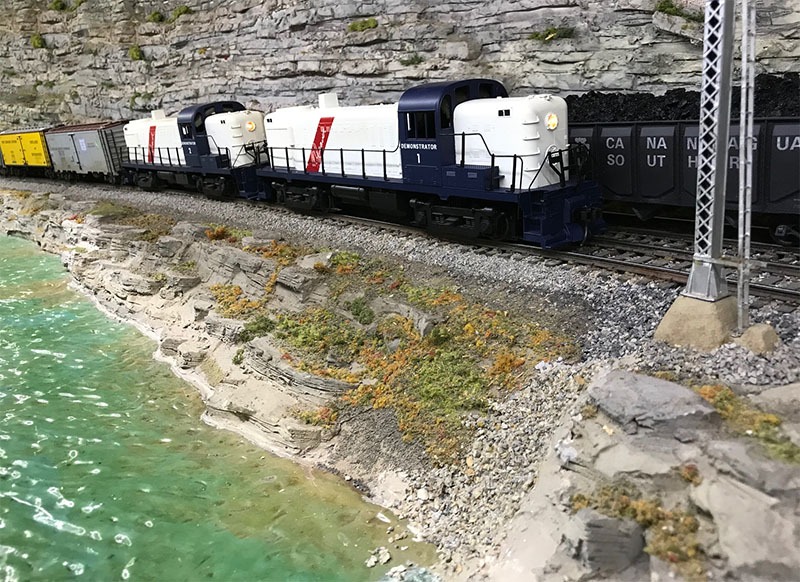
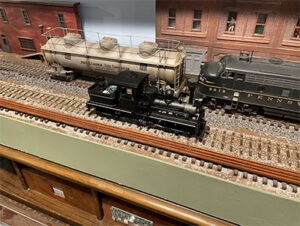
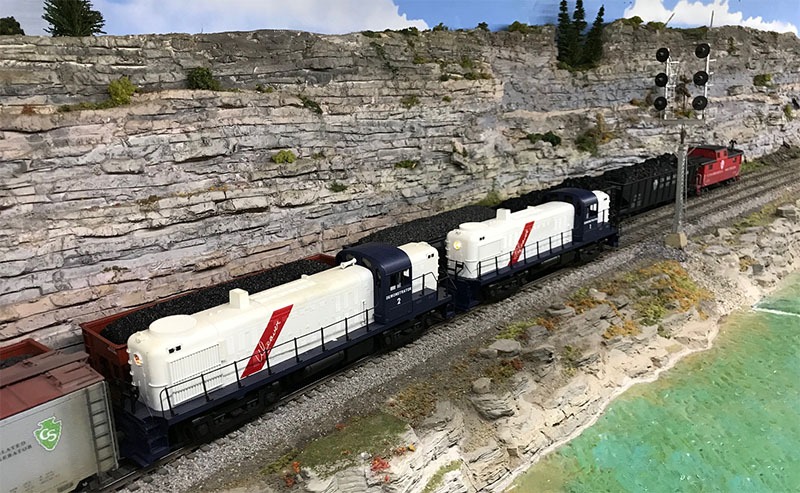
Weaver RS-3 Demonstrators handle a Reefer hotshot at Photographers curve on David Vaughn’s restored Canandaigua Southern, as a CS coal drag passes on the other main.
So I am puzzling over how to configure the units. I bought some Tam Valley components. I can put a receiver in one, wire the motors of the two units together and try to save room for batteries in the second unit. I would like to avoid having to hide batteries in a trailing car. Other than my 2004 engine, I have no dead rail experience.
 So the famous Weaver Demonstrators, 1 and 2, are still sitting on my workbench, waiting conversion (the photos on my layout which might look like they are operating are for scenic effect only!). Thoughts and suggestions from OS2R modelers on how best to proceed will be appreciated. Thanks. NKP48@AOL.com
Milwaukee NW2 Project work progress
By Rich Randall
I bought a General Models NW2 switcher, painted black, with a very nice drive mechanism, but no lighting or couplers.
Image 1 below is the bare switcher.
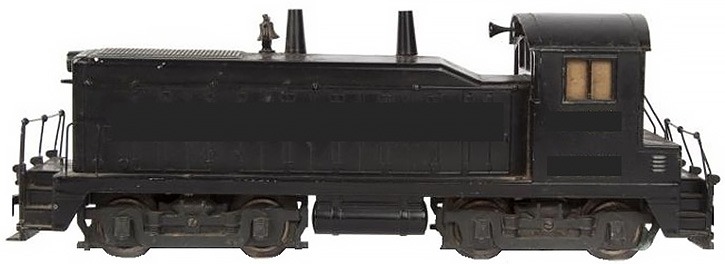
Image 2 below shows the excellent drive mechanism, the real reason I bought it.
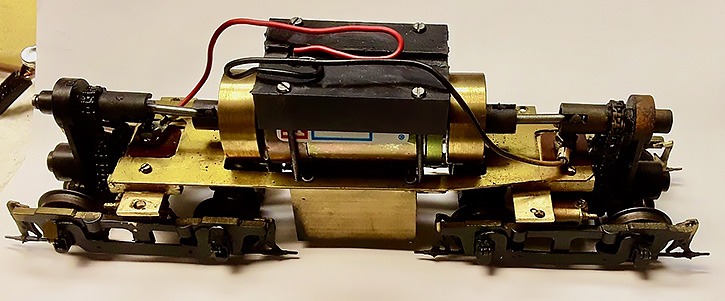
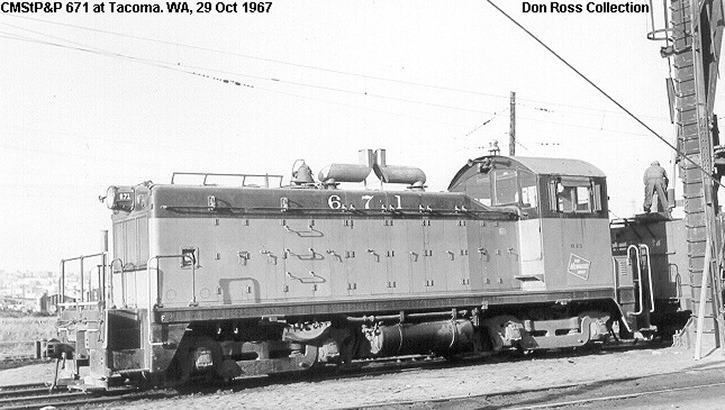
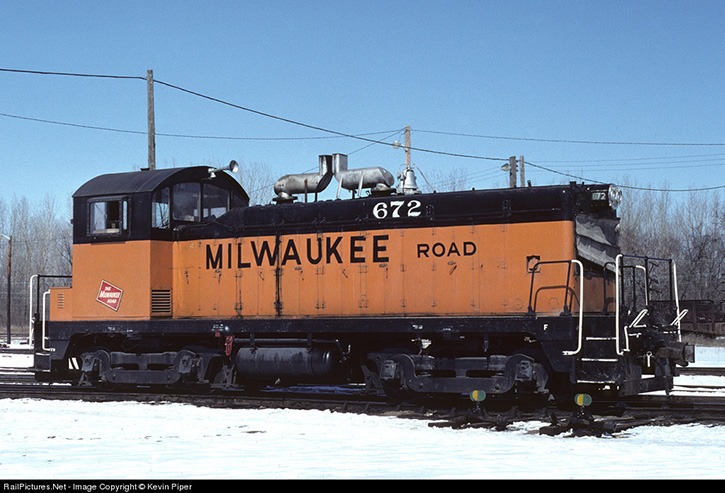
So my project is to make it look like a Milwaukee Road switcher like those working out west in the 70s. I will add a DCC sound decoder, speaker, LED lights, a partial cab interior, and crew.
Images 3 and 4 below shows a couple of the Milwaukee NW2s. More to follow!
A Lightbulb Moment
By Bruce B. Blackwood, June, 2020
Yes I know it’s been a while, and it’s not that I have anything on my workbench. I certainly have had maybe too much on my workbench. But I had a problem and this is how I solved it.
My basement is sort of Z-shaped and I have three light switches at the top of the stairs, one for each section of layout lighting. I freely admit that I’m forgetful enough that I don’t want to leave power on in the basement and have that random soldering iron burn down the railroad and the house above it for that matter. I will often go down and just turn the lights on in the section that I am going to be working in. But then if I need to go grab something from the other section it’s dark.
So I have a lightbulb moment and said luck, why don’t you just install one or two lights in each of the outside rooms and run a switch leg down so that if you need something in a dark room you can just turn on the light Bob or two without having to go all the way back up the stairs. I’m sure some of you can relate to that challenge. So I did and it’s very nice.
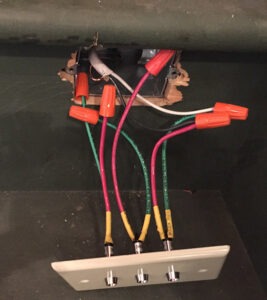
However my forgetfulness would often lead to leaving those lights on. Another lightbulb moment I thought said hey why not run a piece of fiber optic to The top of the stairs as an indicator that I had left lights on. I don’t know a lot about fiber optic so I asked the Gettysburg group for advice. Got some great feedback including one suggestion of just running a line over to the steps and plugging a 15 W Bob. But hey it’s 2020 and I like to learn things so I did some Internet searching on a circuit for an LED. I then found that you could just go on Amazon and have 120 V LEDs delivered to your door as soon as the next day. I jumped on it. They were delivered the next day and surprisingly inexpensive.
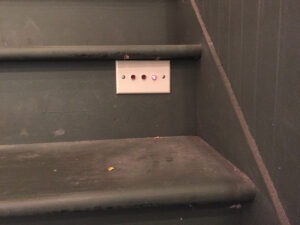
I drilled three holes into a plastic wall plate and mounted them up soldered some new leads onto the back of the LEDs and ran them to the cables Mount at the box underneath one of the stair Lipps stair treads and guess what when I head up the steps The indicator light might be on which just tells me I have to go turn the lights up. No I know this might seem just plain silly to a lot of you and it is. But I enjoy projects like this, and I learned a few things.
Thanks Bruce in Mount airy Maryland
Colorado Midland’s Leslie Plow
Andrew Dodge, MMR
The rotary snowplow was probably the most important piece of maintenance equipment a railroad needed during winters in the Colorado Rocky Mountains. In 1887 the Colorado Midland Railway began operations, and the following year they purchased rotary snowplow from the Leslie Brothers Company of Paterson, New Jersey. The brass hats in the main office realized that after the first year they could not rely solely upon what would become known as the “Midland Snowbirds,” hand shovelers to remove the snow. The plow had a nine-foot rotary blade with a shroud extending out an additional foot on each side. At 11 feet across, the machine would clear a path wide enough for any Midland equipment. The original Leslie design of the body resembled a “greenhouse” with large windows along both sides and in the operator’s area just behind the rotary and impeller blades. No doubt the windows provided the operating and steam engine crews with plenty of light and a nice panoramic view of the mountains in the winter, but of little practical value. One can only imagine all the broken glass that had to be repaired each winter.
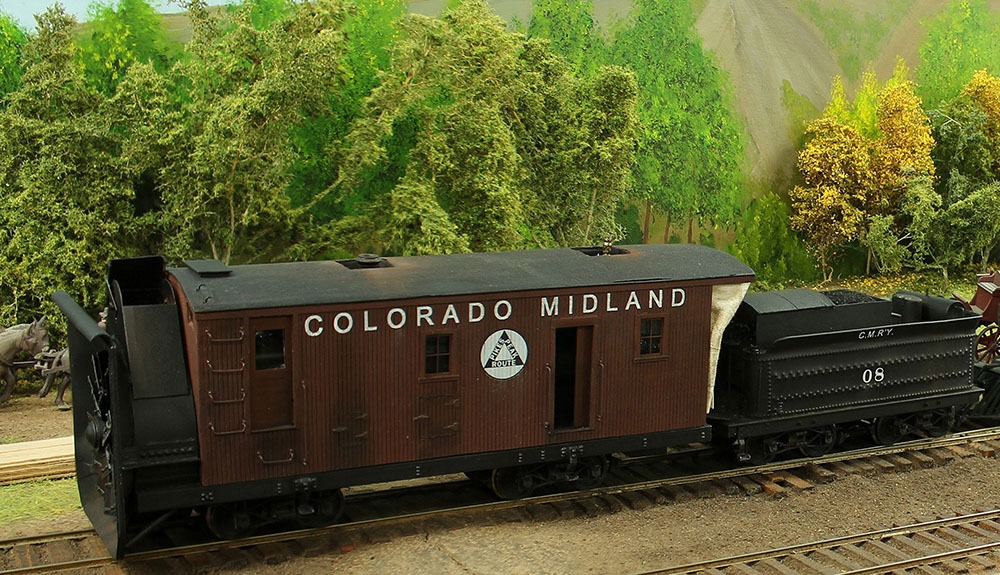
In 1895 the Midland decided to rebuild the body of the plow. The railway’s shop converted the body of the machine to a more conventional and durable design, which included a minimal number of windows and a larger work space for both crews in the machine. The plow served the railroad well as its sole snow removal machine until the terrible winter in early 1899. The winter snow was so bad that the Midland had to rent a Jull machine from the Santa Fe and another rotary from the Rock Island. In 1900 the Midland bought a larger 11-foot bladed machine from the Schenectady Locomotive Company. The Leslie plow was renamed from “08” to “Rotary A” and the new machine was designated “Rotary B.” Both machines survived until abandonment of the line in 1918. The Midland Terminal Railway bought the Leslie machine in 1921, and it served that railroad until its demise in 1949.
The model is based on post-1895 rebuilt machine. The design and layout information follows photographs and specification information published in Morris Cafky’s and Dan Abbott’s books. It is totally scratch built to Proto48 standards with a few castings such as side frames for the trucks, some of the machinery castings inside, and the water hatch on the tender. Everything works and when powered up, the impeller blades create a breeze out the exhaust chute.

I’d like to start out this month by asking each of you to tell us what’s on your workbench. When I suggested this “column” if you will, I did not intend it to be a clearinghouse of my projects. I’m sure there’s many of you out there that are doing some very interesting things on your workbench. Please send us an write up / article of what you’re doing! It does not have to be fancy and if it’s not even well-written that’s okay too. I am certainly no great author. Include a couple of snapshots. But please share share, share ?
So as this is the end of March, I decided I would send out another write up for April. One of the good things about our website, is that we do not have page restrictions or time restrictions. What I mean by that is if you have something going on your workbench and write it up, send it in to our webmaster Dan. He can put it up immediately. Mine doesn’t have to be up for a month. I think we are moving along nicely with membership and therefore would like to see us have a new what’s on your workbench every two weeks or so. So again, please share!
We can all learn from each other. Yours may even be a great motivational article to another. So as for me, I decided to take on a project that keeps me off my workbench. I have decided to use that old “painted floor joists black” trick to help all that stuff disappear.
I have included a before and after picture of a small area. I’d like to tell you a few things I’ve learned from this project. Number one: I went out and bought myself one of those hand held electric “Wagner” type paint sprayers. I quickly learned that to get this type of sprayer to work you had the thin latex paint so far that you could not get decent coverage with one coat. I also found that because of its feed through a tube in the attached container, it was virtually worthless at most of the angles overhead.
The super thin paint would drip everywhere. Fortunately, I had invested in several cheap plastic drop cloths. So, my second effort became a 2-inch brush (which of course, is all you really need according to one famous painter — Maybe that was just for happy trees?) Anyway, this resulted in much better coverage with the latex paint because it was no longer thinned, but man did it take forever and was still somewhat of a messy job.
Trying to get into all the little cavities and such that existed and honestly, exposed wiring was a real pain. So, for my recent birthday my sweet wife bought me a airless paint sprayer. After watching several YouTube videos, I was sure that this was going to be the absolute. I can tell you that out of all the methods I’ve tried this is the best. However, the amount of prep time is significantly increased. And the amount of cleanup time is greatly increased.
This has not been without learning experiences, like not forgetting to use a pair of wrenches to make sure all the connections on the hose are tight. This device is basically a motor that is used with a propeller to pull the paint up out of the bucket and send it through the hose to the sprayer at high pressure, so that no air is involved. For a rough work like just covering floor joists, it is very quick and much easier.
I even bought a 2-inch extension to the nozzle so that I can just stand on the floor and get right up in there. There is also a steep learning curve on how fast to go to apply a good coat of paint and not have runs appear on things like the HVAC ducts and so forth. Cheap plastic drops clothes are your friend. Cover everything! A fine mist will coat anything you do not want black. I am now done with probably 1/3 third of my basement and will continue to use this method.
Before:

After:
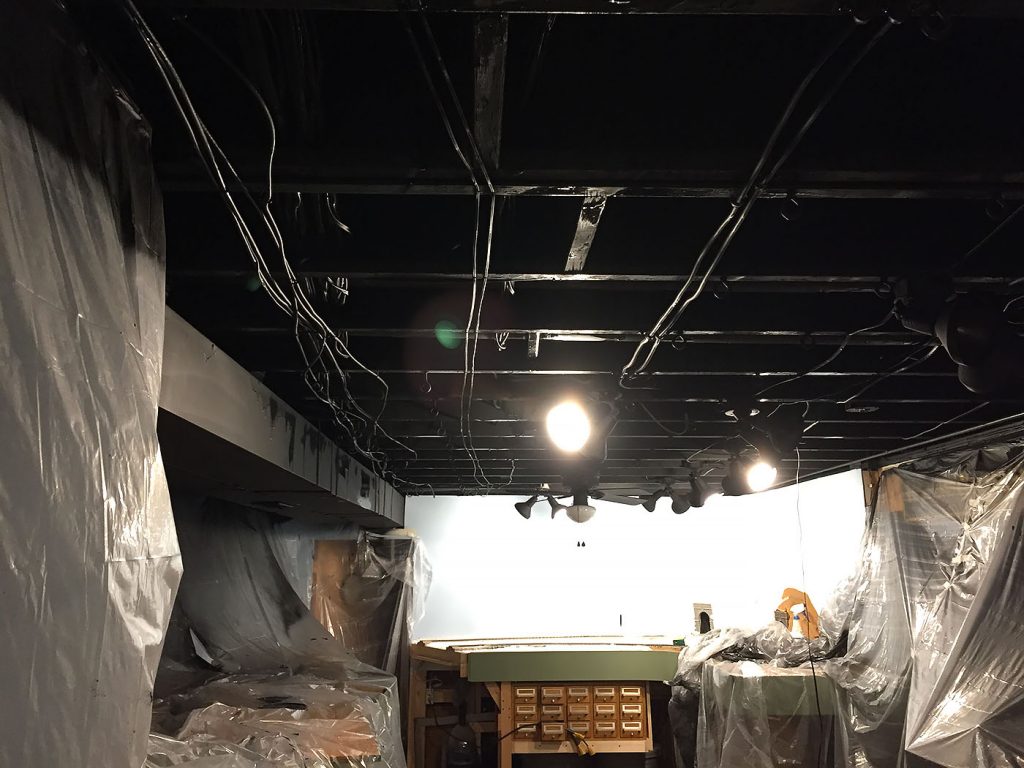
I’m sure it’s just going become easier and easier as I learn the little nuances of airless spraying. The real lesson learned is that I should’ve done this first! I definitely will if I ever get the opportunity to start over and build another layout in another house. I will empty the basement and spray everything above black then put up my backdrops before any bench work is started. (that’s my plan if ?. Easy to say now) So tell us, do you do a black-out or have you installed a drop ceiling? thanks, Bruce.
Painting Wheels
By Bruce B. Blackwood, February 14, 2019
 Hello and welcome, so I know spring is a long way away, but my spring cleaning has begun!
Last segment I talked about a finishing a coupler job …. Update … Talked to MNP at the Amherst show. They may design a coupler pocket for “kadee” couplers. Tells me we can and should tell the O scale manufactures what we would like to see … they want and need our input.
A few days ago, I went down and looked at my workbench and realized that I had probably a half dozen projects running, creating a situation where I had really no room to do anything. I had purchased another copy of ITLA’s 1st full O scale building kit at the Amherst show, after drooling over their display models. Nick reports sales are going well on this limited-edition kit, so don’t delay if you are thinking about one. So, I need space to work on the kit. I also have been working on the layout space for the building. And thus, Spring cleaning begins!
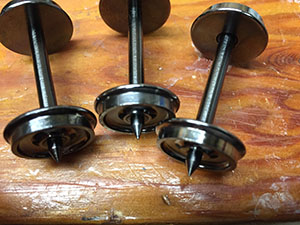 This is somewhat of a tale of how one project leads to others, let me explain. I have an IMRC or maybe a Red Caboose reefer kit sitting on the side of my work bench that had one truck missing. So, I looked all over the workbench and of course could not find it. So, I went to my box of wheels and trucks, pulled out a set of Intermountain metal wheels and a pair of their sprung trucks in kit form. I assembled the trucks and yes, I use the needle and thread method to contain the springs during assembly. I will freely admit that the coordination in my left hand is not what it used to be before the stroke. Thus, using the needle to run the thread thru the spring to act as keeper works well and serves well to keep me off the floor searching for what ultimately becomes a smashed or flat spring.
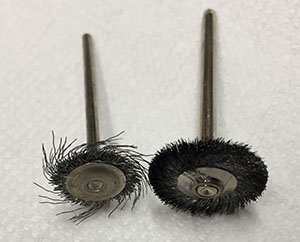 What I like to do is polish the treads of the wheels. I’ve seen this on a couple of the models that some of the well-known professionals have produced. I’m not sure how they do it. My method is typically a wire brush in a Dremel tool with the wheelset in my hand and slowly rotating the wheelset against the spinning metal brush. So, the obvious thing here I hope, is to wear eye protection — and not just a pair of eyeglasses! Something that will offer real protection. I will also suggest to you that buying better quality wire brushes is money well spent. Don’t know where or when I got them, but I bought a batch of wire brushes that have no information such as part number or manufacture or anything like that. They don’t last even one tread! The wire bristles just fly out. And of course, right toward my eyes. I don’t seem to have that problem with the ones that are higher-quality like Dremel. Your experiences of what brands you like, and dislike would be a tip well worth passing on to other modelers. I will tell you that putting a cheap wire brush in the chuck and having it basically come apart instantly can be very discouraging.
So, another method I’ve tried is putting a felt polishing wheel in the chuck and repeating the above procedure. I would like you all to look at the attached photo of three wheelsets. The way they come from Intermountain is on the left, one in the middle is the felt wheel and the one on the right is done with a wire brush. Do you see a difference? Also, please tell me if you think it’s worth the trouble? At this point I’m not so sure. Maybe there’s a better way of doing this? I would welcome your comments and tips.
I mentioned that this project led to another project. After I polish the tread, I like to paint the center of the wheel. this was becoming frustrating as I typically just push the wheel set into a piece of soft Styrofoam. Not being one of my better days for dexterity, they keep getting knocked off and on to the bench and into the drawers and all that type of stuff. So, I decided it was time to build a wheel holder to paint the centers. Here is a photo of my quickie wheel holder made from some scrap scale lumber on hand.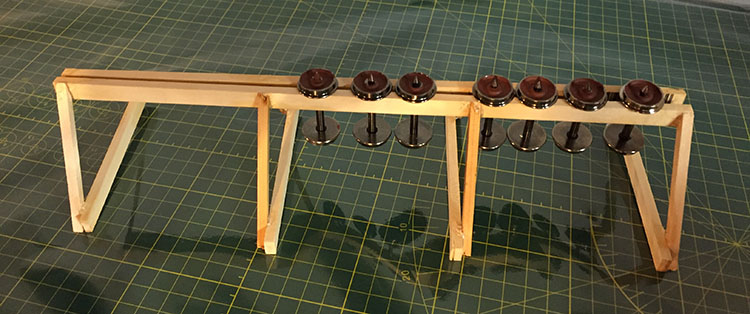 It took a couple of tries as I forgot that I had to have clearance for the wheel not getting paint to slide on. Thus, I went from straight legs to angled legs. This allows the wheels to be flat and keeps the paint on the wheel, instead of running off if vertical. Here’s something else and I would like to know. If you know, please pass it on. You should notice that not only is the tread polished, but the actual side of the tread is also polished. I’ve noticed this on the one foot to the foot scale cars. I don’t really know how that area gets polished. A proto 48 guy I met explained it to me at Amherst, but I forgot to lock it into my memory.
 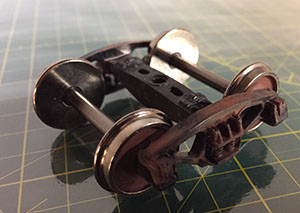 So, after the center of the wheels are painted, I reinstall the polished wheel sets into the truck and give the truck a little bit of light weathering. Usually by dry brushing and applying some weathering powders to the truck.
So that’s the latest installment of what’s on my workbench. How about you? What’s on your bench? How about writing up a short article and a couple of photos? The Webmaster would love it.
Thanks,
Bruce