2-Rail O Scale Primer
By
William Louie
Edits by Eric Peterson 12 10 2022
Introduction
Welcome to the world of 2-rail O scale model railroading!
What is this special niche of scale model railroading, you ask? We hope that by the time you finish reading this primer that question will be fully answered and your interest will be piqued enough to join us in this fascinating aspect of the model railroading hobby. We’ll tell you something about the history of 2-rail O scale modeling and how it differs from other scales and from the toy trains most of us are familiar with when we were children. You’ll get information on how to begin, where to find equipment and supplies, what magazines cater specifically to 2-rail O scale, and, very important to everybody, how much it will cost.
We’ll also give you basic information on modeling in 2-rail O scale, from planning and designing a layout, to building a layout, to acquiring and building your own models. In short, we hope to supply you with enough tantalizing information to get you started in 2-rail O scale model railroading. A caveat, however – this primer targets people who already are acquainted with the model railroading hobby. It is not a comprehensive how-to manual nor a beginner’s guide. For more in-depth material, we will refer you to literature recommended in the text.
Now let’s start on this fascinating journey!
A BRIEF HISTORY OF O SCALE
Although O scale is in the minority now, this was not the case in the early days of model railroading. Indeed, model trains have been around since the middle of the nineteenth century, and it has been reported that one John Gwartzell was building O scale trains as early as 1894. Manufacturing of O scale equipment began in the 1920s, and O scale was the predominant scale from the early 1930s until after World War II.
 Toy, or tinplate, trains using O gauge track began to be manufactured in the United States by the Ives Company in 1910. They were followed in later years by Lionel and A. C. Gilbert (American Flyer) among others. These early trains were just that, toys, so most tinplate cars and locomotives did not look at all like real trains in appearance or dimensions. Later, however, companies started producing models that were more realistic looking and followed prototype dimensions more closely. For example, in the late 1930s Lionel produced a line of locomotives and cars that was true to 1/4″ O scale right down to the wheels and track, although it was 3-rail track. The introduction of such models was a boon to O scale modelers who could now modify these models, if necessary, to run on their own layouts. Many took this route because in the early days of O scale, commercially available models and supplies were limited, so if a person wanted a particular model, more than likely he would have to build it himself mostly from scratch, provided he had the proper tools, including machine tools, and the know-how to do so.
Speaking of 3-rail, most of the early O scale layouts used 3-rail track with the center rail removed and a third rail added on the outside of the two running rails. This outside third rail carried one side of the power to the trains and was mounted on raised insulators so the track looked much like the track of prototype electrified railroads that do not use an overhead wire system for power distribution. Power pickup from this third rail was via sliding shoes mounted on the powered units. The more realistic current standard of 2-rail operation did not become widespread until the 1940s.
Early scale models would look crude compared to modern offerings, whether they were commercial or scratch-built, although there were notable exceptions. Like everything in which a broader interest grows, accessibility to the desired models required that they be more readily available, and from the mid-1930s on, more commercially produced models appeared on the market, so the modeler had a continually larger basket of goodies to choose from. Early kits were mostly craftsman-type kits which required work and time to build. Car kits were all wood, all metal, or a combination of both. Locomotives were available as castings kits, partially machined kits, or fully machined kits and were priced accordingly. Even some of the easier-to-build kits required some drilling as well as tapping for screws. Some built-up and painted models were also offered for sale. The late 1930s to the early 1940s was the heyday of O scale with a large variety of equipment offered to the modeler. Some of the more well-known O scale manufacturers of those years included Lobaugh, Scale-Craft, Scale Model Railways, Ferris, Walthers, Auel, Egolf, Lenoir, Icken, Saginaw, Edwin Alexander, Westbrook, Staples, and Rail Craft. Some of these companies have survived although the majority are alas gone from the scene. Fortunately, many new companies have arrived to replace the old ones and are making names for themselves.
In the meantime, HO scale gained in popularity, and soon after the end of World War II, O scale was no longer in the majority. In 1952, however, a new phase began with the introduction of highly-detailed built-up O scale brass locomotives and cars that were imported from Japan by Max Gray. Imports of these brass models continue to this day, with models getting even more detailed and elaborate, including factory-painted models, although most models are now made in South Korea with some manufacturing being done in mainland China in recent years. Also in recent years, an increasing number of rather inexpensive plastic models with details rivaling more expensive brass models have come on the market, and their popularity has been growing. An increasing trend is the proliferation of built-up plastic models that are ready to run right out of the box: no assembly or painting required. You can get a model railroad running immediately without much wait or work. Another trend is that more manufacturers are producing assembled track sections so that modelers who do not want to hand lay track can build their layouts more quickly and easily.
If you are interested in learning more about the early history of O scale or model railroading in general, we suggest books such as 150 Years of Train Models by Harold Carstens or early issues of magazines such as Model Railroader, Model Craftsman (now known as Railroad Model Craftsman), and Miniature Railroading. The first two magazines have been in publication since the 1930s (the last one ceased publication a long time ago). There were also two magazines devoted exclusively to O scale in the early 1950s called The Whistle Stop and The O Gager, but they are hard to find anywhere nowadays although they may exist on microfilm in some libraries. Information can also be found in early issues of the NMRA Bulletin. Other recommendations are listed in the appendix.
WHY 2-RAIL O SCALE?
Why model in 2-rail O scale? The best answers come from those who are already in 2-rail O scale, whether they are old timers who started with it or are converts from 3-rail O scale or other scales.
 For those who were hi-railers (O scalers using 3-rail toy-train track), the obvious justification for 2-rail is realism. No matter how real their model locomotives and cars look, the illusion is incomplete with the presence of 3-rail track. And since hi-railers already model in O scale, the changeover to 2-rail is relatively easier and cheaper than switching from another scale. For rolling stock or traction equipment, it could be as simple as changing wheels and couplers. Locomotives require a more work, but it can be done. Again, depending on the model and construction, it may be as easy as replacing the drivers and other wheels. We have seen that this was a common practice in the early days of O scale modeling when commercial offerings were rather limited.
One often cited reason for modeling 2-rail O scale is that modelers like the size and heft of O scale models. O scale models look substantial rather than like something small enough to stick in one’s pocket or that look like they can be easily broken. O scale models have a presence so that one doesn’t need binoculars to see them clearly as they traverse around the layout. A long O scale train going down the track can bean impressive sight indeed.
Another common justification for modeling in O scale is that details on O scale models are larger and easier to see than on smaller scale models. This helps those whose eyesight is not what it used to be or whose hands are not as steady anymore. It makes it easier to build and detail in O scale than in the smaller scales. The larger size is also conducive to super detailing to your heart’s content. There are many prize-winning O scale models with unbelievable am ounts of super detailing. And for those in traction, modeling in O scale allows building more accurate overhead construction with closer-to-prototype wire dimensions compared to smaller scales.
Larger scales such as G scale may allow even more added details; however, these scales require a considerably larger space to build a layout, perhaps even the use of a backyard which modelers may not have available. O scale provides the modeler the capability to build a layout inside and protected from the elements.
O SCALE AND DIFFERENT TRACK GAUGES
We have mentioned O scale and O gauge, and now is a good time to expound on these terms since they are often erroneously used interchangeably.
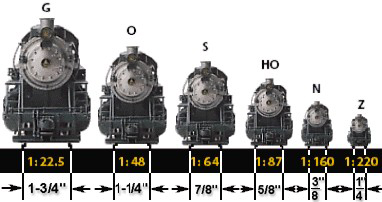
SCALE refers to the size ratio of the model to the prototype, which in O scale is based on 1/4″ equals one foot (1/4″=1′), or 1/48 full size. GAUGE refers to the distance between the rails which for prototype American standard gauge track is 4′ 8-1/2″. So models should properly be called O scale models, not O gauge models, although toy trains using O gauge track are commonly called O gauge trains.
On this note, we should point out that the 1-1/4″ track gauge commonly used in O scale actually measures out to 5′ rather than the correct 4′ 8-1/2″. This came about because early toy train manufacturers used the 1-1/4″ track gauge (which was invented by Marklin in the 1890s) since it was a nice round number, and the small gauge discrepancy was not very noticeable.
Some early O scale modelers used 17/64″ to one foot as a more exact scale for the 1-1/4″ track gauge, but this was a rather cumbersome scale, so it did not endure.
Some other modelers used a track gauge of 1-3/16″, calling it Q gauge, which was close to the actual dimension. One famous Q-gauge modeler was Minton Cronkhite who built the original O scale layout for the Chicago Museum of Science and Industry.
Another gauge is 32mm for the British O scale of 7mm to the foot [from whence came the HO (half O) scale of 3.5mm to the foot]. This gauge is very close to the 1-1/4″ track gauge.
At any rate, the 1-1/4″ track gauge endured and is now the common track gauge for O scale. As an added note, 2-rail O scale traction utilizes this 1-1/4″ track gauge which is very close to some of the prototype Eastern traction systems with a 5′ 2-1/2″ track gauge.
 Proto 48 refers to modeling standards based on prototype dimensions. Models and track are based on 1/4″=1′ scale. Not only is the track gauge to scale (1.177″ or 29.9 mm), but all wheel dimensions are reduced exactly from the prototype (normal O scale wheel treads are wider and flanges are deeper than the prototype dimensions).
Besides standard gauge, there are also narrow gauge tracks which were laid in areas where space was limited, so we have 3′, 2-1/2′, 2′ etc. gauges. In 1/48 these are called On3, On2-1/2, On2, etc.. A fairly recent addition in 1/48 scale is On30 which uses narrow gauge equipment operating on HO gauge track (16.5 mm track gauge or 0.650″). This On30 was introduced by Bachman Industries and is now popular. The normal equivalent of On30 is On2-1/2, which uses the correct track gauge of 0.625″. The Model Railroad Association Standards and Recommended Practices are the source for the detailed dimensions for the different scales. Here is the link to the information: https://www.nmra.org/index-nmra-standards-and-recommended-practices
TRACTION and RAPID TRANSIT
O Scale is also a popular scale for traction modeling since traction generally uses very sharp radius curves, which allows for O scale size traction layouts to fit in smaller spaces.
TRACTION EQUIPMENT – Traditional traction models have always been fabricated from a variety of available materials. Since each prototype trolley line typically had different equipment from other trolley lines, few commercial models of smaller quantities have been normal because of the selection of prototype to model. Standard and popular designs were more prevalent. Complete models were initially only available from custom builders. Commercial kits became available in cast metal, stamped metal, wood, plastic, and cardboard. Brass bodies became available from Japan in the early 1950s. Production was very limited and quantities could be as few as one or two of each. Production quantities increased but for fewer types of models. In the 1990s more and higher quality traction cars became available in brass from multiple importers lasting until the early 2000s. Cast epoxy and resin car bodies became available with superior detail and quality. Painted and detailed resin display models of many different trolley types and paint schemes became available from eastern European builders. Many new 3D printed models are being developed for an ever expanding group of prototypes
(NEW) RAPID TRANSIT EQUIPMENT – Epoxy bodies for rapid transit cars became available in the
1980s for New York and Chicago prototypes. Additional cast resin bodies became available and some
painted and detailed resin display models became available from eastern European builders in the 1990s. In the early 2000s, Lionel and MTH imported RTR three rail rapid transit sets, which can be converted for scale operation. Many new 3D printed models are being developed for an ever expanding group of prototypes.
INFORMATION SOURCES
We have given you some background on 2-rail O scale and made convincing arguments why you should model in this scale. Now where can you go to get more detailed information on this subject?
One excellent source of information is the O Scale Central organization, the producer of this primer, which was founded in June 1999 to promote 2-rail O scale model railroading. Their primary focus is 2-rail realistic models which encompasses all aspects of modeling, including mainline, branch line, narrow gauge, interurbans, and Proto 48. Any member would be happy to help you learn about 2-rail O scale and provide you with the benefit of their experience and knowledge. You are also invited to join the organization not only to enjoy the camaraderie of fellow O scalers, but to have access to additional information, member directory, club and group directory, and the organization with its vision to promote 2-rail O scale.
The National Model Railroad Association, (NMRA) is the model railroad organization for model railroading including all scales. The NMRA has an extensive website with information for all scales. NMRA Standards, Recommended Practices and Technical Notes are an excellent source of detailed information on a wide variety of topics. The monthly NMRA Magazine is published on line and available in print for all scales including O. Model railroad conventions, include clinics on modeling topics and prototype information, train shows and other informal activities are organized by the NMRA Regions and local Divisions. It is a good way to meet other model railroaders locally including O scale modelers.
Two of the best information sources are the following magazines devoted exclusively to 2-rail O scale.
 O Scale Resourses 407 E. Chippewa St Dwight, IL 60420 http://oscaleresource.com/ |
O Scale Trains |
 48/ft, O Scale News 48/ft, O Scale NewsP.O. Box 51 Elmhurst, IL 60126 (ed note:48/ft, O Scale News is no longer being published but older copies are available) |
All these fine magazines cover the many areas that other model railroad magazines include in their pages, but here the emphasis is strictly on items of interest to the 2-rail O scale enthusiast – no 3-rail articles or other scales in these pages. Especially helpful are directories of hobby shops which stock O scale supplies, listings of O scale clubs and organizations, and schedules of shows and model train meets including the annual O Scale National Convention. Visiting clubs and attending shows, meets, and conventions are ideal ways to find out just about everything you could possibly want to know about 2-rail O Scale. Reading about something is fine, but there’s nothing like talking face-to-face with someone knowledgeable to learn about the subject in question. This is the best way to make use of someone’s experience and not repeat his mistakes.
Another good information source is your local hobby shop if you’re fortunate enough to have one who deals in 2-rail O scale equipment. Besides imparting their own knowledge, they can recommend other sources such as how-to books on the subject or introduce you to customers who model in 2-rail O scale. They also have the advantage of dealing with suppliers of 2-rail O-scale products and can help you with brochures, catalogs, and other valuable information.
O scale manufacturers, importers and distributors have reduced the use of catalogs and brochures focusing on website based advertising and sales. O Scale Central website includes the O Scale 2 Rail Product Guide(tm) with information about suppliers and their products with website links to their websites. https://oscalecentral.com/
GETTING ACQUAINTED WITH 2-RAIL O SCALE
Now that you’ve gotten a handle on where to get information on 2-rail O scale, it’s time to find out what 2-rail O scale is all about in terms of actually seeing and handling O-scale models for yourself, maybe for the first time. So where do you start?
If you’re fortunate enough to have a local hobby shop that sells O scale equipment, that of course is the obvious choice of where to go to look over the equipment and see firsthand what is available. You also have the added advantage that the hobby shop personnel can assist you and answer your questions about O scale. If the hobby shop also has a test track or layout, then you are lucky indeed in having the added plus of seeing O scale trains in operation.
Visiting O Scale Clubs is an ideal way to see and meet other O scale 2 rail modelers. O Scale Central has a listing and there are other listings in magazines and on websites.
Each year there are O scale 2 rail train shows and gatherings. Watch for them in the magazine and on line event lists.
If you’re really lucky, you may have made the acquaintance of a local O scale modeler and/or a member of a club in your quest for information, and they will be more than happy to show you what O scale models look and feel like, if there’s a club or home layout, so much the better. Now you can really see 2-rail O scale in its element, learn more about what models are commercially available, and get an idea of the price range of different models.
As we mentioned earlier, visiting clubs and attending shows,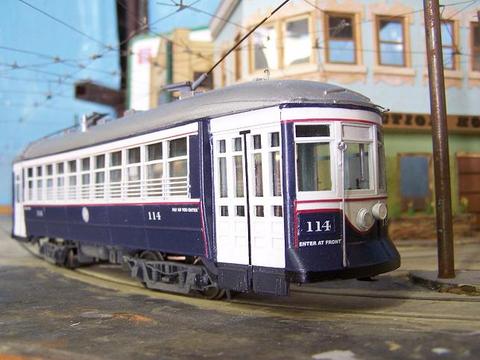 meets, and conventions are ideal ways to find out all about O scale equipment. Especially at conventions and the larger meets, manufacturers, retailers, and just plain old modelers have lots of display or sellers booths where you can examine their goods and ask questions about their models. Here you can find just about everything ever made in O scale, including long out-of-production items as well as the latest hot-off-the-production-line models.
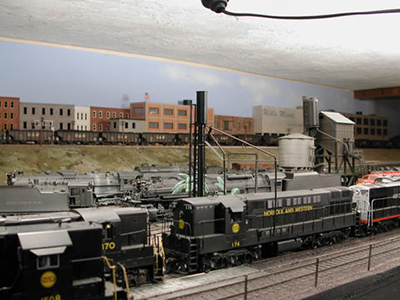
How about the availability of in-production models? In the 1990s, O scale came alive. The quantity of products manufactured in 2-rail O scale in the continues to improve. Brass model production started in Japan and transitioned to Korea and China.
Most new brass, plastic and dicast models are now built to the quantity ordered by individuals, hobby shops and distributors. Most are factory painted with high quality details and finish.
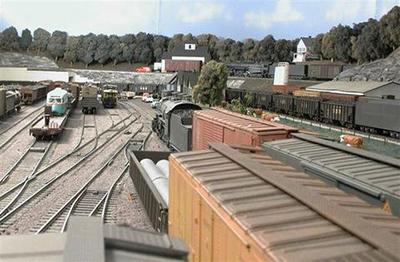
Freight cars – before 1990, only a few scale plastic freight cars were available on the market. 3 Rail models from several manufactures are now built to scale proportions with very nice details. They can be converted to O Scale 2 rail by changing trucks or wheelset and couplers. There are also
Passenger cars – before 1990, only a few companies produced affordable passenger car kits. Today there are several suppliers of built up passenger cars and other kit suppliers as well as multiple sources of detail parts.
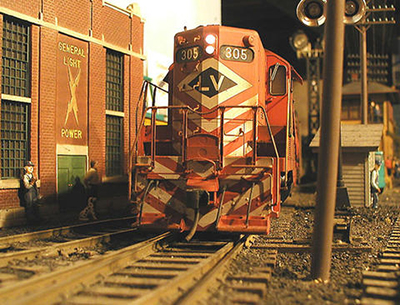
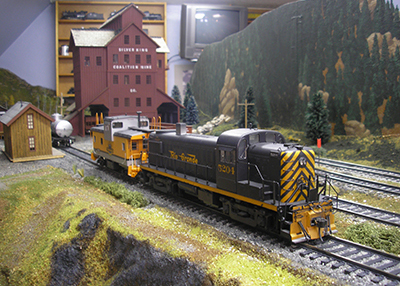
Diesel locomotives – before 1990, there were 3 plastic diesels available in 2-rail O scale on the market. They range from entry-level to craftsman-quality kits, so we have choices. Conversion of 3 rail scale models is also possible. Some locomotives have been produced for both the 3 and 2 rail markets. Many of these locomotives have vertical motors over each truck with lower gear ratios affecting slow speed operation.
Steam locomotives – before 1990, the choices for steam locomotives were either expensive brass models or kits that were NOT entry-level offerings. The choices here are still limited, but at least one company is producing diecast 2-rail steam locomotives that cost far less than the brass alternatives.
Traction equipment – before 1990, the number of traction or interurban kits available were rather limited. Usually, the only way to obtain the desired traction related equipment was by scratch-building. Today there are multiple manufacturers producing equipment ranging from ready-to-run to kits for different building skills.
Buildings – before 1990, only a few companies offered structure kits for O scale. Many of these kits were toy-like or very limited runs, so we had to scratch build almost every structure on our layouts. Today there are multiple companies that producing buildings, either built or in kit form. Several companies are offering built up and highly detailed buildings. Construction methods vary from wood to plastic, urethane to metal.
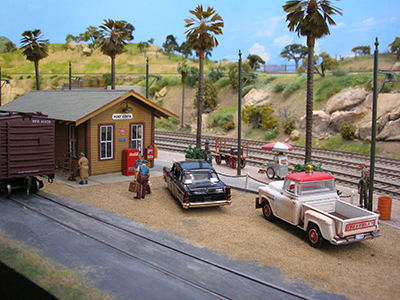
Detail parts – before 1990, few companies produced add-on details for locomotives, buildings, and accessories, and even fewer hobby shops stocked them. Today there is a wide variety of accessories, including vehicles, trees and other scenery, car loads, people, and animals. There are many sources of 1:43, 1:48 and 1:50 size vehicles, construction equipment, detail parts and people usable for O scale.
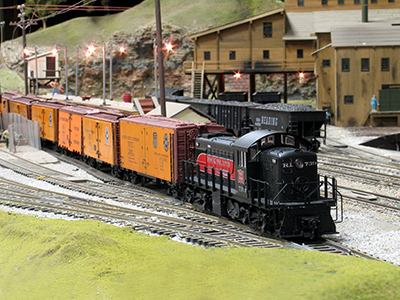 Track – many companies in 3-rail produce track systems and many of them are very good. In 2-rail we also now have ready-made track systems with fixed-radii curved track sections, straight track sections, and No. 5 and 7.5 turnouts as well. Track in 3′ lengths that can be curved to any track design is available in different rail sizes. This flexible track is available with different rail size or code referring to the height of the rail. 148 rail is larger representing modern heavy main line. Code 125 represents 100 lb per yard prototype rail that represents lighter traffic routes up to the 1970’s. Code 100 rail represents light rail used in earlier years and limited to lighter duty branch lines and sidings. Additional sources for turnouts include custom built turnouts with cast detail parts priced a little more than the manufactured turnouts. Detailed parts such as frogs, guard rails, and switch points are also available to build hand-laid track and turnouts. Many O scalers have hand-laid their track using wood ties, scale-section rail, track parts, spikes, and ballast to create beautiful trackwork.
Brass – the brass industry has been a big part of O scale since the beginnings of imported models. The first brass models out of Japan were imported in the 1950s were O scale. Because of the lower demand in O scale, brass was one of the only ways for O scalers to get a variety of equipment to operate or collect. Steam, diesel, traction equipment, freight and passenger cars, and even bridges and buildings have been produced in brass by a number of importers. Today there are several importers that produce and import brass from from South Korea, China and some from Japan.
In the 1990s, some manufacturers combined efforts with the hi-rail market and produced brass that run on either 2 or 3-rail track. This increased the number of models produced and in most cases lowered the price of O scale brass. Today, you can find O scale brass locomotives that are about as expensive as HO-scale locomotives. There is a wide level of variety and detail in brass models, so there are also many choices for the modeler to make. Much of the brass is expensive, but collectable.
Now we come to the ever important factor of price. What is all this going to cost me? Contrary to what you may have heard that O scale is a lot more expensive than say HO scale, that is a misconception. It’s true that you can spend a bundle of money on O scale, but that’s also true for any scale. O scale models are about twice the size of HO-scale models and about eight times the volume, but that doesn’t mean O-scale models are going to cost twice to eight times as much as HO models. For example, a new plastic diesel locomotive will cost anywhere from about $400 to $800 or more while an all metal (including some brass) locomotive can cost around $1000 and up. Most brass locomotives will cost more depending on the level of detail, all the way up to ultra-detailed museum-quality models. As for cars, new plastic cars can be had for as little as $45. Kits can start at a similar price while brass models can run up to several hundred dollars each depending on the type of car and the amount of detail and finish. Traction equipment (freight and passenger) is in the same price range depending on the car or locomotive type, level of detail, finish, and whether powered or unpowered. As you can see, these prices compare favorably with HO-scale model prices and so are not way out of line. In addition, the larger size of O scale compared to say HO means that less equipment is needed to fill a same sized layout, so it’s possible that an O-scale layout could end up costing less than a smaller scale layout.
Digital Command Control (DCC) is now used for O scale 2 rail as well as other 2 rail scales. Converting older locomotives to DCC control can require changing to a more efficient motor to reduce the current required. DCC decoders are often included in new 2 rail locomotives adding to the cost.
Shopping for used equipment and even some new equipment at O scale train show events will provide substantial cost savings. Used equipment and supplies other than brass are often priced at 50% of the original retail price.
CONVERTING TO 2-RAIL O SCALE
So 2-rail O scale sounds interesting to you. But you’re in 3-rail O scale or some other scale. How difficult and expensive is it to convert to 2-rail O scale?
As we’ve mentioned earlier, converting rolling stock 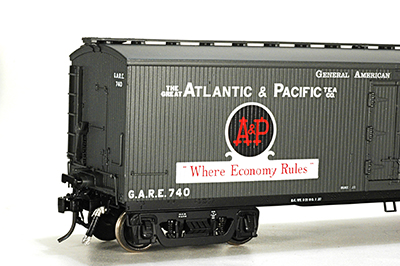 from 3-rail O scale could be as simple as replacing trucks (or perhaps only the wheels) with their 2-rail counterparts and changing the couplers to scale couplers. Indeed, several manufacturers produce O-scale models in both 3-rail and 2-rail versions, and they sell trucks separately for either configuration, so for these models there’s no trick in making the conversion. As for locomotives, it may also be possible to purchase the 2-rail drivers to replace the 3-rail ones. For those modeling traction, equipment can be easily converted to 2-rail by simply changing the wheels and modifying the truck width (i.e. frame supports, frames, bolster) or just replacing the 3-rail trucks, powered and unpowered, with 2-rail units.
Converting 3-rail models that don’t have 2-rail versions is a little more challenging since it may involve more than just replacing trucks, drivers, and couplers with the 2-rail versions. It may require some fitting and/or modifications to make the replacements work properly, although for rolling stock this should not be a major undertaking. Locomotives are a different story and depend on the models in question. It could be as simple as changing drivers and wheels, but more likely it will require more work to make the conversion. There are commercial firms who do this kind of work, and the price will depend on the model. Clinics at past O-scale meets have covered this subject and are a good source for the ins and outs of converting from 3-rail to 2-rail.
Changing to O scale from another scale is another story since probably nothing from the old layout can be converted, 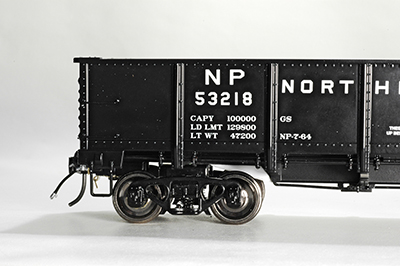 so it would involve purchasing new locomotives, rolling stock, structures, etc. Some of the electrical and control equipment can probably be used for the new layout depending on whether they can accommodate the higher amperage required for O-scale operation. At any rate, one can always sell the old equipment or trade for O scale, so the costs can be minimized.
As for layouts, those in 3-rail O scale with scale-type 3-rail track and large radius curves are in the fortunate position of being able to change over to 2-rail with a minimum of effort. If the 3-rail track uses scale rails, then it could be as simple as removing the center third rail and replacing or modifying turnouts, crossings, and other components, so the entire layout can be easily transformed without a major overhaul. Those layouts with tinplate 3-rail track would require more effort depending on the situation. If the curves are wide enough to accommodate the planned 2-rail equipment, then replacing the track system is sufficient without a major disruption of the layout. Otherwise, conversion would require a redesign and rebuild of the layout.
Those in other scales would need to replace their entire layout, of course, although the benchwork could be salvaged for use in the new layout.
3-rail O-scale layouts usually use AC power, so converting to 2-rail operation would require changing to DC power, which may be a major undertaking if the majority of the electrical components on the layout are AC compatible only since these will have to be replaced. A major share on O scale 2 rail layouts are now using Digital Command Control (DCC) for track power with decoders in each locomotive. Almost all other scales already use DC or DCC power, so the changeover there would be minimal although heavier duty power supplies may be needed for the higher amperage O-scale locomotives. Items which are not scale dependent, like switch machines, can be salvaged for the new O-scale layout. Control equipment such as Lionel’s TMCC for 3-rail would not be adaptable although 2-rail versions are available. Additional thoughts on the subject can be found in the section on electrical and layout wiring.
PLANNING YOUR RAILROAD EMPIRE
You’ve gotten some familiarity with 2-rail O-scale equipment and checked out what equipment is available, so now where do you start in planning and building your model railroad layout? Regardless of scale, one of the first considerations is space and how much of it you have for your creation.
Suppose your space is limited. For example, houses in the western U.S.usually don’t have attics or basements, thus space for a layout is hard to come by. So how do you get O scale into a limited space? As a little research will show, there is a part of every railroad which is adaptable to any possible space which an O scaler may have available, from a small switching operation of an offline industry to a large passenger mainline. Thus, your 6″ x 8′ space can suddenly become a narrow switching layout for four industries around a two track stub mainline. Strategically placed mirrors at the ends of the tracks can give the illusion of an even longer layout when they are partially hidden behind a mound or in a depression. By contrast, it is evident that the modeler who has only a six-inch-wide space (e.g., underneath shelving or on top of or toward the back of cabinetry) but which extends around the perimeter of a room can accommodate larger train operation. If you’re really fortunate, you may have an entire basement, garage, or attic for your layout and can fill up all the space to your heart’s content. The “average” size of an O-scale layout is probably somewhere in between these extremes.
 The space available will also play a role in your decision about what type of railroad you can model. For example, if your space is limited, then obviously you can’t model the mainline of a railroad like the New York Central, so you might consider a narrow gauge or a trolley layout. With their sharper curves, a lot of railroad can be built in a limited space. On the other hand, if you like narrow gauge or traction, the layout can occupy a whole basement or attic without regard to space. There are many famous large O-scale layouts that are traction or completely narrow gauge without any standard gauge operation at all. Traction models have the added advantage in that each unit contains its own power and can be run in combinations of one or multiple units similar to the prototype. Smaller traction layouts in O scale can still look prototypical in spite of their size. Traction and Rapid Transit layouts also offer the opportunity to emphasize an urban environment with a higher level of detail including structures, vehicles, lighting, and figures. Trolley cars, rapid transit, trolley buses, trucks and automobiles can be operating in a limited space.
Now that you’ve determined the space available for your layout, you should then decide what era you wish to model. Will it be the 1890s, 1920s, 1940s, etc.? Part of that decision will naturally depend on your preference of railroad equipment and the availability of commercially-made models. If you are able to scratch-build models, your horizon is limitless. If your fancy is toward steam locomotives, then obviously it will have to be sometime before the 1960s after which time steam disappeared from mainline operation. On the other hand, this is YOUR railroad empire – you can haul the most modern of equipment behind your steam power and create a logical explanation for the seeming incongruity.
Next you should select which part of the country (or of the world) you wish to model. Will it be the mountains of Colorado, the desert of New Mexico, or the plains of Nebraska, Iowa, or Kansas with their many grain elevators? Or will it be an urban switchyard 20 tracks wide? How about some railroad in a foreign country if that’s where your interests lie? Maybe it will be a fantasyland for which there is no real counterpart. You decide. Your layout is bound only by your imagination and the space which you have available.
Now you need to decide if your railroad will follow a certain prototype or be freelance, and that will determine the type and lettering of your equipment. Some cars and locomotives in O scale come undecorated, which means that painting and lettering are necessary to finish the model to the road name and color of your choice. Some finicky modelers insist that locomotives and rolling stock adhere strictly to the prototype as to type, paint color, and lettering. Then there are some who feel the urge to invent a private road name, using a family or familiar place as the source. They can paint any locomotive or car any color of the rainbow they desire and apply any road name without regard to real life prototype.
The next step is to determine what kind of track plan you should use. There are many layout planning publications and the plans can be adapted for any scale. The most common one is the round-and-round layout where trains are able to run continuously in a loop. It can be a simple circular layout plan, or it can be a loop folded over one or more times so that trains seem to traverse the layout more than once before returning to the starting point to begin the cycle again. This latter plan will obviously require more space.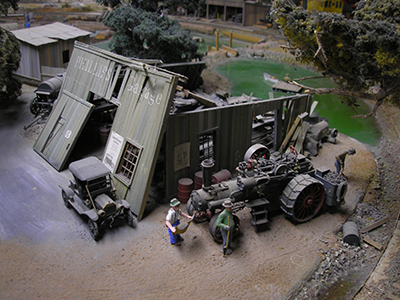 One plan that will work regardless of the amount of space is the point-to-point system as exemplified by the real railroads. Trains proceed from one end of the line to the other end where locomotives are turned around or reverse to begin the return journey. This makes for realistic operation and many layouts, including large club layouts, employ this strategy which is favored by those interested in prototype operation. A variation on this is an out-and-back plan where a reverse loop is incorporated at the end of the track. One inescapable fact of O scale is that the size will limit the amount of track on your layout even if you have a huge basement, attic, or train room.
One thing that must be considered in planning an O-scale layout is the weight of O-scale models. Benchwork must be sturdy enough to support the heaviest of the locomotives and the scenery that you will be using (more on benchwork in a later section). Also, if your layout will be large, access holes or spaces must be placed so that models are within easy reach. It’s OK to reach over to pick up an HO-scale locomotive, but try picking up a 15-pound O-scale locomotive at arm’s length without damaging the model or getting a hernia in the process. These access holes and spaces must be carefully planned when designing your layout.
One of the great masters of model railroad layout design was the late John Armstrong, and in planning your layout you can do no better than studying his layout designs for ideas and adaptations to your own planned empire. His designs, as well as completed layouts based on his designs, have appeared in model railroad magazine articles, and he has written books on the subject (two of them are listed in the appendix).
BENCHWORK
For those who have already built layouts in other scales, benchwork for O-scale layouts should not be fundamentally different except that it should be robust enough to support the heavier weight of O-scale locomotives, some of which could weigh as much as ten pounds or more, such as large articulateds.
Owing to the size of O scale, benchwork most likely will be of the open framework type with risers to support the base on which the roadbed and track are laid or to form the basic outline for scenery. Risers generally are 1×4’s, or wider where multiple tracks are laid. 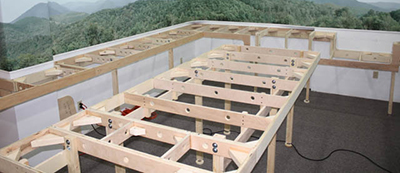 Distances between risers will depend on the load on the risers including the roadbed, track, equipment operating over the section, or the amount of scenery supported by the risers, but in general the spacing should not be more than 24″. Support legs are usually 1×4’s or 2×4’s or even larger in locations where heavier loads are carried such as locomotive servicing areas, i.e. roundhouses, or where there is a lot of heavy scenery material. The main frame-work usually consists of 1×4’s or 1×6’s although some 2×6’s have been used for extra strength such as where one might have to climb onto the layout for maintenance or other tasks.
Instead of using nails to fasten the framework together, screws or bolts may be used advantageously in that if the layout ever has to be dismantled, it would be easier to do so and also to reassemble later. More effort is required initially, but the payback comes later.
Some modelers have made benchwork from steel instead of wood using such materials as slotted angles (under various brand names and types), metal house framing materials or even pipes, but of course this means that the builder must have the equipment and tools for metal working.
You can find what you need in the many books and how-to manuals at your local hobby shops (some suggestions are listed in the appendix). In addition, visiting clubs or home layouts can provide a wealth of data on how actual benchworks has been done, and you get the benefit of other modelers’ experience.
Traction layouts are often constructed in a modular format which allows for easy rearrangement of the track plan and/or portability. The modular sections are lighter since they need not carry the heavier weights. Typically, the modular sections are only 12”-24” deep and about 36” long.
TRACKWORK
The basis for all good trackwork is the roadbed, and for 2-rail O scale this is no different from other scales or hi-rail. The heavier O-scale equipment makes sound absorption even more important so that noise is kept to a minimum. Modelers in other scales are already aware of this, so the same methods can be used for 2-rail O scale. This usually involves using familiar materials for the roadbed such as Homasote, cork, foam, etc., which are already used in other scales. Books and magazines are available which cover this subject in detail and should be consulted for advice and guidance. Some recommended books and manuals are listed in the appendix.
For those changing over from other scales who are already familiar with trackwork, tackling O-scale trackwork should be a snap since, except for size, there should be no difference in the methods of laying track. It is easier in the larger scale. For everyone, there are three basic methods in approaching trackwork: sectional track, manufactured track components or hand-laying track.
Hi-railers generally use sectional track, 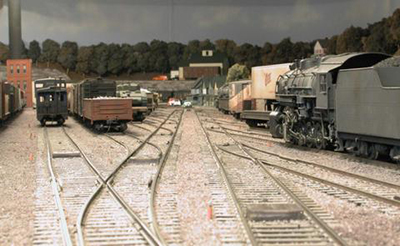 and these modelers can continue to use sectional track in 2-rail O scale. Turnouts, straights and curved track of specific radius is available. Sectional track required less fitting and cutting of the track. There are several sources of track manufactured in 3′ lengths and compatible turnouts. The track can be curved to fit specific radius. Cutting and fitting is required to complete track arrangements using flexible track and compatible turnouts. As for flexible track sections, there are many manufacturers producing these, so the modeler has a wide choice of products. Some track even has ties that are pre-weathered for realism so the modeler doesn’t have to do his own weathering.
Track sections are also available with different rail sizes such as code 148, code 125, etc. The code number refers to the rail height in thousandths of inches (i.e., code 148 rail is 0.148 inches in height). Sectional track sections with concrete ties instead of wood ties has also been available for those who want to model the latest prototype road. As for switches, or turnouts, many manufacturers produce these in different turnout numbers, so there is a wide choice for the modeler to select from.
As for the modeler who prefers to hand-lay his own track, there is no limit to what he can accomplish. Companies such as Right-O’-Way manufacture just about every kind of prototypical model track components, so a modeler can reproduce an extremely realistic track with two tie plates and four spikes for every tie, with rail joiners every 39 feet just like the prototype. Switches, or turnouts, have frog and guard rail castings with all the nut-and-bolt details just like the prototype, and rail braces and gauge plates to scale are also available to make very realistic turnouts. This takes a lot of work, however, so most modelers take a simpler approach although some modelers have gone the whole distance in reproducing trackwork as realistic as possible.
Trains will run only as well as the trackwork allows, so no matter what the approach to laying track, it must be done well and in compliance with NMRA Standards. This is even more important in the smaller scales, so O scale has an advantage in that it can tolerate imperfections in trackwork better than the smaller scales. Another advantage for O scale is that the heavier locomotives make better contact with the track, so stalling due to circuit interruptions because of dirty track is less frequent than with the smaller scales.
Traction modelers have an additional challenge with overhead wires or catenary systems in that these must be well constructed also in order for equipment to operate properly. This can be achieved very easily (contrary to popular belief) by using some very simple fixtures and gauges. Several companies provide overhead wire components such as switch frogs, hangers, crossings, and poles in 2-rail, so the modeler can have realistic traction operation. Some good reference books and catalogs that describe construction techniques and overhead wire diagrams are listed in the appendix.
Traction track work is typically scratch built. Most track work is located in paved streets, so the guard of the guard rail is typically detailed. The track plan is more compact with sharper curves and tighter turnouts. Curves should include transitions to smooth car operation. There are castings available for single point turnouts used by street cars or the turnouts can be scratch built. For interurban areas, flex track and commercial turnouts can be used.
SCENERY MODELING IN O SCALE
There used to be an old joke that O-scale layouts had lots of neat-looking locomotives and rolling stock but was challenged when it came to scenery, or rather the lack of it. That is not really true because, in fact, many O-scale layouts have beautifully done scenery.
 Scenery is one part of model railroading that is common to all scales in that methods and materials are universally applicable, so model railroaders should already be familiar with making scenery. Suffice it to say that all the popular methods apply, such as wire screening on wooden forms with overlays of plaster, Hydrocal, paper strips soaked in plaster, etc., or foam blocks to form the foundation for the scenery. Since this primer is not a how-to manual nor a beginner’s guide, on that note we will not expound further on the subject but refer you instead to the literature in the appendix if you need information on making scenery.
ELECTRICAL AND CONTROL
This is another area where the same principles apply regardless of scale, unless one is in tinplate or hi-rail operation in which case some new learning is in order. DC and DCC are the standard power source for 2-rail O-scale train operation, so except for amperage ratings, electrical components used in other scales can be adapted for O scale. Those in tinplate or hi-rail usually use AC power sources, so for those folks, most of their electrical components cannot be used when they switch over to 2-rail O scale. They will have to acquire new or added equipment for the changeover. An improvement for them is that, in DC, reversing a train’s direction is much simpler to accomplish both electrically and control-wise. With DC operation the standard convention is the positive polarity on the right hand rail will produce forward motion. Simply reversing the polarity to the track will produce the reverse motion. There’s no need for the sequencing switching in AC where one has to go through a neutral cycle to change the direction of travel.
Digital Command Control (DCC) is completely different. It has become very popular and changed model railroad operations. A continuous square wave voltage with control signals addressed separately for each locomotive. A decoder in each locomotive reads the DCC instructions and moves the locomotive, controls lights and provides realistic sound from the locomotive. This permits unrestricted walk around control of trains.
 The basic DC power pack consists of an AC transformer to reduce the house AC line voltage to the model operating voltage range and a full-wave bridge rectifier connected across the transformer output to convert the AC to DC. This DC is unfiltered so a small AC component remains superimposed on the DC wave form. To reduce this AC component, capacitors can be connected across the power pack output to smooth out the DC. The higher the capacitance, the greater the filtering and the smoother the DC. More expensive power packs add extras such as pulse power, throttle response, braking and other features for more realistic control and operation. Those in tinplate and hi-rail can make DC power packs using their current AC transformers and adding rectifiers on the outputs. Consult the electrical references listed in the appendix on how to do this.
 Basic control with standard DC power is straightforward, consisting of a rheostat to adjust voltage to control speed and a switch to change polarity to the rails to control direction of travel. For a small layout this is the simplest concept, where there are a few insulated track block sections where power to each block can be turned on or off. This scheme can also be applied to larger layouts where there are many blocks, but in this case each block has its own rheostat and direction switch and is known as cab control. Here trains proceed from block to block with each block perhaps controlled by an independent operator. Many large club layouts use this type of control.
One variation to this approach is to use a variac (a variable-output-voltage transformer) instead of a fixed-output-voltage transformer, the output of which is rectified to DC. The rheostat is eliminated, and the variac is used to adjust voltage and thus speed. This method is usually limited, however, to layouts that run only one train at a time.
Recent advances in control include radio control, such as Locolinc, or the latest form of control, DCC (digital command control). Similar systems such as Lionel TMCC (TrainMaster Command Control) for 2-rail and Mike’s Train House (M.T.H.) DCS (Digital Command System) are also available. The TMCC and DCS systems are compatible with each other using accessory components and their use in O scale 2 rail is very limited. DCC is now the preferred control system. These systems are more complicated and more expensive, but they have the advantage of great flexibility in the control and operation of trains.
In radio control, each locomotive has a receiver, and therefore it can be individually controlled, independent of other locomotives. Thus it is possible, for example, to double-head different locomotives which otherwise would not run at the same speed at the same track voltage.
The latest system, DCC, has even greater flexibility in that besides independent control of locomotives or traction equipment, it can also be used to operate other functions such as whistles, bells, lights, etc.. In DCC, decoders are installed in each locomotive and are programmed by the operator to perform the various functions desired when the commands are sent out from the controller. Lionel TMCC and M.T.H. DCS also provide similar functions.
Traction equipment is often operated with a simple relay based control system. Trolley operation employs multiple individual powered cars which is different from railroad operation. The relay system is used to operate the multiple cars on a single route and keep the cars separated without collisions.
MAINTENANCE
Maintenance is an important for all model railroaders regardless of scale, layout size, tinplate or scale, 2-rail or 3-rail, etc. All model railroaders with layouts should be aware of this, so nothing revolutionary will be introduced here. The only thing to add is that, owing to the weight of O-scale equipment compared to the smaller scales, more attention should be paid to maintenance, especially for trackwork, traction overhead wire systems, locomotives, and powered traction equipment.
 A layout that runs well without a lot of derailments is because attention has been paid to maintaining the track in tip-top condition. Spikes can become loose, track can get out of gauge, shifts in benchwork can cause track to buckle, weather can affect track alignment, or a host of other conditions can affect the integrity of trackwork. Derailments in O scale can be disastrous when heavy locomotives are involved, not only to the model but to the modeler as well. A 15-pound locomotive dropping on one’s foot can cause serious damage. So continued preventive maintenance is essential to a well-running layout.
One advantage of O scale is that because of heavier locomotives, dirty track is less of a problem compared to the smaller scales. The weight of the locomotives provide better contact between the wheels and the rails, so stalling is minimized. Keeping the track clean is still essential, however, to prevent build-up of dirt on the wheels. Track-cleaning cars are available which clean the track as they are dragged around the layout. These are filled with chemical solutions which can also be applied manually. There are many such solutions on the market today which do a good job in cleaning the track. A more common cleaning method is to use abrasive track cleaning blocks on the rails, but this method has drawbacks because not only does it wear away the rails, it also leaves scratches on the tops of the rails which are good traps for accumulating dirt and grit. Light oil has also been used successfully to minimize the need to clean track.
Traction modelers also need to keep overhead wire systems clean. One method is to use fine grit sandpaper or the abrasive track cleaning blocks, but again this method also removes wire material in the process. One method is the use of commercial cleaning agents followed by wiping with a dry cloth to remove any cleaner residue buildup.
Lubrication of O-scale locomotives and cars follow the same guidelines as for any other scale, but it is more important because the heavier weight of O-scale equipment will cause more wear and tear if there is not sufficient lubrication. It should be done sparingly, however, so that lubricants are not carried to the rails. There are many lubricants on the market today that are specially formulated for model railroad applications. There are different kinds for gearboxes, for example, while there are others that are suitable for motors, journals and such. There are still others that can be used in the presence of plastics. Hobby shops usually carry a good selection of lubricants.
As in all scales, screws, bolts, nuts and other fasteners should be checked periodically for tightness, especially on locomotives. Since motors in O-scale equipment are more powerful, a loose rod on a locomotive, for example, could raise a lot of havoc. A loose steel screw could conceivably be picked up by a motor magnet and, if deposited in the wrong place, could cause damage to the motor.
MODELING SERVICES
One of the facts of life is that there is never enough time to do everything one wants, and this is true of model railroading. Few of us are so blessed that we can work on our models whenever we want. Furthermore, not everyone has the skills to build that dream model that is not commercially available or to build that dream layout. For those folks, there is a wide range of commercial services that will do the jobs for them.
Even though there is a large variety of 2-rail O-scale models on the market today, not every prototype locomotive, car, structure, etc., will be commercially produced, partly due to the small 2-rail O-scale market. For those people who want a specific model that is not commercially available, custom builders are available who will build that specific model to specifications. Some can be modified from existing models while others are completely scratch built. It can be as simple or as super detailed as you wish. Of course, the more elaborate the model, the higher the cost, which is to be expected.
Besides building complete models, some firms 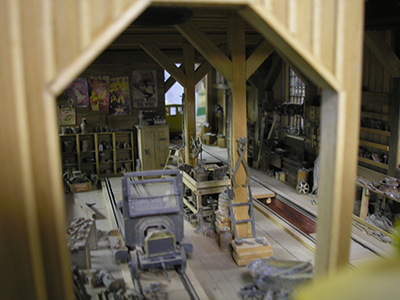 also offer customizing or upgrading of your own models. Say you have a favorite unpainted brass locomotive, but your painting and lettering skills aren’t up to the standards you want for that model. Custom painters are available who will do the job for you. As an adjunct, some painters can also do other work as part of their disassembly of the model in preparation for the painting, such as adding some extra detail parts or adding lighting. Or maybe your locomotive doesn’t perform like you expected. Many companies specialize in reworking or modifying mechanisms so that the model runs as smoothly as silk. Sometimes the rework may involve discarding the old mechanism completely and building a new one from scratch. Or it could simply be fine-tuning the current mechanism with a minimum of replacing of old parts. It all depends on the situation and your specifications.
Not all of us are empire builders, either from time or skill constraints, so we can be at a loss when it comes to designing and building our layouts. Folks have been around for some time who specialize in designing layouts. As mentioned earlier, one of the most famous and well known was the late John Armstrong. His layout designs are legendary, and examples of his work show up from time to time in the model railroad magazines. And if you need help in building your layout, there are firms that will do the work for you, either from your design or as a turnkey project from design to finish.
Where do you find these people who specialize in these services? Most of them advertise in the model magazines, either in commercial ads or in the classified ads columns. Some of the more well-known ones get a lot of their business from word of mouth.. And almost all of them have display booths at shows and conventions where you can examine examples of their work and find out more information about what they can do for you. Many also present clinics where you can get even more in-depth material to digest.
APPENDIX
Bibliography
Note: There are many other good references available, including many in video tape and DVD format. Model railroad magazines and your local hobby shop are good sources for additional material.
- Model Railroads, Edwin P. Alexander, 1940, W.W.Norton & Company, Inc.
- The Complete Book of Model Railroading, Louis H. Hertz, 1951, Simmons-Boardman Publishing Company
- A Century of Model Trains, Allen Levy, 1974, Crescent Books
- Toy Trains, A History, Pierce Carlson, 1986, Harper & Row, Publishers
- Model Craftsman
- Model Railroader
- Miniature Railroading
- The Whistle Stop
- The O Gager
- 48/ft,O Scale News
- O Scale Trains
- Traction & Models
- Trolley Talk
- Scale Model Traction and Trolleys Quarterly
- Traction Handbook,1974 , Kalmbach Publishing Co.
- Traction Prototype and Models Planbook, 1964, Carstens Publishing, Inc.
- Classic Layout Designs of John Armstrong, John Armstrong, 2001, Kalmbach Publishing Co.
- Track Planning for Realistic Operation, John Armstrong, Kalmbach Publishing Co.
- Basic Model Railroad Benchwork: The Complete Photo Guide, Jeff Wilson, 2002, Kalmbach Publishing Co.
- How to Build Model Railroad Benchwork, Linn Westcott, 1996, Kalmbach Publishing Co.
- Basic Trackwork for Model Railroaders, Jeff Wilson, 2004, Kalmbach Publishing Co.
- Track Design, 1989, Carstens Publications, Inc.
- Model Railroad Scenery Made Easy, Kalmbach Publishing Co. (Video)
- Basic Scenery for Model Railroaders, Kalmbach Publishing Co.
- Basic Wiring for Model Railroaders, Rick Selby, 2001, Kalmbach Publishing Co.
- Electrical Handbook for Model Railroads, Paul Mallery, 1998, Carstens Publications, Inc.
- Digital Command Control, Stan Ames, Roger Friberg, and Ed Loizeaux, Allt om Publishing
- DCC Made Easy, Lionel Strang, 2003, Kalmbach Publishing Co.
- East Penn Traction Club web site: www.eastpenn.org