Building A Mac Shops RDC- 2 As A B&O “Speed Liner”
In September 1949, the Budd Company fielded its first RDC demonstrator. The idea was an old one: find a way for railroads to provide passenger service in marginal markets where alternative transportation was scarce, expensive or unavailable to most people. Self-powered rail buses were tried, as well as larger gasoline and diesel powered ‘doodlebugs.’ They were all slow, uncomfortable, unreliable and noisy. These units replaced expensive to run steam locomotives and aging passenger cars, with all their attendant labor. Something more efficient and attractive to the public was needed.
So, Budd applied their engineering and understanding of the railway passenger service market to this product to sell ‘off the shelf,’ with few modifications. The price tag of a brand new 1950 RDC-1 coach was $ 97,000. It was powered with two 275 HP GM Detroit diesels mated to Allison torque converters, like those powering U S Army tanks. To entice the conservative, cost-conscious railroad market, Budd warranted no cost replacement of any transmission and drive unit, should it fail in regular service.
The clincher was RDC units must never be used to haul, push or otherwise move other railroad equipment, such as an extra express car or coach. Or, use an RDC to switch passenger cars. In hauling a fully loaded RDC at speed (60-70 MPH), these drive units were running close to maximum output. Using them for other sorts of work would void Budd’s warrantee. Yet some work ‘beyond warrantee’ was occasionally done anyway!
On the O scale modeling side, RDC models were slow to develop. Some modelers scratch built their own units in the 1950s. Lionel produced short versions of them for the 3-rail toy train market, as did All Nation in the form of a molded plastic kit, with reasonably accurate, cast metal early RDC trucks modeling those built of welded steel. By the mid-1950s, Budd was using frames from General Steel Casting for its RDC trucks and updated the RDC appearance with a new front, more power and improved interiors as the “New Look” RDC.
Haynes Mac Daniel, owner of Mac Shops which produced Budd passenger car kits with extruded aluminum bodies, was one of the first to offer parts for building a full-length O scale RDC model about 1984. Kits soon followed for the “New Look” mid-1950s RDC 1 and 2 by 1989. Mac Shops also offered brass General Steel Castings trucks for the “New Look” RDCs with 38” diameter wheels. But the O scale RDC market was thin.
Division Point in the 1990’s imported RDC’s built in brass. Highly detailed and accurate, they were also expensive. In the 2010’s, Sunset 3rd Rail was offering molded ABS bodied RDC models that were also well detailed ad a some-what lower cost. But by then, I already had my RDC.
In 2002, I bought a Mac Shops RDC-2 kit someone had started. No trucks were included. After a search, I located a pair of All Nation RDC trucks for my model. By December of 2003, I began work on the RDC. My wish was to build a B&O RDC-2 “Speed Liner” unit. It would be run as a single unit, despite its kitchen and dining area.
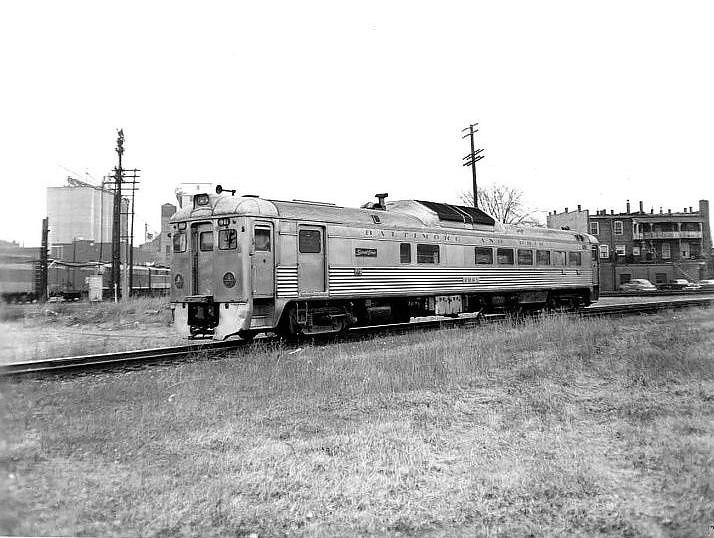
Doing would be prototypical! On B&O’s route into Detroit, the last several miles were over the New York Central under a trackage right agreement based on daily use. To preserve those rights, B&O had to operate a week end round-trip train between its NYC junction and Detroit, even though no such train was on the B&O schedule. One of the RDC-2 “Speed Liners” held down this assignment until B&O was able to discontinue service to Detroit. Below is a photo of a ”Speed Liner” holding down that slow, easy-going run with a full crew and few if any paying passengers who knew about it – mainly a some week-end rail fans.
Photo B&O RDC-2 on NYC
Building this Mac Shops RDC kit is somewhat different from the Budd passenger car kits Haynes Mac Daniel produced. He made a change on the extruded aluminum body to suit an RDC. It was cutting off the lower skirting and interior ridges that usually held the car floor in place. That was done because the prototype RDC has a very short, smooth skirt running between the car steps. The Mac Shops Budd extrusion carried fluted lower skirting, which would be incorrect. Because of the lack of floor ridges, I felt there was a need to somehow fasten the body and floor at mid-point to reduce the possibly of eventual floor sag. Car end castings would hold the floor in place as well. A second detail was the Budd extrusion included two large ribs or purlins running the length of the roof. While used on Budd’s main line passenger equipment, they were not on RDC roofs. It was a detail I felt could be overlooked, if the rest of the model turned out OK.
Pewter castings were provided for the car ends, roof ends, steps, pilots, end doors and side doors for the RDC-2 as well as a large roof blister. Horns and vents were provided, along with faces for the engine compartments and battery boxes as well as a few brake details. Nickel silver wire and aluminum strips were included for hand rails, grab irons, car side number boards and sander hatches. A wooden floor and strips of green tinted glazing were included. In all, a reasonably complete kit that could be enhanced to whatever degree a builder might desire.
Here is the Mac Shops instruction sheet for the RDC kit:

Fitting up the car end castings was tricky. A good deal of filing and fussy fitting ensured they went together square, straight and were identical. I used dots of Walthers GOO at first. If anything did not work out, it would not be difficult to take the castings apart.
Nine castings make up each car end: one face, one roof, two side doors, two car steps, two car step rear panels and one pilot skirt. The roof, end face, side and vestibule doors were attached to the extruded aluminum body. The steps, rear panels and pilot skirt are attached to the floor. The kitchen vent and stack was made from brass tubing. Aluminum inserts drilled for twin Grain of Rice light bulbs were made for the headlight casings in the roof casting.
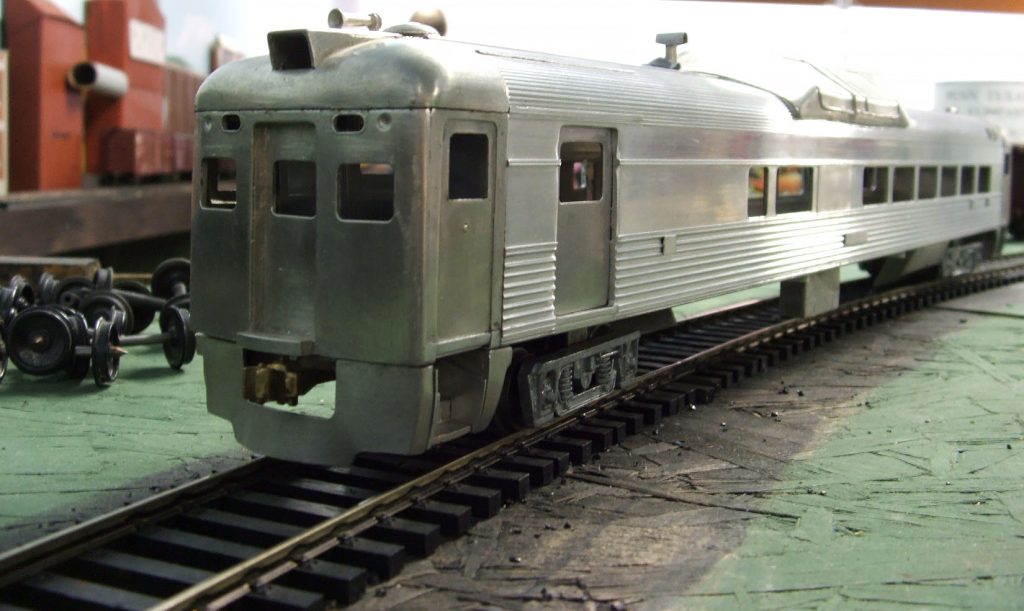
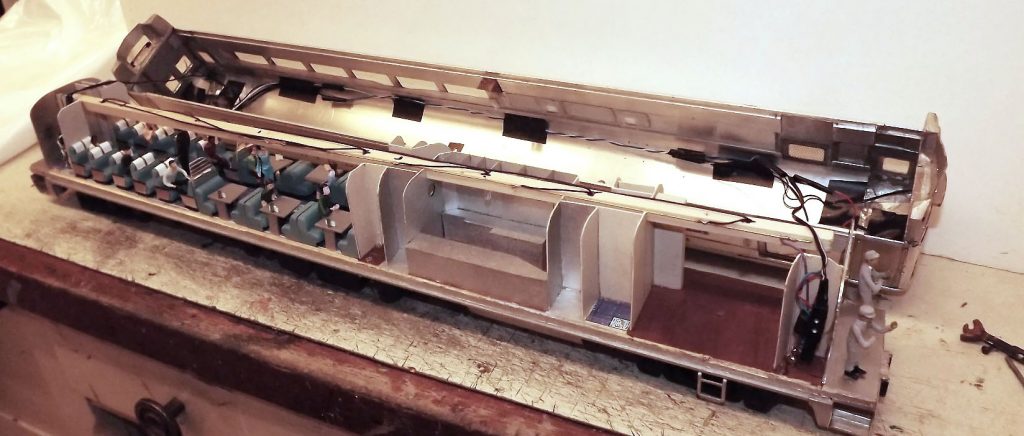
Here we are at first assembly. A left side window has been blanked off per prototype and kitchen windows were cut in on the opposite side. Look very carefully at the model. Now go back and look at the prototype photo above. What differences do you notice?
Here’s a punch list of things needed to improve this model’s appearance:
A: The three end windows are too low. Their bottom edges should be in line with the bottom edges of the vestibule door windows.
B: The car body seems to stand too high. This is because the lower skirting was cut off the car body. It also removed extrusion’s inside floor braces. This makes the bottom edge too high, with the bottom face of the floor being even with the side edges. A shallow, smooth faced skirt matching the step casting ends running the full length of the car is needed to restore the correct depth.
C: The battery and engine casing face castings need more depth.
D: More underbody detail is needed.
E: The All Nation RDC trucks need to be replaced with Mac Shops RDC trucks or modified.
F: Further work, to include interior details, lighting and power with Magic Carpet units.
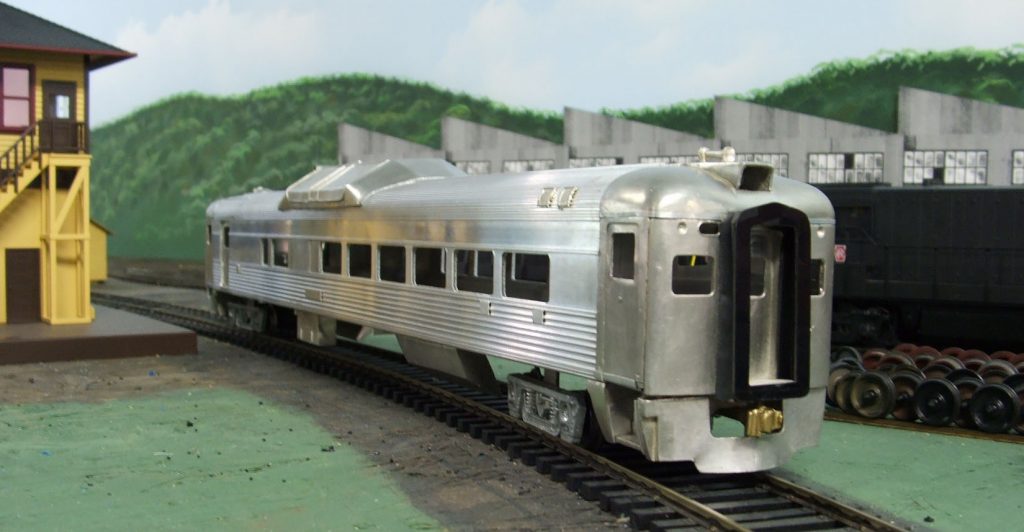
Track testing the RDC on a friend’s layout. The model had not yet been powered and was hauled by a locomotive along with other passenger cars. The rear diaphragm is temporarily mounted, following B&O practice.
Punch List Projects:
A: The end windows are the most jarring part of the model RDC’s appearance. Yes, the “New Look” front windows were smaller than those on the first RDC units of the late 1940s. But the bottom edges should be in line with those of the vestibule doors. All three end windows need to be ‘raised’ above where they are in the car end face castings. The tops of those windows cannot be raised too high, or they would be too close to the marker/class lights and number boards. Seamlessly matching filler strips with the pewter ends to correct the window locations would be next to impossible.
The ‘fix’ was to cut the window openings in the castings as high as possible. These openings were made 3/32” slightly wider, so that installed glazing would be nearly flush with an aluminum veneer surface. These veneers were cut from soda pop cans, after removing the printing and can liner coatings on them with steel wool and lacquer thinner. Each end required identical right side, left side and center door panels. The left and right-side panels had to wrap around the corners of the car to the side doors, and bent inward, to the end door opening to be a seamless sheet.
Fussy work assures the window openings come out exactly in the right position, along with openings for the marker/class lights and number boards. One help is to tape two panel sheets together. Then cut in the window, maker light and number openings. Both end doors were also made that way. The finished left, right and center door panels were attached to the cast pewter ends with thin coats of Walthers GOO, set up as contact cement.
A thin aluminum strip serves as a batten covering the roof to car end seam at each end. To model the window glazing gaskets of the veneers, a fine point black Sharpie pen was used to outline them. A least now the RDC ends no longer look droopy! To permanently attach the car end assembly (roof, face and vestibule doors) to the body, J B Weld was used. Ditto for the steps and pilot faces which were mounted to the car floor.
B, C and D: Detailing the underbody takes care of all three. 3/32” x 1/8” styrene strips were used to fill out the missing, narrow side skirts below the body between the step castings. The lower outer edge was rounded with a file and smoothed with sand paper. They are attached to the wood car floor with Walthers GOO and offset to be flush with the extruded car body. Three coats of Floquil bright silver brought them close to matching the aluminum body. An RDC body and underframe was all stainless steel. So, the underside of the floor and the center sill was also painted silver. Under body parts not made of stainless steel were painted black.
The Mac Shops engine casing faces were built out with sheet styrene following photos of RDC units and drawings in the book “RDC” by Donald Duke and Edmund Keilty. This book provided insights about the other underbody items such as air filters, mufflers and their piping, fuel tank, brake system and battery boxes. For those, I used Keil Line (now Scale City Designs) Budd battery box faces, which are more accurate for the RDC.
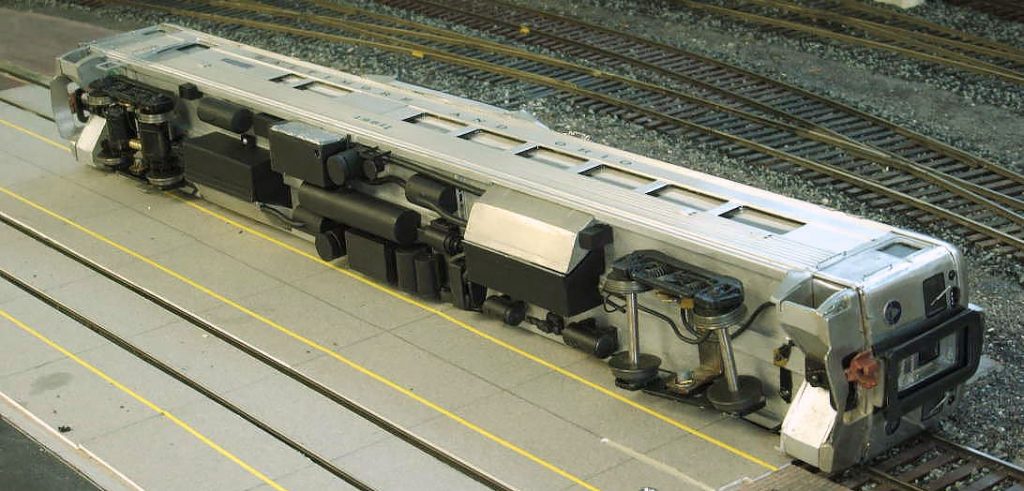
The RDC engine/transmission casings are big. They are deep and reach back over the center sill. Each prototype engine/torque converter unit was hung on extension rails and could be rolled out for a swap if necessary. I watched this being done in Philadelphia at Reading Terminal in the mid-1960’s. The crew exchanged an engine and transmission with a rebuilt unit in about 40 minutes. The RDC was in a train and it departed on its scheduled run less than a half hour later. These power units also drove generators for car lighting and air conditioning.
E: Unable to locate a pair of Mac Shops brass “New Look” RDC trucks modeling those with General Steel Castings frames, I found a pair of All Nation RDC trucks with no wheels. I equipped them with 33” diameter wheels from my parts stash. RDCs were equipped with 34” diameter wheels, so I felt these would be closer in size than larger 36” diameter wheels. To make the All Nation truck frames look ‘heftier’ I added styrene strips to the tops of the side frames to better match what GSC trucks looked like.
F: It took a while to find Magic Carpet units with 33” diameter wheels. I located a pair of used MC’s by late 2004 which were installed in one truck. It was tricky to make certain both units turned in the same direction when wired up. Like prototype traction motors, these are ‘nose hung’ which allow the trucks to equalize when running along the track. I made a joiner of brass tubing to connect the nose post of each MC unit. A bracket holds this nose joiner at a side frame mounting screw. The axles of each ride in the side frame journals like a prototype traction motor.
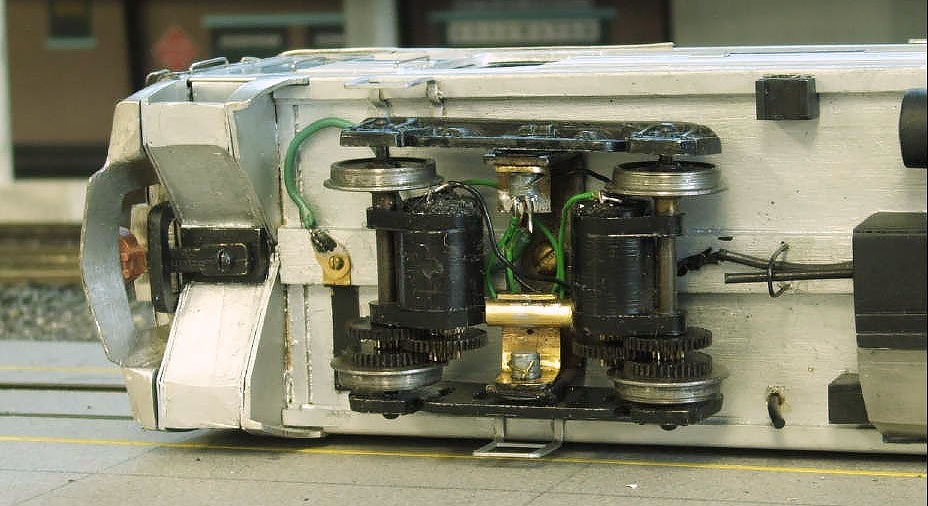
It worked fine, but the model would sometimes stall on track having dead switch frogs. This is due to the truck’s short wheel-base. The fix will be adding a set of wipers to each truck with wiring to get full, 8-wheel electrical contact. That should solve the stall issue, as well as any difficulties if running on less than perfectly clean track.
The car wiring is set up with two circuits. One is for the headlights and markers at each end. Headlight and marker wiring runs along the ceiling of the car body, with mini-plugs at each end so the body can be separated from the floor. They use 1.5V Grain of Rice bulbs with diodes arranged for constant /directional lighting. Yes, it’s an older method and in 2004 I was not yet familiar enough with LED lighting. In any case, the headlights are lit in the direction of travel, with red markers lit at the rear. However, if this model is run on a DCC equipped layout, ALL the end lights are lit!
The interior lights are mounted in the long 1/8” x 1/8” wood strip running end to end. There are six 12-volt Grain of Wheat bulbs wired in paired series to split the track voltage between them. This provides soft interior lighting as well as longer bulb life. Should any fail, the interior lighting may be replaced with LED strip lights and a 2K ohm resistor.
Interior details include twelve coach seats and six dining tables each seating four. The card stock and ceiling tile staple tables (a’ la Walthers), are set with menu holders, menus and sugar bowls made with white beads. (I still need to add place mats!) The floor has blue and gray patterned linoleum, computer-printed on photo paper. The window shades are pieces of gray ribbon cut to suit with their edges at the bottom. There is a motor operator, a fireman and a conductor along with several passengers.
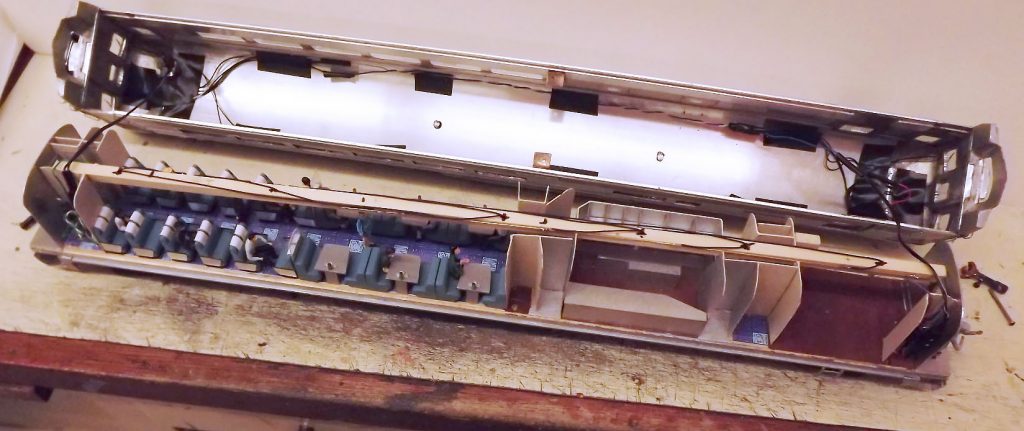
The inner vestibule walls and doors were made with roofer’s aluminum flashing. Other dividers and wall paneling are painted, heavy card stock. The kitchen is only roughed in since its window glazing is frosted. The coach and dinette seats were made from milled wood stock. All this helps to save weight, as this is a very heavy car.
Circus Craft figures were put in, with three men given major surgery to stand on their own two feet and alterations to become a motor operator, fireman and conductor. The body is held in place with two 2-56 machine screws that thread into brackets on the car body which fit into lockers on the floor. The brackets are .040” thick brass, epoxied to the inside walls of the car body. The coupler shanks passing through carry irons on the end castings and screwed to the center sill and floor, holding the body ends in place.
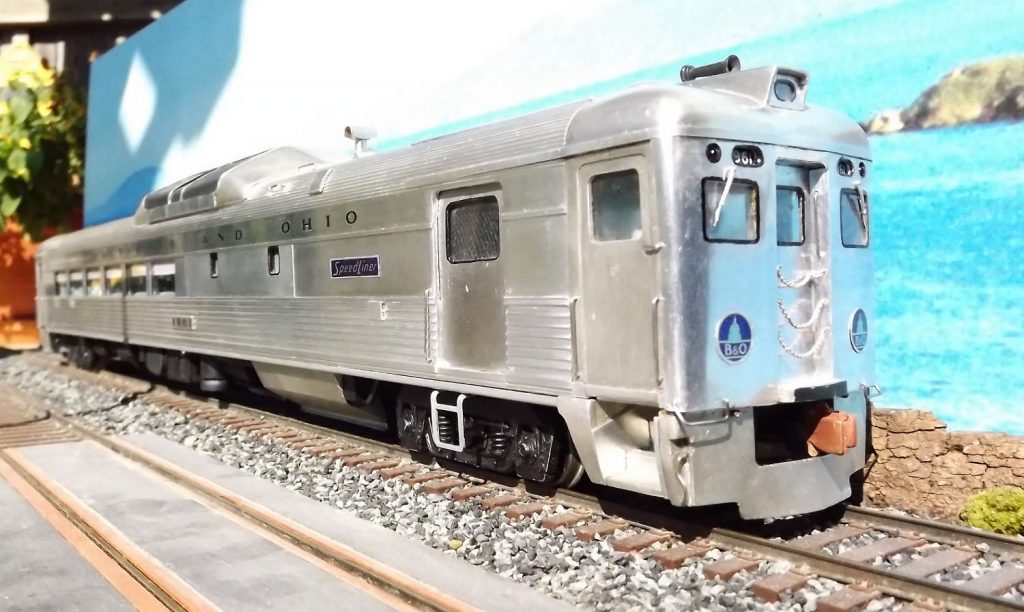
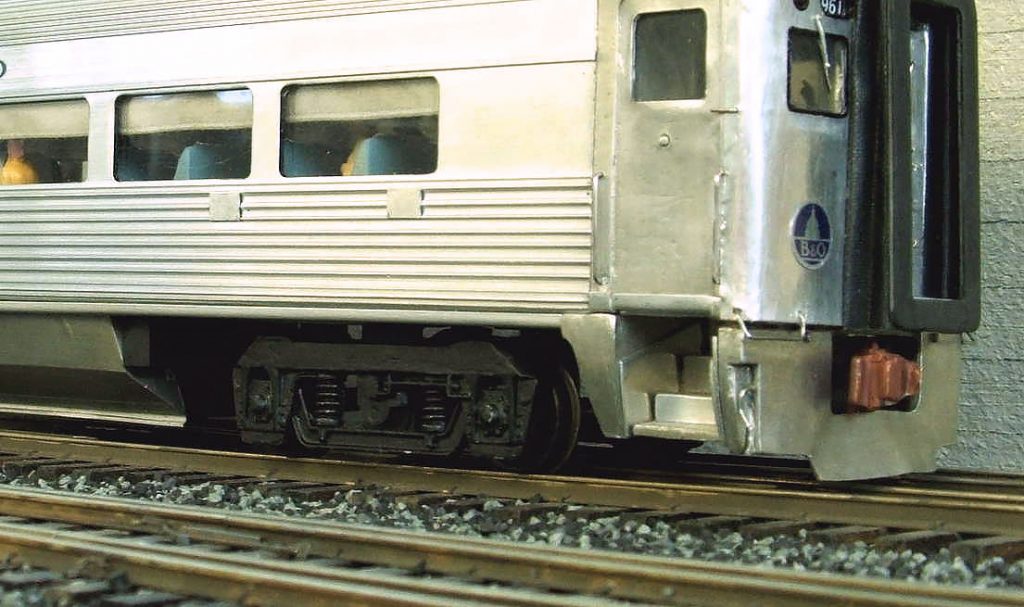
At last complete, below are some photos of the finished Mac Shops B&O Speed-liner, number 1961. The lettering is from a black extended railroad Roman alphabet set. The B&O heralds and Speed Liner plaques were computer printed decals applied over thin aluminum bases previously cut out and mounted to the car body. The baggage door steps were made from sheet brass.
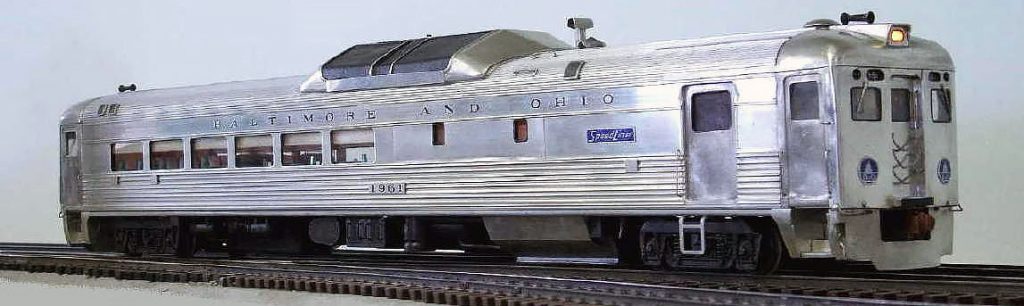
Inventory photo of the Mac Shops RDC, finished in March 2004. No light-weight, it tips the scales at 3 lbs. 9 oz., thanks to all those heavy pewter castings.
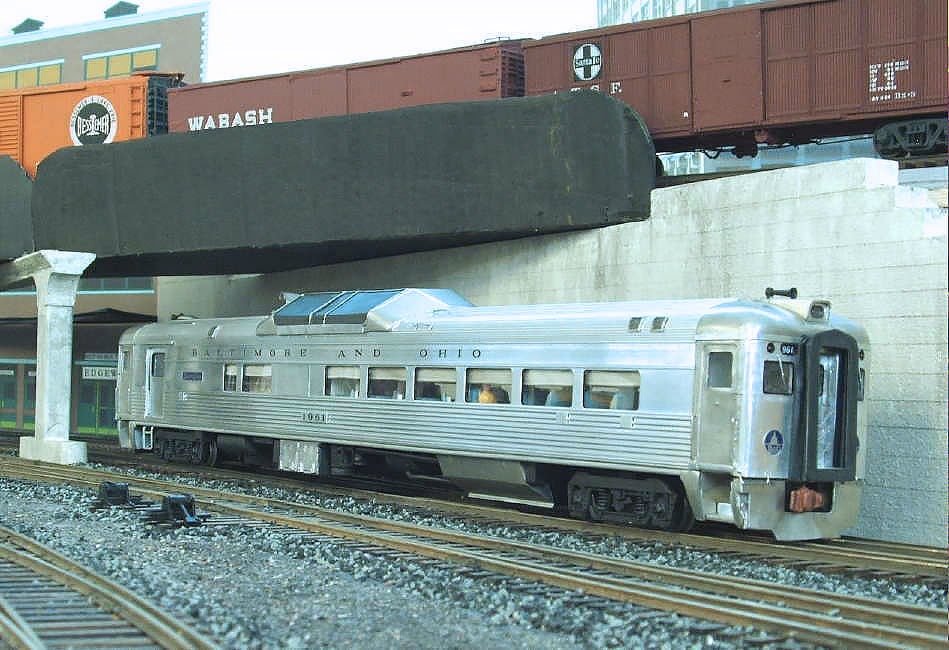
The B&O Speed Liner 1961 approaches Edgewater Station on the Baltimore & New York in 2005. The layout was under construction, with temporary plate girders made with black painted corrugated cardboard.
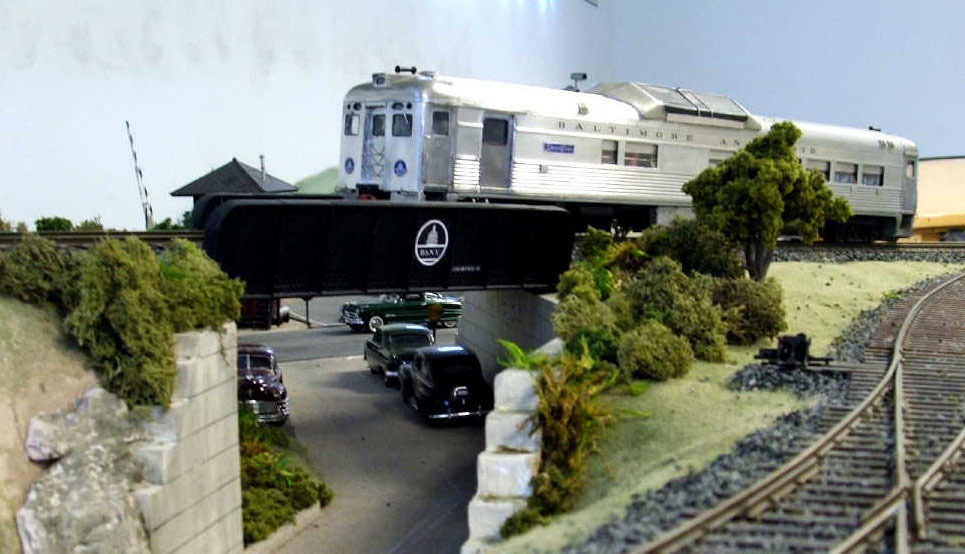
The B&O Speed-liner 1961 has passed Park Junction and is heading up to Tower Hill on the highline of the Baltimore & New York Railway in August, 2010.
Written by Ed Bommer, July 2018.